• Scam Alert. Members are reminded to NOT send money to buy anything. Don't buy things remote and have it shipped - go get it yourself, pay in person, and take your equipment with you. Scammers have burned people on this forum. Urgency, secrecy, excuses, selling for friend, newish members, FUD, are RED FLAGS. A video conference call is not adequate assurance. Face to face interactions are required. Please report suspicions to the forum admins. Stay Safe - anyone can get scammed.

Daily Shop Improvement

Ok I have to know what do you do with the seaweed you harvest? and where do you harvest it?

This is getting a bit off-topic, but here is one use of a seaweed harvester.

On Chestermere Lake, just east of Calgary, the city operates 3 during the summer. The lake is part of Alberta’s 7500+ km canal and pipeline irrigation system to send water from main rivers to areas of low water for irrigation of crops, cattle, households and to dewater wet areas and control flooding.

It is a shallow lake and the water temperature gets quite warm, promoting seaweed and algae growth. The water level is controlled based on irrigation / flood mitigation demands. The harvesters pick this weed / aquatic plants and bring it to shore. It is then mixed in with regular household/garden compostable materials and composted.
We get to go and pick the finished product for free at the city works and it is an excellent natural fertilizer for around the house.
 
I have fought for years trying unsuccessfully to manage the cords on my corded hand tools. Wasn't too bad when I only had a few but then I inherited my brothers and then my dads.
Everything has lived on one shelf in the pallet racking at the back of the shop and while it was nice having everything where I could find it, it was a nightmare untangling the cord of the heat gun from the cord of the planer which had somehow tied itself to one of the drills.
I tried the toilet paper roll trick...too flimsy
I tried the sealer ring trick.. too fragile
I tried the piece of twine trick...hard to untie and easy to lose
Then I saw this guy make his own snap strips and thought Hey, that might work.
I think it's going to work. The more you jiggle them, the tighter they get. Made about a dozen from an old tape measure.
PXL_20210430_222056183.jpg
 
This is really interesting. Thanks for posting. So much you can do with spring steel...I remember making reed valves using a technique similar to Bruce Simpson's technique years ago when I was playing with pulse jet engines.

 
I got shutdown by my neighbours. They are so loud you need ear protection.

Tell me about it.... When we fired the one up we had in JHS shop you could feel and hear it all the way out into the parking lot. Was GREAT fun.
 
Last edited:
Made one of these today.... figure if I didn't, I should give away my lathe and drill press. It's an auger bit extension for a post hole auger I bought at Princess Auto. The bits they sell are only drill 32" deep, any real Saskatchewan born farm-kid won't risk a back hand from his father for putting posts less than 48", so the extension is a must. I'm just not paying 60 bucks for a 18" piece of 1" bar. Can't do it.

Auger bit extension
 
Drilled 6 post holes, worth every penny of the auger. Bought one because I don't relish the drive/rental process at Home Depot, and something tells me I'm not done drilling holes on my acreage.
 
Made one of these today.... figure if I didn't, I should give away my lathe and drill press. It's an auger bit extension for a post hole auger I bought at Princess Auto. The bits they sell are only drill 32" deep, any real Saskatchewan born farm-kid won't risk a back hand from his father for putting posts less than 48", so the extension is a must. I'm just not paying 60 bucks for a 18" piece of 1" bar. Can't do it.

Auger bit extension
Good for you Kevin. I used to beat myself up for all the tools I own, but since I bought good quality and I still have them decades later, I feel great when I can fab something for next to nothing that some store charges an arm and a leg for. It feels even better when you realize that $60 part only cost $5 bucks to make. I swear they manufacture many things these days knowing the actual device is useless w/o the "optional" accessory/extension etc.
 
I’ve used citric acid to clean steel and other metal with fantastic results! 200g at the grocery store is even cheaper then the big bags on Amazon.
Strips and is safe. Very handy!

EDIT: oops didn’t realize there were so many reply’s already
 
I replaced the front wheels on my engine hoist with casters. With the legs up for storage, the two wheels in front don't swivel so that meant skidding the hoist sideways for stowage.
Casters1.JPG

So I had a spare pair of casters kicking around from something else and finally found a place for them.
I made up two plates that bolt onto the cross bar and mount the wheels.

Casters2.JPG

Next cutoff the ears for the original wheels and drilled and tapped the holes in the cross bar for attaching the plates.
Casters3.JPG

Mounted the wheels to the plates
Casters4.JPG

and then bolted the plates to the crossbar, done.
Casters6.JPG


Now I can steer the hoist in any direction without having to skid it across the floor, sooooo much easier.
 
Well I figured I'd add into this thread a couple things that I've done.. Not recently really but since I've done them I've found they really helped me.
Personally I'm finding that the more I do to speed up my general fumbling around the shop, the more motivated and productive I am. I'm sure this isn't only me, but I'm getting to a point where if its too much frustration I stop getting things done and eventually give up.

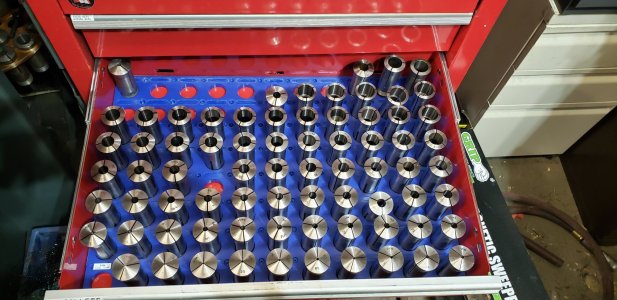
The first is a collect rack that fits exactly in a drawer of the toolbox holding all of the lathe tools. I had them all in their boxes, and they were organized and in order but this works much much better for quickly finding the collet I need.

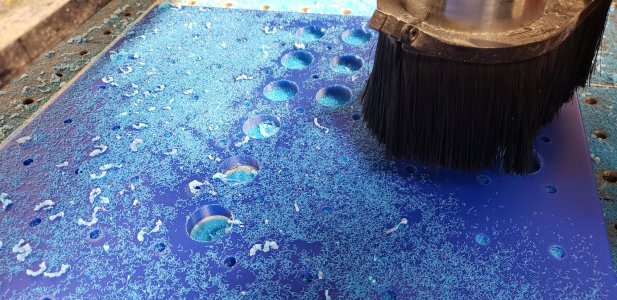
I started with a cutting board from Canadian wholesale club, I think they're 18inx24in and 0.5in thick. Easy to cut and obviously won't damage the collets. I think the router was probably the fastest part of doing this.
20201123_125003.jpg

20201123_125753.jpg
20201123_142715.jpg
20201123_153730.jpg
20201123_153734.jpg

I printed labels for each one with its imperial and metric size, as well as the fraction - Each 1/16 increment is printed in yellow so I can quickly identify them and I find it super useful to have them arranged in this way. I believe this was the longest part of the whole process, but for what I put into it, I am quite certain it has saved me more time than that already.
20201123_161242.jpg
20201127_115731.jpg
IMG_20210207_144041262.jpg
IMG_20210207_144051642.jpg
IMG_20210921_195955864.jpg


The 2nd is colour coding the fasteners I am constantly using. I picked up a bunch of dollar store nail polish that sits in a bin and I use it to mark fasteners that I know I could go back to and don't want to be looking for the right tool for. It may look stupid, but it is a lot easier to look for the orange hex key than fuck around trying to get the right key and go back and forth, especially if its somewhere less than convenient.

For like a buck a piece you can pick up a bunch of easily identifiable colours, because nailpolish is meant for hands its pretty tough and will stand up quite well and if you're not happy with it use a little acetone and take it off. You can also use paint pens, which is where I started but there really are not a lot of colours available and they're a lot more money.
IMG_20201226_174324794.jpg

IMG_20210921_192332110.jpg

IMG_20210921_192259124.jpg


The only thing to watch out for is don't accidentally mark your 17mm wrench orange, and then the 3/4 in imperial, offset them by a substantial degree and you can reuse the colours.. use red for maybe 12mm and then again for 19mm. The other thing is its quite hard to find easily identifiable colours outside of a few - Red, green, orange, white, yellow.. those are all easy to spot. But if get something purple-ish you could confuse it with red quite easily.

Anyways, these two things I notice often speed up my day and lower the overall frustration - figured I'd pass them along to others to try out.
 

Attachments

  • 20201123_161242.jpg
    20201123_161242.jpg
    344.8 KB · Views: 4
  • 20201123_140020.jpg
    20201123_140020.jpg
    588.1 KB · Views: 5
Awesome kylemp. I use the same idea for all my reloading dies ( I have and could load for, I think, 32 different calibers at one time) but I just used an appropriate sized piece of 3/4" plywood....serviceable, but not near as appealing looking as yours....well done.
 
While quarantining for the past week I made some big improvements on my shop's circuits. I added a 6 pole breaker panel to my shop's original single nema 6-50 receptacle to split the circuit into four different receptacles, one for each machine. I will no longer need to continually change the plug on a single receptacle to use a different machine.
 
While quarantining for the past week I made some big improvements on my shop's circuits. I added a 6 pole breaker panel to my shop's original single nema 6-50 receptacle to split the circuit into four different receptacles, one for each machine. I will no longer need to continually change the plug on a single receptacle to use a different machine.
We added 6x50a outlets, 2 per wall for the walls without the door.. It makes it so much easier to have power available all over. Would do it again in a heartbeat.
 
Assuming the plugs provide convenience, not the ability to run up high amp loads on all plugs?
Meh, whichever.
It is for convenience but sizing the plugs to specific loads would defeat that, everything I have runs on 50a or less, and it's a standard plug for compressors or welders generally. It'd be hard to justify running a 10a line for a 1hp drill or something just to have the exact correct breaker.
 
I think it’s time I found a vise for the drill press. The ol’ “wear leather gloves and move fast” works but it’s not great long term

I also would like to find a decimal to fractions chart. But that only gets me in the ball park. What do you do when it’s halfway between 1/2” and 9/16”? Or halfway between 9/16” and 5/8”? I used a tapered reamer and wallered the holes to the “right” size but they are grabby.

Fabbed up a bracket for a buddy yesterday and he gave me stainless to make it from, not my most favourite metal to work with. But it’s done
 
Back
Top