• Scam Alert. Members are reminded to NOT send money to buy anything. Don't buy things remote and have it shipped - go get it yourself, pay in person, and take your equipment with you. Scammers have burned people on this forum. Urgency, secrecy, excuses, selling for friend, newish members, FUD, are RED FLAGS. A video conference call is not adequate assurance. Face to face interactions are required. Please report suspicions to the forum admins. Stay Safe - anyone can get scammed.

Daily Shop Improvement

B426C826-5CEA-4D67-9960-5490F9ABCD1B.jpeg

I was scratching my head wishing I could hang those somewhere. Then I got looking at the stuff hanging on the pegboard. The pegs want to push apart so I added a zip tie to pull the pegs together more. It “works” for now....

I think I want to build a charging station somewhere, somehow, it doesn’t take long to add up to 6-7 things that need charging
 
That’s simple and neat chicken lights ! Look at this cool Christmas tree for holding tools. It’s at steel inc.

F6AA875A-0CDB-483E-9C01-9B67E7F85E02.jpeg
 
7CAA0A28-1E5E-4D9E-9634-A33C639BB98D.jpeg

First attempt just using what was around the shop at a charging station. It puts the batteries by the cordless tools and gets the chargers off the bench. Good enough for now
 
Nice. I use a similar setup, but have to take a second to point out a safety tip @Dabbler taught me. For years I always kept my chargers plugged in all the time. Apparently there have been fires caused by batteries that fault and then overheat during the charging cycle—which is likely why most manuals tell you not to leave charging batteries unattended. Duh...that makes sense. It got me thinking about my setup. I wasn't prepared to only charge when I could supervise them, as I often need to recharge batteries after a full day's work. But I did want to reduce the risk as much as possible.

My solution was to tie a powerbar to an Auto Shut Off Timer. This way when I go to bed, or go into the shop, I just hit the button on it to dial in 2-8 hrs. It shuts off after this and I feel safe knowing it isn't on all the time. The price has skyrocketed on this model since Covid, but I'm sure you can find them for much less if you look around. Another solution could be to tie your charging station into your overhead lighting circuit so you are only charging when in the shop; however, this doesn't solve the overnight charging issue like the timer does.


1609111845656.webp


1609111880436.webp


1609111918634.webp
 
08EA12C4-83E1-43E7-8F28-21F286FC23B3.jpeg
7410DB8E-6D73-4D2F-8AC1-D22DD6CFA322.jpeg

Helped a friend install an axle in his project today. Thought we had the right upper spring plate but we didn’t. It’s a little crude but it’s temporary. Cordless drill, drill press, zip disc, die grinder, cutting torches and a 1” reamer. No idea what size holes we needed and still don’t, we “made it fit” :D
 
Nothing that hasn't been done before...

View attachment 8665

But, I finally got motivated to build a set of extended vise jaws for my band saw. Would never have grabbed that snippet of stock using the regular jaws.

Craig
I make mine but I did not cut the angle at the end close to the blade. I love it but I don't think I can cut in angle if I don't remove my plate. Most time I cut straight cut now I could cut very small peace. Thank You for this post.
 
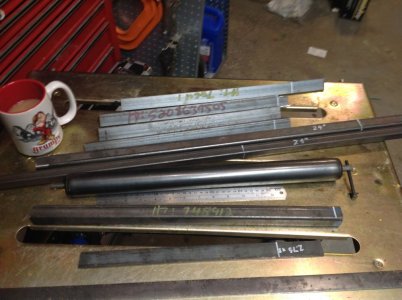
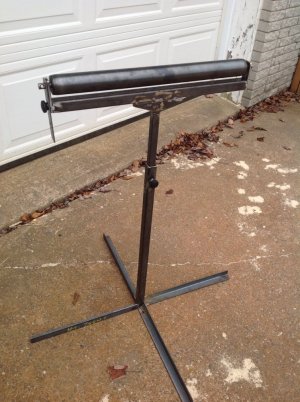
I need to cut a bunch (72) of 7" pieces of aluminum angle and don't have a roller stand to feed in the 9' pcs I bought. I really didn't feel like going to HD and figured I had enough scrap lying around, including a salvaged roller from a treadmill. It will go from 28" to 48" and has an optional edge guide. It needs some rubber feet and a coat of paint but it will do for now.
 

Attachments

  • IMG_0001.JPG
    IMG_0001.JPG
    119 KB · Views: 13
  • IMG_0002.JPG
    IMG_0002.JPG
    173.5 KB · Views: 16
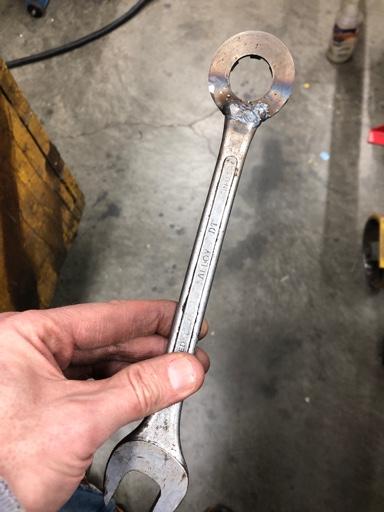
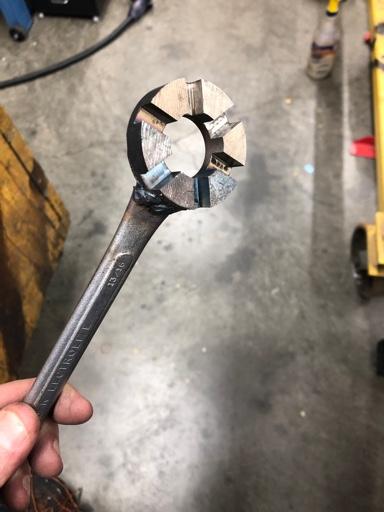
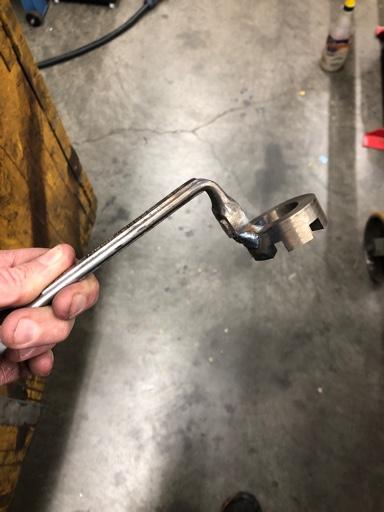
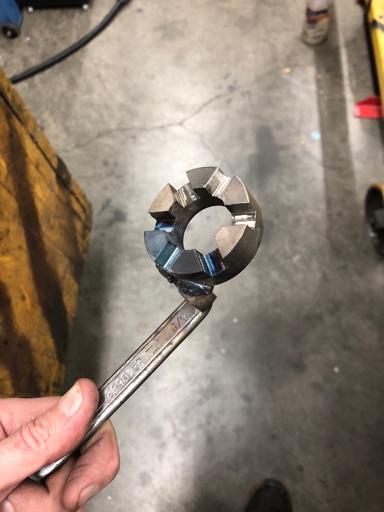
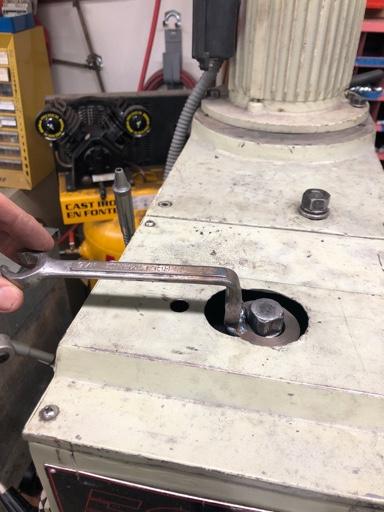
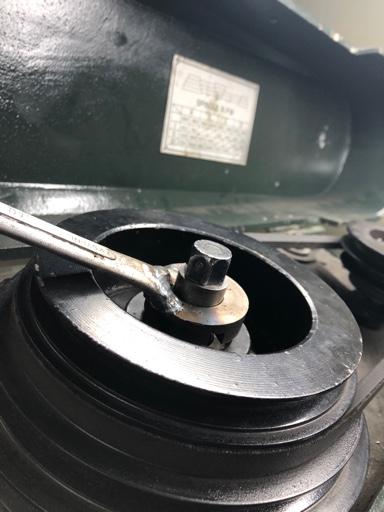
Neither of my mills have spindle brakes or spindle locks, makes it interesting for tightening draw bar manually

Made spindle wrenches out of some old wrenched from an auction and some 2” 12L14


209f96276a8caa5e2fce4032e001246c.jpg

ffd9780a88e80440330ef505f4b6e425.jpg

ac8f4376bfae4780771a0530f0d1112c.jpg

cabb3a4a6a227f2b91ff65cc14538fc1.jpg

2aa9117039bebc78f0a35f8e36c80aeb.jpg

fc8d428e90e363167aae8b96fadf37d4.jpg


Sent from my iPhone using Tapatalk
 
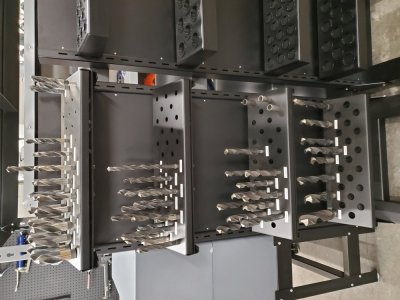
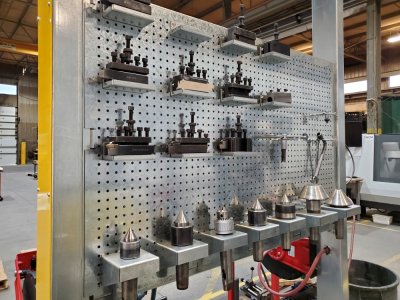
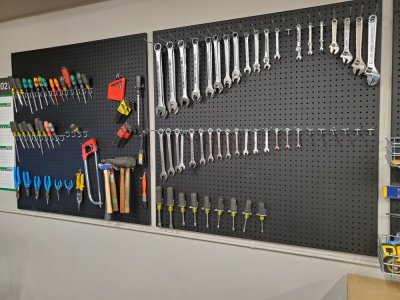
As you might already know I work at a machine shop full time. The sheet metal shop next door made these tool racks. I think they turned out great.
 

Attachments

  • 20210119_152857.jpg
    20210119_152857.jpg
    114.7 KB · Views: 39
  • 20210119_152928.jpg
    20210119_152928.jpg
    173 KB · Views: 41
  • 20210119_152910.jpg
    20210119_152910.jpg
    139.4 KB · Views: 41
When I was working at Gatineau city we had a program the 5S and this is very similar to this one fact is behing each tool there was a sticker with the form of the tool. for exemple the broom was on the wall behind it there was a sticker with the form of the broom. So a new employee could see where the broom is supose to be same thing with wrench socket ratchet gauge and more. That was funny when they come with this program because when I was a little kid my dad did the thing with is tool's when we open the two door on each side is wrenh was on the door with the form made by a black marker behind .If one wrench was missing you know than you look to find it. I was in this program and that was good but it was very expensive to . I don't thing tax payer will be very happy but in the garage it was a must.
 
@trlvn : You must be mind linking me in some way...LOL....before I left for work I got a load of smaller end mills and I need a place to organize them and put them in some order of size. My one tool box has 2 drawers full of end mills from 1/16 to 2" and other cutters that have inserts. It would be nice to move these to a common place - I am thinking to tool cabinet them like a divided drawer system according to size?

I would also like to free up a whole drawer of taper drills and have them out and sorted into size. Drives me nuts going through the drawer to find a half inch one and picking the 1/64th size difference all the time.

Anyone have a nice taper drill stand? (pics etc) I would only be going from about 1/2" #1 MT up to 7/8" #2 MT - maybe 1" but those have a straight shank after the 7/8"
 
Almost done the shop, ceiling is up. Just some mud, paint and then on to getting it set up. I hate drywall. 18'x21' shop with a true usable 15'x20'. PS: Going for function not form on this shop.
20210129_201035.jpg
20210129_20100601.jpg
 
Finally upgraded my sandblasted with a cyclone separator on the back and a control panel for the shopvac on the front:
9E78819E-77EE-4CAD-98F1-DC00F98B07F3.jpeg
B95E4627-80AF-4A94-A64E-4532195225B3.jpeg


It seems to work well, if not too well here is what it captured from one horseshoe:

EBF21431-3AD8-4368-BF1D-240DB72C0615.jpeg
FED024BF-C6B4-43E8-B5FB-B96BFC35A895.jpeg


overall i’m pleased with the result.
 
Finished a drill bit organizer this week. Just leftovers from a bathroom remodel. it will hold 36 plano cases and my Drill Dr. down below with long drill bits on the side.

623032A0-8347-4DFB-971F-F2B43E82BA7C.jpeg
 
Back
Top