• Scam Alert. Members are reminded to NOT send money to buy anything. Don't buy things remote and have it shipped - go get it yourself, pay in person, and take your equipment with you. Scammers have burned people on this forum. Urgency, secrecy, excuses, selling for friend, newish members, FUD, are RED FLAGS. A video conference call is not adequate assurance. Face to face interactions are required. Please report suspicions to the forum admins. Stay Safe - anyone can get scammed.

Collet questions

DPittman

Ultra Member
Premium Member
This an all-too-common debate. @thestelster has the right of it:

The set screw is *never* to have hardly any pressure on it. at all. It isn't there to aid in tightening. It isn't a drive dog. It *is* absolutely required for the R8 system.

It is there solely to orient the collet in the *same* direction each time the collet is inserted and tightened. During tightening, there is usually a tiny amount of pressure on the set screw as the slot touches the set screw, but it is *not* there to resist the high tightening pressure of the draw bar nut. It holds the collet in the same position during tightening so strictly speaking it resists the collet tendency to turn during draw bar tightening.

Some guys remove or fail to replace the set screw. This is also a mistake. But it is illustrative of the notion that R8 can be used without putting pressure on the (sometimes nonexistent) set screw - which I think is properly termed "dog" and the set screw is actually a dog-pointed set screw.

Please forgive the rant. I really hope that this clears up the R8 set screw thing.
Yes this is exactly my understanding also from various reading and NOT from my own experience .
 

Susquatch

Ultra Member
Administrator
Moderator
Premium Member
I don't use R8 tooling, but isn't that set screw just to prevent the collet from turning while tightening the draw bar and nothing else?

There is some disagreement on that. I've read countless articles from professional sources that claimed different uses and benefits. I found many of them to have merit. I have synthesized all of that information as follows:

The R8 collet taper is about the shortest of any of the big collets at just under an inch. It also has a faster sharper taper angle. An R8 taper usually serves two purposes - to stop the arbour from turning in the quill AND clamp a tool in the collet.

Given the low probability of properly torquing a drawbar the design was improved to include an alignment pin that could resist a "small portion" of the operating torque when the drawbar torque wasn't perfect and simultaneously assist in torquing a drawbar by preventing a loose collet from spinning.

I do not have any reason not to accept all these explanations. One could easily make sound arguments to the contrary on all of them. But my conclusion was that erring on the side of caution was clearly the safest approach.

That's why I redesigned my pin to look like the one on the left not like the one on the right. It roughly doubles the strength of the pin - maybe a bit more than double.
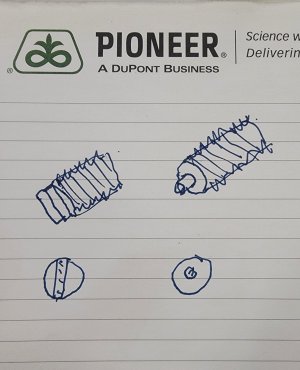
20231116_134851.jpg

Is it necessary? I have no really evidence or information either way. Does it help? Again, I don't know.

However, what I do know is that I have seen what happened to another mill when that pin sheared off and the collet spun in the spindle. I NEVER EVER want that to happen to me.

I also know that those pins seem to break regularly. In fact, they break so often that there is a fair number of users who simply remove them. That is NOT EVER GUNNA BE ME! The only reason it would break is if the collet spun.

Therefore, I've chosen to be a wee bit safer, use the pin, and strengthen it a bit too. I consider it cheap insurance.

I can also say that the one I modified as above is still inside my spindle and still working fine.

Last, but not least, the modified screw automatically retains alignment when the keeper screw is installed - no loctite required.
 

Susquatch

Ultra Member
Administrator
Moderator
Premium Member
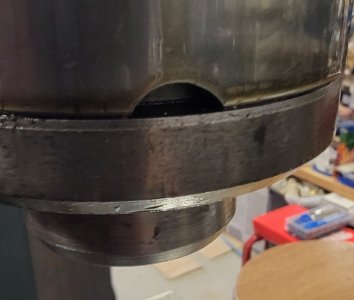
Here is another mill change I made for easier access to grub screws. I saw this on other mills during my hunt for a good used mill and it was love at first sight. Anyone who has ever removed that grub screw should appreciate this fix. The metal is very soft and it was easy to grind the clearance arc.

Edit - forgot the photo!

20231116_142544.jpg

I'd also be remiss if I didn't mention that proper torque of the grub screw is imperative as a loose screw can back off and a tight screw can distort the quill barrel and jamb up the action.

Lastly, note the oil on the barrel. My barrel nose collar came with oil drain holes but I've seen many that don't. The oil washes down the barrel dirt and keep everything moving smoothly and freely. All it takes is a little oil everytime it is used.
 
This an all-too-common debate. @thestelster has the right of it:

The set screw is *never* to have hardly any pressure on it. at all. It isn't there to aid in tightening. It isn't a drive dog. It *is* absolutely required for the R8 system.

It is there solely to orient the collet in the *same* direction each time the collet is inserted and tightened. During tightening, there is usually a tiny amount of pressure on the set screw as the slot touches the set screw, but it is *not* there to resist the high tightening pressure of the draw bar nut. It holds the collet in the same position during tightening so strictly speaking it resists the collet tendency to turn during draw bar tightening.

Some guys remove or fail to replace the set screw. This is also a mistake. But it is illustrative of the notion that R8 can be used without putting pressure on the (sometimes nonexistent) set screw - which I think is properly termed "dog" and the set screw is actually a dog-pointed set screw.

Please forgive the rant. I really hope that this clears up the R8 set screw thing.
This.
 

mbond

Well-Known Member
Premium Member
View attachment 40443Math.

Calculator at https://calcdevice.com/taper-connection-tightening-id258.html

R8 taper values used, with 20 ft-lbs of torque on the draw bar. Steel coefficient of friction at 0.8, typical for clean steel, not polished.

The calculator is ignoring the thread pitch on the drawbar.

Results in over 850 lbs of force required to push out taper from socket.

The set screw doesn’t do much, lots of machines I’ve used have been missing the set screw. It’s just nice to have it because it makes sure the arbor is lined up properly and not cocked.

Using the R8 taper in one of the shops I inhabit, a good one-arm pull on the draw bar using a 3/4” open end wrench is capable of holding the taper just fine. It’s a 2hp round-column mill/drill, and it will stall before the taper spins. And it doesn’t have a set screw. And my good one-arm pull might not be much, I weigh less than Grandma’s 21” console TV.

It was interesting to try to find a calculator for this.
More important than this 'raw' math is the point that slippage will tighten the part as it has to climb the thread of the draw bar. That can only result in an increase in the normal force and the consequent friction reaction.

So as the tool it used, it will become tighter until it becomes tight enough to sustain the load

There are different reasons for different tapers, but they all work on this principle IMHO
 

Susquatch

Ultra Member
Administrator
Moderator
Premium Member
... hmmm... I've never broken a grub screw. In 45 years of using R8 machines. Hmmm. Im must be doing it wrong! o_O

Neither have I. But I've seen them broken many times. I'd go as far as to suggest that 50% of the machines I looked at had the tip broken off inside the spindle.

Your experience (and mine) might also explain that popular practice of just removing them.

I'm just hypothesizing here. But let's say you are a skinny little fellow that can't reach the drawbar very easily. Therefore, you can't properly torque it consistently. (or get lazy about trying) The end result is a loose collet that wants to spin. A collet that wants to spin could easily break the pin on the nose of the screw.

If this happens, more than once, I think users would get tired of replacing them and then at some point just stop using them. Ending up with the view that they are not required.

I can't really think of any other reason for one to break. You can't even get a drawbar started if the pin is not aligned. And I would like to believe the vast majority of users wouldn't take a hammer to an unseated collet.

It's an easier gentler conclusion than recognizing their own faults. Heck, it might even give them an excuse for their messed up spindle taper (from spinning collets).

Perhaps it can also be surmised that an improperly inserted tool could either spin in the collet or get pulled out. As the tool pulls out, or wears the collet, the collet loosens even more since it has less inside it to resist the tightening forces. At some point in this cycle, the taper could become the weaker of the two retention mechanisms and then the pin fails, and the collet spins.

I have a half inch collet that a tool had clearly spun in at some point in its earlier lifetime. I still have it so I should look at it again to look for evidence that the collet may have also spun in the spindle.

I guess what I'm suggesting is that you and I tighten our draw bars adequately and that's why we have never failed a pin ourselves. That might not hold true for others.

I suppose it's worth considering the excessive torque scenario too......

At any rate, I like my stronger pin. It can't possibly hurt and there is a chance it might save my hairy butt some day.
 

DPittman

Ultra Member
Premium Member
The end result is a loose collet that wants to spin. A collet that wants to spin could easily break the pin on the nose of the screw.
What I'm not understanding yet is how the collet spins? Isn't the end mill/tool going to slip long before the collet? Maybe it's not a spinning collet that breaks the pin but rather other r8 tooling like a drill chuck or arbor?
 

Darren

Ultra Member
Premium Member
Mine doesn't have a pin, but it would if I used collets in the spindle. I use r8 tooling that i can hold by hand and tighten with my power drawbar. Endmill holders, drill chucks, facemills, er40 collet chucks etc, are easy to hold. Using r8 collets in the spindle would be tough to hold. If they spin, with a power drawbar, you could damage the spindle.
 

Susquatch

Ultra Member
Administrator
Moderator
Premium Member
What I'm not understanding yet is how the collet spins? Isn't the end mill/tool going to slip long before the collet? Maybe it's not a spinning collet that breaks the pin but rather other r8 tooling like a drill chuck or arbor?

I think you are right for a small endmill. The bigger the endmill gets, the more that changes.

You might also be right about other tooling.

I really don't know because I've never broken one. I've just seen lots that were broken. I guess that is the issue. It's always difficult to say what happened when you were not there to see it. Hence all my speculating.
 

Susquatch

Ultra Member
Administrator
Moderator
Premium Member
Mine doesn't have a pin, but it would if I used collets in the spindle. I use r8 tooling that i can hold by hand and tighten with my power drawbar. Endmill holders, drill chucks, facemills, er40 collet chucks etc, are easy to hold. Using r8 collets in the spindle would be tough to hold. If they spin, with a power drawbar, you could damage the spindle.

Makes sense Darren.
 

slow-poke

Ultra Member
I'm going to investigate further I'm assuming mine must be broken off or has been removed.

Is this typically located near the bottom of the spindle or 2-3" up?

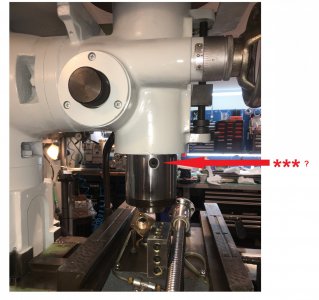
In the image below, is the pin hiding behind this *** setscrew?
R8.jpg
 

Susquatch

Ultra Member
Administrator
Moderator
Premium Member
I'm going to investigate further I'm assuming mine must be broken off or has been removed.

Is this typically located near the bottom of the spindle or 2-3" up?

In the image below, is the pin hiding behind this *** setscrew?
View attachment 40456

Your photo doesn't seem to work, but the location seems about right. Keep in mind that there are usually two screws stacked on top of each other in there.
 

Susquatch

Ultra Member
Administrator
Moderator
Premium Member
I'm going to investigate further I'm assuming mine must be broken off or has been removed.

Is this typically located near the bottom of the spindle or 2-3" up?

In the image below, is the pin hiding behind this *** setscrew?
View attachment 40457

Edit - Sorry, I misread your first post. It's the one you highlighted and about 2 inches up. The bottom one locks the cap on place
 

whydontu

I Tried, It Broke
Premium Member
Instead of going to my shop and making chips, I just spent the last hour or so researching the origin of the R-8 arbor. (I really need to get a life.) Couldn’t find a patent, and prior to retiring I spend a lot of time doing patent investigations. I do know it’s a Bridgeport design, but can’t see that they ever issued a patent.

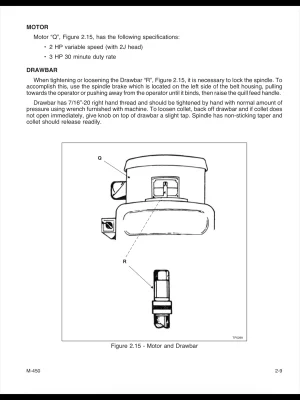
However, here’s the relevant page from the Hardinge / Bridgeport operating manual for their vertical mill. No reference to torques, setscrews, or anything.

Go with your gut. Properly loading the drawbar with a reasonable amount of torque, the set screw is not transmitting any torque. Improperly loaded at too low a drawbar torque value, the set screw gets sheared off. This leads me to believe the set screw was never intended as a driving element.


Bridgeport has a quill lock, none of the round-column mills I’ve used had quill locks. Even so, holding the quill by hand and using the factory drawbar wrench would provide enough torque to lock in the arbor, with or without the set screw.
 

Attachments

  • IMG_6863.png
    IMG_6863.png
    701.7 KB · Views: 5

Darren

Ultra Member
Premium Member
The set screw will surely see reaction torque from the drawbar, and with a power drawbar will see impacts. So its a good idea to make sure to add some antiseize or grease to the drawbar threads If it were to gall and seize, the set screw would probably shear and damage to the spindle would be inevitable
 

slow-poke

Ultra Member
Getting somewhere.....
Removed the black setscrew *** red arrow,
Behind it (when I turn the spindle, I see another smaller setscrew, I removed it and it's not stepped like your image. Now that I know where it is, using a mirror I can see that the smallest end piece is broken and flush with the inside of the spindle.

So I need to get it out, suggestions???

Am I correct to assume the smallest portion of the step is not actually threaded into the spindle (it's just a turned down portion of the setscrew that fits through a small hole towards the inside of the spindle that is slightly larger than the O.D of the smallest portion of the stepped setscrew? Is that correct or does that smallest segment on the end actually thread into the spindle?

Assuming only the larger thread portion of the setscrew actually threads into the spindle, I could try gentle tapping the smallest portion in further so it falls out the bottom, or try to make a tool to reach up through the bottom to push it back from the inside back in the direction it was threaded in from, though that seems near impossible?
 
Last edited:

DPittman

Ultra Member
Premium Member
Bridgeport has a quill lock, none of the round-column mills I’ve used had quill locks. Even so, holding the quill by hand and using the factory drawbar wrench would provide enough torque to lock in the arbor, with or without the set screw.
I think you mean spindle not quill?
 
Top