• Scam Alert. Members are reminded to NOT send money to buy anything. Don't buy things remote and have it shipped - go get it yourself, pay in person, and take your equipment with you. Scammers have burned people on this forum. Urgency, secrecy, excuses, selling for friend, newish members, FUD, are RED FLAGS. A video conference call is not adequate assurance. Face to face interactions are required. Please report suspicions to the forum admins. Stay Safe - anyone can get scammed.

Cambridge - machinist newb

Apologies for the multiple posts; I'm waiting on an assistant to arrive so I can work on things in the cold.

Tomorrow, I want to remount my vise to the milling machine - this week, I've learned that I don't necessarily need to mount the swivel base (which is cool). Last time I mounted it, I used an edge finder to ensure the fixed jaw was (relatively, it's only an edge finder) parallel w/ the y-axis - I'd like to do the same BUT I want to improve how I determined (squareness?) the accuracy - my goal this week is to get some milling practice by making a square block from material (chunk already cut off the end of the 1018 I've been eyeing up for the tool slide project).
I'm sure there's videos, but I have a hard time staying focused when on YouTube...

My idea right now is to place one of my long levels in the vise (I haven't decided if this is a good idea yet, the thought of clamping makes me slightly nervous) so that I have a "true" edge to measure off of and by running the table out to the ends of it's travel, it'll give me a (I think you guys refer to it as accuracy) broader baseline to measure from.

Is there a better way (well there is) - could someone recommend a better way to do this, or somewhere to read up on it? I don't really have any "material" that i would consider true outside of the level.
 
I think you're asking about a process called 'tramming' your vise. It's a pretty simple procedure once you get used to it, but you'll need a dial indicator and a way to hold it. No need for the level, just use the back side of your vise jaw as a reference against the travel of your ways and get them to run parallel.
Surely there's hours and hours of youtube and forum posts on how to do it, but here's the first one that came in my results.
 
Tramming the vise is easy - lots of videos on line as @Six O Two says. BUT....... Tramming the vise is useless if the mill itself is not trammed. You need to do that first.

I am actually working on what I will call an invention right now for tramming a mill. I won't be patenting it so I don't care who copies the idea or if they do. It's just plain old fun for me.

You can currently buy a two gauge tram tool to tram the the bed. They work well. But you have to tram the axis separately. I want to tram the bed in both x and y (nod) with three gauges simultaneously.

Lots of discussion and debate already. I really should start a new thread on it but you can follow along here:


The first one is prolly the most discussion (and debate).
 
Wow, I love your garage, I wish I had that much space to work!

Also, some really cool stuff you've worked on in the past.
 
Thanks @SomeGuy, I've worked hard/been lucky - those are all projects since the start of 2019 and I've slowed down quite a bit since 2015ish - I'd like to do more and with the advice from this group of guys I think that's possible.


@Susquatch - trying to visualize your simultaneous triple triangle tram tango - I think I understand what I need to do to ensure spindle square to the x and y; I just need to look through what pieces I have w/ the indicators that have followed me home... I have gathered some stuff so I could assemble 9" rearends and then a buddy volunteered to do that specific portion when I had fitment issues (supplied chinese made parts that weren't machined enough).

I'm still working out how to ensure the table travel is square to the head(?)/spindle(?) but think if I can get that first task completed it'll give me enough experience to lean on that I could figure it out.

Between clearing snow this morning for the neighbourhood (John Deere loader tractor that's been in some of the pics, winning hearts and minds of the neighbours) and learning more about this stuff, I haven't gotten started on machining that material - obviously now that I know I should (and kind of how) square the head/table, etc. there's been a couple of steps added.

@Six O Two - I appreciate you sharing the video... YouTube is a place I avoid because I don't know who to trust on there and I can waste a ton of time looking/getting sidetracked
 
You guys trying to convince me to downsize to AXA should have been sharing this with me!

I'm good though ;) lol
 
@Six O Two - I'm watching YT now... "This Old Tony" is okay? Seems good, but I don't know what I don't know...

He time travels so I figure he has to be pretty smart.

I'm not really a fan of You Tube either. But sometimes they are ok. It's just that sifting through the crap takes more time than I want to spend. Ive never been particularly thrilled with this old Tony or with Keith Rucker - both of whom are pretty popular.

I do like a lot of Joe Pieczynski's stuff but not everything. He did do a few alignment videos but I don't think he did one on vice tramming.
 
@Six O Two - I'm watching YT now... "This Old Tony" is okay? Seems good, but I don't know what I don't know...

He time travels so I figure he has to be pretty smart.

This Old Tony is fantastic entertainment...some of his earlier videos were actually good to learn machining stuff but lately he's been too CNC and weird projects.

Abom79, AvE, Clickspring, NYC CNC, Mr. Pete 222 are some of the other popular ones I know of.
 
@Six O Two - he's made references to his technique/shenanigans but other than slipping on a banana, I haven't seem them yet - I went back to the start/his oldest and have it playing in the back ground in order... I skipped over a few...

This 10 second piece where he's aligning his "reference rail" to the machining head(?) (<---- the brackets and question mark mean I'm unsure about the terminology) seems similar in theory to aligning the x and y travel to the head (at least, how I'm perceiving it, not necessarily how it's being done).

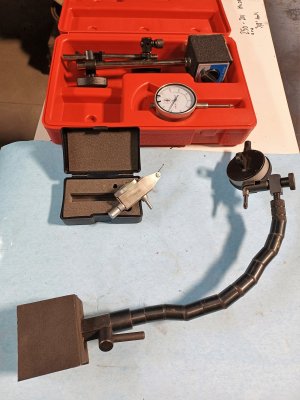
What I currently own for dial indicator related items.
20220118_082425.jpg

The smallest seems like it could be mounted to the spindle in a collet/chuck.

I may have royalty visiting later today so I have a bunch of things that I need to get done - I'll get to play with this stuff later.
 
The smallest seems like it could be mounted to the spindle in a collet/chuck.

Not really. You could put it in a chuck on the tailstock but it's hard to use that way for much other than dialing in the bore of a part in a 4jaw chuck. In a moving spindle it would be subjected to way too much centrifugal force and you couldn't read it anyway. In a manually rotated spindle it might be used to square up a vise. But mounted to an arm on a spindle it becomes much more useful.

All those different attachment systems on the indicators are really just different ways to hold them in an adjustable framework like your indicator holders. For some reason there are multiple standards for that. For example either of the two indicator holders you have can be used with either of the indicators you have in multiple ways.

I know that you have already invested a small fortune in your equipment, but I was recently pointed to a NOGA holder that I LOVE by other forum members. It is a two way holder with both a base and end fine tune. If I had my life to live over, one of these would have been my first and perhaps my only indicator holder. They come in three sizes. Best to watch for sales.


The short version of the indicators goes like this: The plunger type indicator has more range but exerts a little force on the part that can disturb the part you are measuring. The needle indicator has less range but exerts neglidgeable force on the part. Both have their uses.

110% agreed on the Noga holder...it's worth the money over the cheap stuff. Easy to adjust and stays put. I have this one specifically:
 
I'll consider that an essential item on my "near" future shopping list. The 20 or so items that @Susquatch listed on another thread as being items that should be close/on hand (they were discussing shop organization for someone specifically, I recognize his handle but can't recall who it is right now) are also on that list (except for the butt pincher).

Other things that I think I should have (at some point, maybe not right now) are a sine bar, a boring bar or set of (but not the chinese soldered on ones that I do have), a boring head, a live center (options on this are something I still need to learn about and then figure out what's best for me)... and then everything gets "big" and unrealistic (for right now) again (4'x4' cnc plasma table, personal cnc mill, hookers and blow, a mother-in-law that I get along with, etc.)

I'll attempt to be patient w/ ordering the things on the list until I can get a better feel of what I should/shouldn't spend money on... when I first ordered stuff I thought I was going to be all on my own and I'd need to figure out everything through the school of hard knocks.
 
What I currently own for dial indicator related items.

I have both those types of indicator holders as well, the 'bars' type (not actually its technical name, probably) and the articulated one. They can both be tedious and infuriating, for different reasons -- But having said that, they're also capable of getting you where you need to go.

Sasquatch and SomeGuy have linked to a really nice Noga unit. I don't have that kind of money, but I did buy smaller offshore knock-offs (with fine adjustment at the tip only). I hear the Noga one is really nice and works really well. The offshore ones I have... look pretty. Naw, they're not that bad and are definitely a step up from the two other types I have (like in your picture). At some point though, you kind of just have to 'run what you brung' and start making chips.

You can sort of set it up like this for tramming a vise. Yes, there's cosign error, but you're not actually measuring anything absolutely, just a relative measure, so what does it matter...
N7h5omh.jpg

xs3P8Gg.jpg

fMA7mzG.jpg

You are right IMO. What you are really doing when you tram a vice is aligning the rear jaw with the x axis of the bed. So it really doesn't matter squatt how you measure it. That said, am indicator on an angle reduces the effectiveness (call it magnitude of measure) by the normal result of that angle. So you are always better off with an indicator system that is normal (perpendicular) to the axis of movement to maximize the amount of movement you get on the dial readout as a result of any misalignment.

In this respect the last photo is better than the first two.

I like your "use what you got" advice.
 
except for the butt pincher)

Really? With a bad back you don't want a butt pincher?

In case you missed it, that's really just a pair of hand actuated jaws on a long stick that can be used to pick stuff up off the floor that you dropped. I usually keep a magnet on an extension handle for the same purpose.

The wife likes to put it out of reach when she is in the shop......
 
I'll consider that an essential item on my "near" future shopping list.

Ive always considered either making or finding such a list for both the mill and for the lathe. You are correct, the list you referred to is just what I want close at hand and convenient. Not necessarily what I consider essential - although if it's on that list it is essential. But there are lots of other things that I consider essential that are not on that list.

Btw, I was thinking about first lathe projects for you. I highly recommend a lathe tool height fixture. Joe Piezinsky makes one for his lathe here. You can make one out almost any kind of bar stock. I used a big old farm bolt. There is lots of content in that video that is useful for lots of other things.


Joe is hands down my favorite you tube fellow. He has a bit of an ego but he earned it the hard way. I like his teaching style and I like the rich content. You will learn much more than whatever he is featuring.

PS don't get enamoured by that indicator holder of his. The Noga is WAY BETTER. And if you really end up wanting one just like that, look at the Erick Holders. They are better than the General one that Joe likes. Ask me how I know! ;)
 
@ThirtyOneDriver :

For tramming your vise you have a test indicator so just chuck the end of it in a collet (red straight Arrow) and turn it so you can read the dial. I put my mill in the back gear so the spindle cannot move easily or you can put the brake on or lock on...what ever you have. The pointer end can be adjusted so it is in better position to touch the face of the vise. Move the indicator onto the vise so you get a little reading, tram away.

20220118_082425.jpg
 
Back
Top