• Scam Alert. Members are reminded to NOT send money to buy anything. Don't buy things remote and have it shipped - go get it yourself, pay in person, and take your equipment with you. Scammers have burned people on this forum. Urgency, secrecy, excuses, selling for friend, newish members, FUD, are RED FLAGS. A video conference call is not adequate assurance. Face to face interactions are required. Please report suspicions to the forum admins. Stay Safe - anyone can get scammed.

AXA Tool Holder(s)

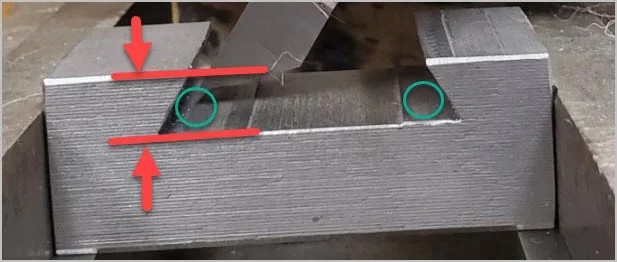
Remember with dovetails, both the depth and and width need to be correct for proper fitment. Measuring across pins is a combination of both depth and width. So it may be perfect, but still won’t fit.

This is VERY good advice. Most people would probably not realize that.
 
I was looking at my AXA tool holders and got to thinking.... With a mill and a shaper I should be able to make these things.

View attachment 20352


As a first go I thought I'd use some of this funky 1" thick aluminum stock I got from @kevin.decelles and @RobinHood (@Janger originator) Thanks guys.

The trick now was how to liberate that 3" X 1.5" piece on the bandsaw......

View attachment 20353

View attachment 20354

View attachment 20355

Took some fooling around but I eventually got her LOL....

View attachment 20356

View attachment 20357

Next up was throw it on the mill, square it up and mill out the majority of the dove tail

View attachment 20358

Finally on the shaper. That setup was a bit of a head scratcher.....

View attachment 20359

One side of the dove tail done.....

View attachment 20360

And the second side......

View attachment 20361

Bummer:mad: She's too wide by at least 0.069" Don't know how that happened..... I checked my tool holders against the Shar's website and came up with the same numbers?

Oh well. Try again I guess......
That’s a lot of stick out from the clapper.
 
@YYCHM , as has been stated, your process is right on the money. The fit is a bit off, but you can fix that.

For your second attempt I suggest you make a vise stop for the shaper. It will allow you to take the part out of the vise to try and fit it onto the tool post. This allows you to sneak up on dimensions.

Remember with dovetails, both the depth and and width need to be correct for proper fitment. Measuring across pins is a combination of both depth and width. So it may be perfect, but still won’t fit.
I find this interesting. Can you point me to more info on why the two dowel measurement may not work. I have only done it once, on a split bed Boley lathe with/ \ "dovetail" and it worked perfectly.
 
I find this interesting. Can you point me to more info on why the two dowel measurement may not work. I have only done it once, on a split bed Boley lathe with/ \ "dovetail" and it worked perfectly.

He means if you did too deep the method will not measure wide properly. Think 3D.

To do a perfect AXA you need to measure depth first and get it right. Should not be hard. Once depth is correct two dove pins or two end mills (me) work perfectly. You can match Aloris fit.
 
That's the only way I could get the tool positioned properly.
I made this little "sled", (I don't know what to call it) to hold my shaper tooling. In this case it is for 5/8" tool steel the tee clamps the bit in place, and the little slot running down it is for the cutting oil to run down, it kinda acts like a little reservoir as long as it is narrow and the oil is thick...
20220126_171636.jpg
20220126_171648.jpg
 
It has been a while since I made mine, I seem to recall setting the top slide over 30 degrees from the 90, so, 60 degrees. The tool angle isn't all that important as long as you have clearance all round, I just kept grinding, until I was happy with the clearances, it's the top slide angle, not the grind that determines the finished angle. The tool is 5/8" x 4" and is a fairly tight sliding fit in the sled, which in turn is a snug fit in the tool post. Pay particular attention to clapper angle to be sure it swings away from the work.
 
Fascinating story. Still really want to build the Gingery shaper. I was doing something on my Gingery lathe the other day and became very annoyed with the fact that I don't have anything like an AXA tool holder on it like I have on my Southbend. Your project has me thinking of creating a set of AXA type tools for the Gingery. Might have to build the shaper first unless dovetail cutters can be used.
 
Just a suggestion, when measuring between the dovetail pins, use an adjustable parallel. Then mic the parallel, the parallel puts equal pressure along the pin, thus eliminating any possible error
 
Interesting idea. I will try it next time I have occasion. I have a set of adjustable parallels that I have not used yet.
 
Bit of an update....

2ndTry.JPG


Left - I was able to salvage the first holder that turned out too wide by JB welding in a brass shim. Seem to hold just fine.

Right - My second attempt turned out too wide as well but not as bad as the first. Initial test fitting would not mount on the tool post so I put it back onto the shaper for a sneak up pass. Something must have moved with my tool setup as the second pass shaved too much off. Again needing to JB welding on a shim.

Top - I'll take one more kick at the can, this time in steel, but not before grinding a new tool. I want to eliminate that funky tool setup with something a little more inline and rigid.

Craig
 
Last edited:
Today was steel attempt day.....

Steel1.JPG


A little saner setup.... BUT....

Steel2.JPG


Had to nibble it down in steps in order to avoid chatter...

Steel3.JPG


Second dove tail done.. AND now the big moment...:rolleyes:

Steel4.JPG


Frack...... too wide by the thickness of jigsaw blade:mad:

Maybe one more attempt in aluminum....:rolleyes:
 
If I can make a suggestion.....Get yourself some layout dye, or a sharpie marker and use the too big one to scribe lines on the next peice so that you have a visual reference to go by. Take it one step further and offset one of the lines by the thickness of the shim needed to bring it in spec, and you now have reference lines to go by. When cutting the new one, leave the lines at first, then measure, and take a finish pass to bring into size.

If I can make a joke.....At this point it might be better to just make the toolpost bigger :D.
 
maybe you need some table stops, maybe micrometer stops. Also, you could make a blank that closely fits in a tool holder that fits your post well. like a checking guage. Also, your tool bit looks like you could move it up a bit.
 
Yup, exactly what you said Tom. Thanks.
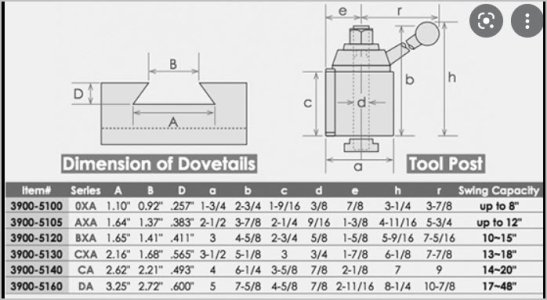
Are you guys trying to say the dovetail depth (D) has to be within a tolerance (as well as distance between dowel pins of course)? Dimension B is a bad reference for practical machinists IMO.

Craig what size of dowels are you using & what size of dovetail?
 

Attachments

  • EDT-2022-01-28 6.41.25 PM.webp
    EDT-2022-01-28 6.41.25 PM.webp
    24.9 KB · Views: 13
  • SNAG-2022-01-28 6.44.31 PM.jpg
    SNAG-2022-01-28 6.44.31 PM.jpg
    45.4 KB · Views: 13
Are you guys trying to say the dovetail depth (D) has to be within a tolerance (as well as distance between dowel pins of course)? Dimension B is a bad reference for practical machinists IMO.

Craig what size of dowels are you using & what size of dovetail?

Peter, those published dimensions don't work on this offshore tool post. I tried the 1.37" (34.8 mm) B dimension the first go and it was way too wide. Then I tried 30 mm and that seemed to be too narrow (but close). This try was with 32mm as a compromise but ended up being too wide again. Seems to be a very fine line as to what the magic value is. Can't use the factory tool holders to measure by as all the corners and edges are rounded off (significantly).
 
Last edited:
Back
Top