• Spring 2024 meetup in Calgary - date Saturday, April 20/2024. discussion Please RSVP Here to confirm and get your invitation and the location details. RSVP NOW so organizers can plan to get sufficient food etc. It's Tomorrow Saturday! you can still RSVP until I stop checking my phone tomorrow More info and agenda
  • We are having email/registration problems again. Diagnosis is underway. New users sorry if you are having trouble getting registered. We are exploring different options to get registered. Contact the forum via another member or on facebook if you're stuck. Update -> we think it is fixed. Let us know if not.
  • Spring meet up in Ontario, April 6/2024. NEW LOCATION See Post #31 Discussion AND THE NEW LOCATION

AXA Tool Holder(s)

Susquatch

Ultra Member
Administrator
Moderator
Premium Member
Why not use a ready made holder and mount a bar to your motor sleeve that would fit into the tool holder?

Yes, I looked at lots of variations. The direct screw on seemed obvious but it isn't without problems. A bar would seem to lose a lot of rigidity but maybe that doesn't matter with a small tool post grinder.
 

Susquatch

Ultra Member
Administrator
Moderator
Premium Member
@DPittman @YYCHM

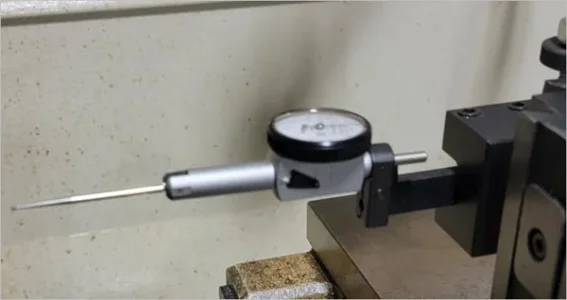
Here is photo of my indicator holder. It's really nothing fancy. The bar in my tool holder came with a Starrett Indicator. The indicator itself is a Mitutoyo 0.0001 with a double length tip in it to reach deeper into a bore. The double length reduces the indicator resolution by a factor of two to 0.0002. But you can read between the lines to finer res if you want.

20220202_150650.jpg

And here are some photos of the spindle motor bracket. It has a bore of 2.25" and it is 3.75 inches long by 1.75 wide by 2 8 inches high.

20220202_145150.jpg 20220202_145208.jpg 20220202_145258.jpg 20220202_145229.jpg 20220202_145245.jpg
 

YYCHM

(Craig)
Premium Member
Did you try this? Did it work?

So, I want to make a custom tool holder to hold a spindle motor in my tool post. The motor came with an alumnium clamp holder.

My first thought was to machine one side of it flat and drill and tap a steel tool holder to hold the Aluminium holder. But it seems like there are lots of reasons why that wouldn't work as well as it seems it should.

So I'm rethinking this now. Reading this thread has me thinking it would be better to make a new sleeve that incorporates its own tool holder dovetail to attach directly to the tool post dovetail.

Hence my questions about how well your aluminum tool holder worked out.

I'll also need to find a big ars chunk of aluminum that is hiding my holder inside it.

I need to be able to cut good dovetails too.....

I would try "drill and tap a steel bar to mount the aluminum spindle clamp to a regular steel AX? holder" first.

If that doesn't suffice embellish one by "adding 4 screws to attach the aluminum spindle clamp to the regular steel AX? holder" second

If that doesn't suffice then "make a new aluminum spindle clamp with integrated dove tail" third.

The aluminum dove tails I made lock up solid on my wedge type tool post.
 
Last edited:

Susquatch

Ultra Member
Administrator
Moderator
Premium Member
I would try "drill and tap a steel bar to mount the aluminum spindle clamp to a regular steel AX? holder" first.

If that doesn't suffice embellish one by "adding 4 screws to attach the aluminum spindle clamp to the regular steel AX? holder" second

If that doesn't suffice then "make a new aluminum spindle clamp with integrated dove tail" third.

The aluminum dove tails I made lock up solid on my wedge type tool post.

Hmmmm...... That makes two votes for the steel bar......

Maybe I don't understand what you guys mean. Can you make a simple pencil sketch?
 

Tom Kitta

Ultra Member
Did you try this? Did it work?


So, I want to make a custom tool holder to hold a spindle motor in my tool post. The motor came with an alumnium clamp holder.

View attachment 20594

My first thought was to machine one side of it flat and drill and tap a steel tool holder to hold the Aluminium holder. But it seems like there are lots of reasons why that wouldn't work as well as it seems it should.

So I'm rethinking this now. Reading this thread has me thinking it would be better to make a new sleeve that incorporates its own tool holder dovetail to attach directly to the tool post dovetail.

Hence my questions about how well your aluminum tool holder worked out.

I'll also need to find a big ars chunk of aluminum that is hiding my holder inside it.

I need to be able to cut good dovetails too.....
I am waiting for the same thing. Idea is to remove the AXA tool post, put a brand new (already made) T in there, machine on side of aluminium holder to be no more than maybe 5mm thick, machine bottom flat & to the proper height, attach to the T and Use bolts through the enclosure to lock the T to the cross slide.

So operation would be, place T connected enclosure, lock the T in the cross slide, put in the motor, lock the motor and finally start grinding.

The reason to machine one side to 5mm thick is to use smaller grinding wheels. Motor already is 53mm. With 5mm extra enclosure thickness we have a 63mm wheel just barely touching the work while rubbing enclosure. So you need at least 3" grinding wheel == 75. But 75mm needs to be dressed, it needs to do some work, this leaves not much before it becomes a bit smaller - we have only 12mm before its useless. I am also looking at 4". 5" is probably too big as I would need to move the T to far to the front in order not to rub.
 

YYCHM

(Craig)
Premium Member
I am waiting for the same thing. Idea is to remove the AXA tool post, put a brand new (already made) T in there, machine on side of aluminium holder to be no more than maybe 5mm thick, machine bottom flat & to the proper height, attach to the T and Use bolts through the enclosure to lock the T to the cross slide.

So operation would be, place T connected enclosure, lock the T in the cross slide, put in the motor, lock the motor and finally start grinding.

The reason to machine one side to 5mm thick is to use smaller grinding wheels. Motor already is 53mm. With 5mm extra enclosure thickness we have a 63mm wheel just barely touching the work while rubbing enclosure. So you need at least 3" grinding wheel == 75. But 75mm needs to be dressed, it needs to do some work, this leaves not much before it becomes a bit smaller - we have only 12mm before its useless. I am also looking at 4". 5" is probably too big as I would need to move the T to far to the front in order not to rub.

I think we need a dwg Tom..... You lost me:p
 

Susquatch

Ultra Member
Administrator
Moderator
Premium Member
I am waiting for the same thing. Idea is to remove the AXA tool post, put a brand new (already made) T in there, machine on side of aluminium holder to be no more than maybe 5mm thick, machine bottom flat & to the proper height, attach to the T and Use bolts through the enclosure to lock the T to the cross slide.

So operation would be, place T connected enclosure, lock the T in the cross slide, put in the motor, lock the motor and finally start grinding.

The reason to machine one side to 5mm thick is to use smaller grinding wheels. Motor already is 53mm. With 5mm extra enclosure thickness we have a 63mm wheel just barely touching the work while rubbing enclosure. So you need at least 3" grinding wheel == 75. But 75mm needs to be dressed, it needs to do some work, this leaves not much before it becomes a bit smaller - we have only 12mm before its useless. I am also looking at 4". 5" is probably too big as I would need to move the T to far to the front in order not to rub.

Sorry Tom, call me stupid. I've read your note three times now and still can't figure out what you mean.
 

PeterT

Ultra Member
Premium Member
I'm curious about your indicator setup. What kind of applications do you find this useful for? I mean I get that that stylus can swivel/rotate up & down a bit, but it has a certain range before you need to jack the toolholder. And then the toolholder runs out of range. Isn't a DTI on a mag base arm a whole lot faster to set in position?
 

Attachments

  • EDT-2022-02-02 9.59.48 PM.jpg
    EDT-2022-02-02 9.59.48 PM.jpg
    24.3 KB · Views: 1

Susquatch

Ultra Member
Administrator
Moderator
Premium Member
I'm curious about your indicator setup. What kind of applications do you find this useful for? I mean I get that that stylus can swivel/rotate up & down a bit, but it has a certain range before you need to jack the toolholder. And then the toolholder runs out of range. Isn't a DTI on a mag base arm a whole lot faster to set in position?

It is used to align the axis of a bore with the axis of the spindle. It could also be used to simply center a bore. The idea is to reach into the bore and measure the runout at several different depths.
 

YYCHM

(Craig)
Premium Member
It is used to align the axis of a bore with the axis of the spindle. It could also be used to simply center a bore. The idea is to reach into the bore and measure the runout at several different depths.

And that went way over my head:confused:
 

Susquatch

Ultra Member
Administrator
Moderator
Premium Member
Imagine making a sleeve with an eccentric bore that is also on a slight angle to the outside. A rod inserted into the sleeve transcribes a bigger circle than the outside of the sleeve itself.

Now imagine that the hole needs to be bored out a bit and reamed for a perfect fit. To do that, the outside must be mounted in a fixture and the bore needs to be centered and aligned axially such that the axis of the bore of the sleeve is aligned with the axis of the spindle.

This is done by inserting an indicator into the hole and centering the hole at several depths using a fixture instead of chuck jaws to hold the outside of the sleeve. Then the hole can be bored and reamed or threaded or whatever.
 

Tom Kitta

Ultra Member
2 updates -

1. The cheap AXA tool holders were a joke - they never made it to Canada and seller refunded me with reason "returned by customer". Well, I never got them so could not return. Obvious scam - i.e. they are hoping people forget after 2 months and they get $$$. Hence why such long shipping and hence why no reviews etc. They probably recycle listings as well. Not sure why amazon goes for this BS.

2. the TPG with large ER20 and actual stone at the end does not seem to work too well - the spindle of just 8mm is too flimsy and not very rigid. I guess this is good only for tiny stuff that fit into ER11 & are well balanced. I.e. small stones that are light, no stick out etc. When you look at real TPGs you notice that the spindles are very beefy - they are not small at all - internal spindles are usually tapered as well - thick close to the motor getting thinner towards stone. Oh well, I guess I have now a little TPG that is good for some internal work and not really any outside work - well maybe with tiny stone. I play around with it some more but I do not have high hopes.
 

YYCHM

(Craig)
Premium Member
1. The cheap AXA tool holders were a joke - they never made it to Canada and seller refunded me with reason "returned by customer". Well, I never got them so could not return. Obvious scam - i.e. they are hoping people forget after 2 months and they get $$$. Hence why such long shipping and hence why no reviews etc. They probably recycle listings as well. Not sure why amazon goes for this BS.

Mine haven't arrived yet either, China post.... Feb 21-Mar17:rolleyes:
 

YYCHM

(Craig)
Premium Member
Today I decided to try this dove tail cutter I ordered from Amazon.....

Mill1 (1).JPG

The cutter is 30mm dia., so lots of cutting fluid and 30 hz on the VFD. It stalled the mill a few times the deeper I progressed. You have to reduce the doc the deeper the cut:rolleyes: I used two 1/4" drill bit shanks to compare the dove tail width with a factory holder, that worked great.

Mill1 (2).JPG

Dropped right in and locked up tight the first try.
 
Last edited:

Susquatch

Ultra Member
Administrator
Moderator
Premium Member
Dropped right in and locked up tight the first try.

What was the sequence for this job Craig?

The top of the v-way looks like maybe you did a groove to depth first with a regular endmill and then widened the grrove with the 60 degree dovetail till it fit the drill width.

I have to cut one for my spindle motor holder shortly. So I'm interested in how you did this. Having no shaper, means I have to do it your way.
 

YYCHM

(Craig)
Premium Member
What was the sequence for this job Craig?

The top of the v-way looks like maybe you did a groove to depth first with a regular endmill and then widened the grrove with the 60 degree dovetail till it fit the drill width.

I have to cut one for my spindle motor holder shortly. So I'm interested in how you did this. Having no shaper, means I have to do it your way.

You've got it. I measured the width of the narrow portion and depth of the dove tail on a factory holder and machined a slot to match. Then I measured the width of the wide portion of the dove tail on a factory holder to use as a first approximation for how deep I would have to cut each side of the slot. 3/4 of the way thorough to the approximation target I switched to comparing the width measured between 1/4" drill shanks to that of a factory holder. Worked like a charm.

If that doesn't make sense PM me.
 
Top