• Scam Alert. Members are reminded to NOT send money to buy anything. Don't buy things remote and have it shipped - go get it yourself, pay in person, and take your equipment with you. Scammers have burned people on this forum. Urgency, secrecy, excuses, selling for friend, newish members, FUD, are RED FLAGS. A video conference call is not adequate assurance. Face to face interactions are required. Please report suspicions to the forum admins. Stay Safe - anyone can get scammed.
  • The 2026 Calgary Area Meetup is set for Saturday May 30th at 10am. The signup thread is here! Robinhood has graciously offered to host the meetup again this year. Please note that you MUST RSVP to the notice linked above if you wish to come.

3D Printer Happened

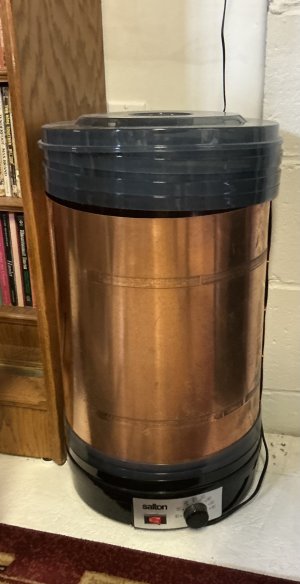
I use a Food dehydrator which I modified as you can see. Used some copper sheeting and I can stack 4 spools inside at a time.
IMG_1658.jpeg

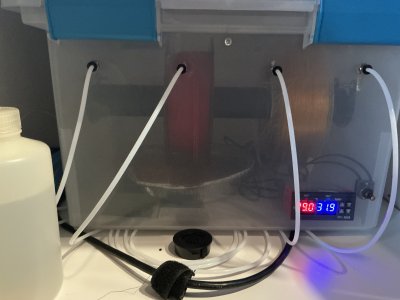
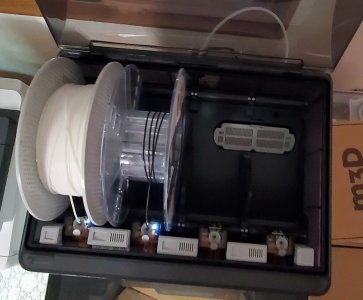
Then I needed a long term solution to keep the filament dry, so a storage box with GASKET, a lizard warmer/heater and a tray of silica gel beads. A controller for the relevant info.
IMG_1660.jpeg
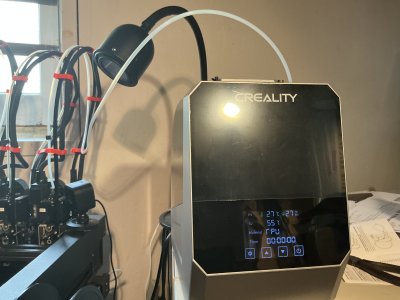
I then bought a small dryer for TPU which gives me trouble in the summer. On sale and feed direct to the extruder.
IMG_1659.jpeg

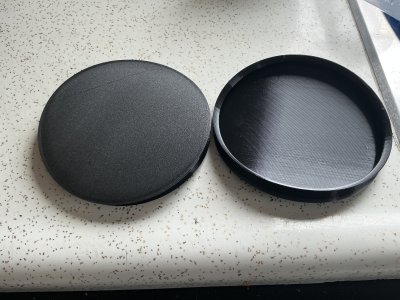
Does your AMS have the heater? Print some silica bead containers to fit to extend time. Lots of files available online.

I print TPU with a layer of PLA on the bed if possible to ease removal or use PETG as the first couple layers if I can. Like for the Anchor-Hocking bowl lids, they have a PETG top and the TPU is on the inside and lip seal.
image.jpg

Pierre
 
I printed these or ones like these for my AMS. Just dried out the desiccant the other day and the RH inside is sitting at 12% while ambient outside in the office is 51%.

And these for the two cavities under the spools.

Or maybe it was these.

Can't find the print files on my system anymore.
 
BTW, for TPU I've just hung the spool on the outside post. Then separated the feed tube from the AMS and pushed the TPU in until it reaches the extruder. When done I remove it and put the TPU back into a plastic bag with the desiccant. Haven't bothered with a Y tube or the external drier/feeder although I have a single reel one now that would work for that.

I guess it depends how often i would print TPU which at the moment isn't that often And I also still have the SOVOL-06 if I wanted to do TPU while printing something else.
 
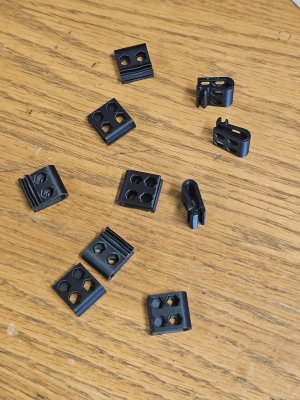
Made some clips to retain the fillament on the spools when not in the AMS. This used the multiple print functionality of the android app. Didn't use the PC.

Might not be the best clips because other users say that PLA is too brittle and won't flex, but I liked them and wanted to try multiple copies.

I made 10.

20260706_190920.jpg
 
Why does it even need a lid? Won't it work even better with no lid? Shouldn't it have a handle? Does your AMS have a cavity it fits into?
Those little desiccant beads are like latent kinetic energy. They bounce really high all over the place. Not having a cover means that if you spill one or two it will end up on the floor across the room in a place you'd never look.
 

Attachments

  • InsideAMS.jpg
    InsideAMS.jpg
    375.2 KB · Views: 5
Not having a cover means that if you spill one or two it will end up on the floor across the room in a place you'd never look.

I don't think I'd care about losing a bead. It's not exactly a Jesus spring. I'd be more worried about it falling into a mechanism of some delicate kind.

What are you gunna do with 4 small winds of Fillament? Can you bond/weld it to the beginning of another spool? Or is the printer smart enough to use it till its gone and then prompt for a new spool?
 
I don't think I'd care about losing a bead. It's not exactly a Jesus spring. I'd be more worried about it falling into a mechanism of some delicate kind.

What are you gunna do with 4 small winds of Fillament? Can you bond/weld it to the beginning of another spool? Or is the printer smart enough to use it till its gone and then prompt for a new spool?
The printer stops and waits until you replace it. It does actually work.

Same with the SOVOL-06 which has a filament sensor. In that case it moves out of the way of the print and stops with a length sitting free. Pull on the lever to disengage the filament and pull out the filament and then insert new. Feed it with the touch pad buttons until it comes out smoothly. Then on the touch pad tell it to continue.

Try it on yours. Cut the filament and wait for the print to stop. Insert the cut edge back into the feeder. Press continue or whatever the Bambu says. Been a while since I've done that.
 
With the ams you can put 4 spools of the same filament in to it and tell it to continue printing automatically. So technically you could print 4kg in a sitting. My CFS has the same function and I have used it to print helmets. I used to buy 3kg reels so I could do the big prints without changing reels. Once I found out about the cfs using all 4 spots I have not used the 3kg. Had to make a special reel stand for the big reels, they are a bit of a pain.

There are some concerns and it can pile up. One of the reasons I like the elegoo rolls is that they only put the filament in to a hole at the end. So the last of the filament pulls free easily. I think Bambu and others use a piece of tape which can get caught in the ams. If snagging is ever a concern. You can make these snag cutters pretty easy. They won’t work with my cfs. https://makerworld.com/en/models/957400-ams-1-saver-snag-cutter-v5-0

It’s one of those things that can happen but it’s pretty rare. If you make sure to not get the filament tangled when swapping rolls it should not be a big concern.

Like John and others have already posted lots of guys also respool and splice. I usually wait until I have a half dozen end rolls then splice em and respool makes for some multicolour prints. I like the pasta lite system, https://www.printables.com/model/1162052-pasta-lite-receiver-a-pastamatic-remix
 
Ok, so power is finally back here again. Generator is even put away till next time.

I'd like to tackle a collet rack. And I'd like to make one for 5C collets first since I have so many. Perhaps 30 collets. The tray needs to go in a drawer and not covered. No space wasting labels either.

Something like this:

View attachment 83933


I'd like to stay out of CAD for this project if I can. That's intentional so we can help members who have not purchased a printer yet because they don't want to have to learn CAD.

Can I turn the 25 collet tray into a 30 collet tray without using cad? Can that be done in Bambu's print program?

If I can do that, can I rearrange the holes like a bees wax frame staggered so it's more space efficient using the Bambu printer program? Or is that clearly into CAD territory?

To be clear, I'd like to stay out of CAD for this project, but I am not averse to using CAD myself. I just want to explore the boundaries.

PS - the cereal boxes I got from Amazon came today. The tray I made for the Fillament spool and humidistat fit it perfectly.
How are you making out with this collet rack? I don't want to sound fearful, but years ago I converted my milling machine to CNC with Mach3 and purchased a license for CAM BAM. The issue was the amount of leaning and then forgetting of how to use the program to draw the part that I wanted to make. Every time I wanted to draw something I spent hours on You Tube going through video's to relearn how to use the drawing part of the program. It is to me, so difficult that I revert to traditional methods of machining parts.

I asked A.I. if Cam Bam had improved over the years and the answer was no. It suggested that I draw in another program and then import the file into CAM BAM to generate the G code. Great something else to learn. I am sure there are thousands of items that have print files but for the most part, things I do are all custom work specific.

Looking at your project, purchase a solid block of plastic and machine it the way you want it currently in my mind makes more sense. I can see it in my mind and the steps to make it happen which currently I cannot see nor understand in 3D printing. Help!

TonyK.

Grimsby Ontario Canada.
 
How are you making out with this collet rack? I don't want to sound fearful, but years ago I converted my milling machine to CNC with Mach3 and purchased a license for CAM BAM. The issue was the amount of leaning and then forgetting of how to use the program to draw the part that I wanted to make. Every time I wanted to draw something I spent hours on You Tube going through video's to relearn how to use the drawing part of the program. It is to me, so difficult that I revert to traditional methods of machining parts.

That project is still a priority. But it's taking a backseat to other aspects of my life. Doctor, dentist, wife, grandkids, neighbours, we are also planning a few days of vacation. It's also not a project I am married to. It's just a, stepping stone - see further below.

For right now, I am learning how to sllice an existing design as per @Arbutus instructions, but it's never as easy as it sounds. I've had to review the Bambu briefing, but it's just not landing in my head in a way that I'm confident in. So I'm starting to think about doing it in cad instead. A flat block with a pattern of holes in it should not be hard to do. Heck, I might even use Alibre instead of Fusion just to try it out. That said, if I do switch to CAD for this project, I'll set the project aside in favour of something else that fits my progression plan better - see plan below.

I might also try printing something I've already done in CAD (lathe stop, DRO brackets, etc).

Your concerns about learning and relearning are partly why I don't ever want CNC. The other reasons being that I love turning handles, I love the feel of the cutter working in my hands, making the machine happy, and I very seldom make multiples.

Even if I'm only in the planning stage of a project and I haven't done anything yet, my mind easily embraces the anticipation of manually machining, and it abhors the idea of punching numbers into a keypad. So ya, no CNC for me. Not now, not ever.

Looking at your project, purchase a solid block of plastic and machine it the way you want it currently in my mind makes more sense. I can see it in my mind and the steps to make it happen which currently I cannot see nor understand in 3D printing. Help!

Just go to the dollar store and buy some 3/8 thick cutting boards.

Before I got the 3D printer, I had always planned to do just as you guys suggest. Buy some decking boards and just drill holes in it at the required spacing. You guys are both right. It's an Easy Peasy job on the mill or even a drill press.

But that misses the point. For me, the collet tray is a stepping stone, not a destination. It's all the other more complex things I'd like to make when my skills have improved.

My simple plan was, and still is:

1. Simple library part - Benchy
2. Complex downloaded part - that turned out to be a spool tray just cuz I needed them anyway.
3. Complex modified part - collet tray.
4. Simple CAD part I designed - TBD
5. Complex CAD part I designed - TBD

Not to disillusion you, but the CAD issue is real for me too. As real as your concern is and very similar too. Like you, I have not been able to find a way to "stick with it" enough to become comfortable with CAD. As fast as I learn things, I lose them in the fog of my mind. It's just easier for me and the things that I do to grab pencil and paper, sketch something, calculate a few numbers, grab some stock, and head for a machine. As weird as it sounds, I am actually hoping that 3D printing will eventually become my reason to get more familiar with CAD and hopefully retain more too. Sort of a chicken and egg thing.

I am also a bit scared and also relieved by what I'm all finding in terms of ready to go projects on line. There are so many people out there posting models that are ready to download and print that you can find almost anything you want. Who needs CAD? But that "no cad guy" has to be happy with what is already there. That prolly isn't me. In fact, the collet tray is already proving that I'm not that guy. Nothing out there is exactly what I want.

Bottom line - so far so good. I'm happy with my slow progress. It isn't a race. I'm thinking I'll either postpone the current collet tray in favour of an easier one, or set the whole idea of a collet tray of any kind aside for now and do something else that rings the same bell.

For right this moment, I'm still learning how to split an existing design. My instincts say it's easy, but the details of how it's done are alluding me. The light bulb might come on today. Stay tuned.

 
Yeah, I tried to make a small tray to hold die and a tap, I even tried to take a pre designed one from a down load, rehash it. It never got to the printer as after 4 hrs.+ trying to redraw, had frustration only. The tray I found to down load wouldn’t hold my die size.
Anyway another day for that.
 
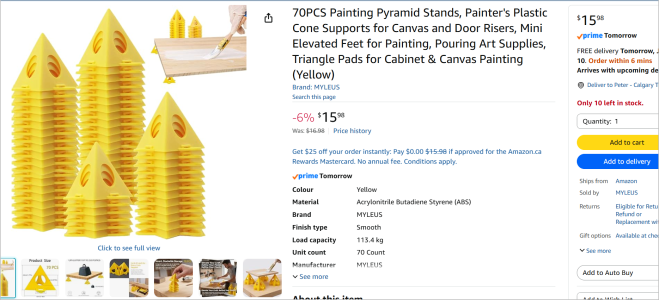
Some things are like that. I was going to 3DP some paint pyramids. For the price, not worth the filament & printer wear. But when you need something custom, there really is no comparison to having a 3DP at home. I have fixed countless household items where parts were unobtanium or expensive, or you actually IMPROVE it. But for that kind of thing, CAD is a requirement. No getting around it unless you were lucky enough to find someone else had the same requirement.

Modifying an STL within CAD is more like surface modelling & not necesarily easy depending on the complexity. Yes you can 1,2,3D scale & distort within the CAD app or slicer file no problem, but thats kind of a universal blunt intrument. Patching a hole or modifying a hole diameter or moving an array of holes is PITA compared to basic part modelling. I've had to repair/modify some STL files & generally speaking requires more specialized technique than modelling the part from scratch. If you like this stuff, dealing with mesh files is good for the resume. Its more of a useful thing when dealing with outputs from 3D scanners where there is a lot of surface topography you want to utilize/honour. But there is no cheap/easy/powerful magic bullet for hobby guys IMO.

1783612449043.png
 
Last edited:
Something I've observed over the years is that often people dive right into making something they need or want with their new tool. Imagine picking up a guitar and expecting to be able to immediately play on stage with Elton John. Not going to happen.

Schools don't throw students directly into complete suspension bridge designs when they are started with CAD. They are given simple drawings that have no use other than to teach the process.

I took that approach when I first started using Alibre back in 2006. I had the Gingery shop series of books with the drawings I'd followed to make the lathe a few years earlier so I understood (a little bit) on what makes a drawing that can be used to make a pattern to make a part.

So instead of designing from scratch I took an existing design and created the part, and then the assembly which included drawings of screws downloaded off the web.

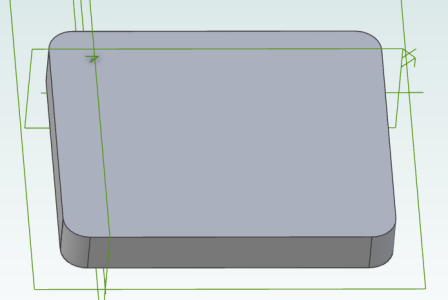
The first part of the drawing was the top part.

1783612953572.png

And so on until I had the finished part.

Compound Slide Assembly.jpg
Key thing here is that this was still a very simple drawing. It's only in the last year or so I've started using more of the parametric 'features' of the drawing program.

However reproducing an existing drawing turning the 2D into a 3D drawing meant I didn't have to do any design thinking which made this easier.

So like a musical instrument or creating G-Codes from a CAM program which came from a CAD program do stuff that is listed as exercises or assignments instead of projects. It seems like a waste of time but I believe if builds fundamentals that you don't forget.

IMHO
 
So like a musical instrument or creating G-Codes from a CAM program which came from a CAD program do stuff that is listed as exercises or assignments instead of projects. It seems like a waste of time but I believe if builds fundamentals that you don't forget.
......... so, if I am hearing you correctly it's like a woman, if you find that g-spot the chance of getting what you want improves dramatically. 😉

......interesting 🙄
 
Back
Top