Aw leave them alone, they don't look ugly, they look light.i will powder coat the tanks, they are kind of ugly.
-
Scam Alert. Members are reminded to NOT send money to buy anything. Don't buy things remote and have it shipped - go get it yourself, pay in person, and take your equipment with you. Scammers have burned people on this forum. Urgency, secrecy, excuses, selling for friend, newish members, FUD, are RED FLAGS. A video conference call is not adequate assurance. Face to face interactions are required. Please report suspicions to the forum admins. Stay Safe - anyone can get scammed.
-
Several Regions have held meetups already, but others are being planned or are evaluating the interest. The Calgary Area Meetup is set for Saturday July 12th at 10am. The signup thread is here! Arbutus has also explored interest in a Fraser Valley meetup but it seems members either missed his thread or had other plans. Let him know if you are interested in a meetup later in the year by posting here! Slowpoke is trying to pull together an Ottawa area meetup later this summer. No date has been selected yet, so let him know if you are interested here! We are not aware of any other meetups being planned this year. If you are interested in doing something in your area, let everyone know and make it happen! Meetups are a great way to make new machining friends and get hands on help in your area. Don’t be shy, sign up and come, or plan your own meetup!
You are using an out of date browser. It may not display this or other websites correctly.
You should upgrade or use an alternative browser.
You should upgrade or use an alternative browser.
Zenair CH601HD
- Thread starter phaxtris
- Start date
Aw leave them alone, they don't look ugly, they look light.
But its free! i could just do a real light dusting!
No grams are free.
Ha i like that answer
i am trying to keep it light where i can, planned interior is some seat cushions and a floor mat....starting to lean towards basic day vfr instruments, those grams do add up
The wing stripping is moving along, going to replace a skin and a few ribs. Stalled on that, ive found a local supplier for the sheet i need, just no time to get down there.
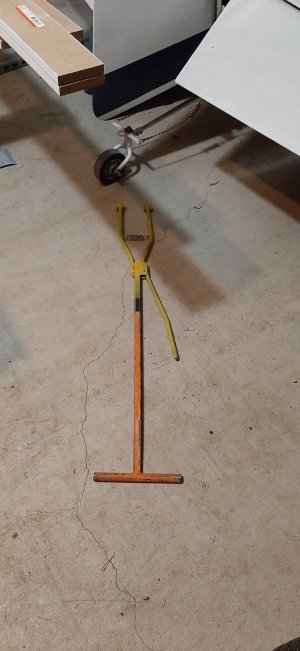
in the mean time ive been putting it off, but i need a tow bar, and im not about to buy one. So i looked around at what odds and ends i have laying around without any planned use, 1" aluminum hss, a few off cuts off 1.5" aluminum intake pipe....i think i can do something with that.
came up with a plan and chopped everything up on Tuesday

smooshed my finger at work on wensday (today).....oops

screw it not gonna let that stop my evening, im finishing it up, that 600mg ib profin did wonders.


works well for now, i can pull it in and out of the garage, yet to see if it will be adequate once its completed and heavier. If it does and i come across some 1" or 1.25" round tube i will replace the handle, possibly figure out something so that i dont have to get down and pin that cross strap, and maybe make it foldable.
in the mean time ive been putting it off, but i need a tow bar, and im not about to buy one. So i looked around at what odds and ends i have laying around without any planned use, 1" aluminum hss, a few off cuts off 1.5" aluminum intake pipe....i think i can do something with that.
came up with a plan and chopped everything up on Tuesday
smooshed my finger at work on wensday (today).....oops
screw it not gonna let that stop my evening, im finishing it up, that 600mg ib profin did wonders.
works well for now, i can pull it in and out of the garage, yet to see if it will be adequate once its completed and heavier. If it does and i come across some 1" or 1.25" round tube i will replace the handle, possibly figure out something so that i dont have to get down and pin that cross strap, and maybe make it foldable.
Ryan dude ouch. Sadly been there done that. There is always a story.smooshed my finger at work on wensday (today).....oops
View attachment 62267
I have done a few tow bars. I like a round handle, even standard 1/2 to 3/4" pipe works well., maybe I have girly hands....
I used a spring to hold the moving arm to the fixed arm and weld a piece of 3/8ish rod to the moving arm as a counter lever. I tried to do sketch but it was easier to run to the shop.
This was originally on the C150 but is now for the RV4.
I used a spring to hold the moving arm to the fixed arm and weld a piece of 3/8ish rod to the moving arm as a counter lever. I tried to do sketch but it was easier to run to the shop.
This was originally on the C150 but is now for the RV4.
Attachments
Ryan dude ouch. Sadly been there done that. There is always a story.
ahh not much of a story, unloading a truck, a bundle of beams snapped together and some way caught my hand/finger in there, could have been way worse, stupid mistake on my part
I have done a few tow bars. I like a round handle, even standard 1/2 to 3/4" pipe works well., maybe I have girly hands....
I used a spring to hold the moving arm to the fixed arm and weld a piece of 3/8ish rod to the moving arm as a counter lever. I tried to do sketch but it was easier to run to the shop.
This was originally on the C150 but is now for the RV4.
I would have preferred round, i just had no round aluminum other than solid. I could have used steel, i just didnt have anything appropriate on hand, and that piece of aluminum hss has been kicking around for probably 10 years now, time to use it up....ill switch the handle to round when i find the right piece
i see what you have done, i didnt think of that... nice and simple, i think i will do just that, another day, when my finger isnt leaking goo
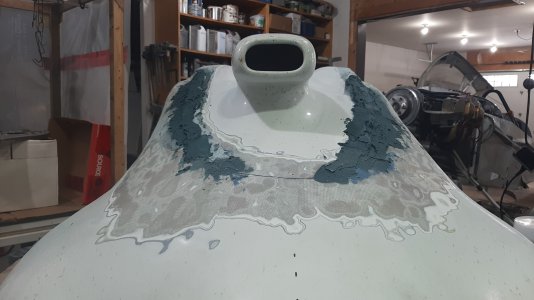
started on the cowling while i wait for a few invoices to roll in, a relatively low cost high time item. I could purchase this, but the nose piece and the sheet metal is just south of 1000$ usd + shipping, with our dollar i think i will spend the time and effort
im 4 cans of spray foam into it thus far, probably need another 2 before i can get to the shaping, and likely 1 more to fill in large voids before i can get to drywall compound for the smoothing. This is the progress so far, im going to let what foam i have on there cure over night, rushing putting on that spray foam overhead doesnt work, one layer at a time, might take a few days to get it filled in


im 4 cans of spray foam into it thus far, probably need another 2 before i can get to the shaping, and likely 1 more to fill in large voids before i can get to drywall compound for the smoothing. This is the progress so far, im going to let what foam i have on there cure over night, rushing putting on that spray foam overhead doesnt work, one layer at a time, might take a few days to get it filled in
Are you going to finish with fiber glass and resin?started on the cowling while i wait for a few invoices to roll in, a relatively low cost high time item. I could purchase this, but the nose piece and the sheet metal is just south of 1000$ usd + shipping, with our dollar i think i will spend the time and effort
im 4 cans of spray foam into it thus far, probably need another 2 before i can get to the shaping, and likely 1 more to fill in large voids before i can get to drywall compound for the smoothing. This is the progress so far, im going to let what foam i have on there cure over night, rushing putting on that spray foam overhead doesnt work, one layer at a time, might take a few days to get it filled in
View attachment 62434View attachment 62435View attachment 62436View attachment 62437
Are you going to finish with fiber glass and resin?
yes, i had thought about using carbon fiber, but i know how to do fiberglass, carbon fiber not so much
@phaxtris your timing is spectacular! I too am working on my cowling. I have to remove the original air intake and install one to accommodate an air filter. I built up the cowling to fit the profile of the new intake, but was wondering what to do next. I also was looking at different profiles for the final look. To make the new intake match the old cowling, it was suggested to use bondo, but that turns out to be expensive and hard to work with (if left too long, which I seem to do) I was just discussing using spray foam today with a friend, and I also wondered if drywall compound could be used to finish the final shape. Today's post by you answered that!
Thank you!
🙂
Thank you!
🙂
Attachments
@phaxtris your timing is spectacular! I too am working on my cowling. I have to remove the original air intake and install one to accommodate an air filter. I built up the cowling to fit the profile of the new intake, but was wondering what to do next. I also was looking at different profiles for the final look. To make the new intake match the old cowling, it was suggested to use bondo, but that turns out to be expensive and hard to work with (if left too long, which I seem to do) I was just discussing using spray foam today with a friend, and I also wondered if drywall compound could be used to finish the final shape. Today's post by you answered that!
Thank you!
🙂
Nice! is the last photo "cowling mod" all finished up ?
your right, Bondo has a window for sanding, that stuff gets hard as a rock in 24 hours. Good Bondo like evercoat is sandable in like 20 min (if memory serves me), and sands beautifully. Some form of bondo or feathering compound is really your only option for the final product though.
bondo, plaster of paris, drywall mud, all options that work (for the form), ive even heard of guys using modeling clay, obviously only good for the form. If you use foam for your plug you do need to protect the foam from the resin, i have in the past just taped the entire mold, then covered it in Vaseline as the release agent, I have heard of people using cellophane (saran wrap) to wrap the mold, im going to give that a go this time around, cheaper and easier than tape for a big mold.
Nice! is the last photo "cowling mod" all finished up ?
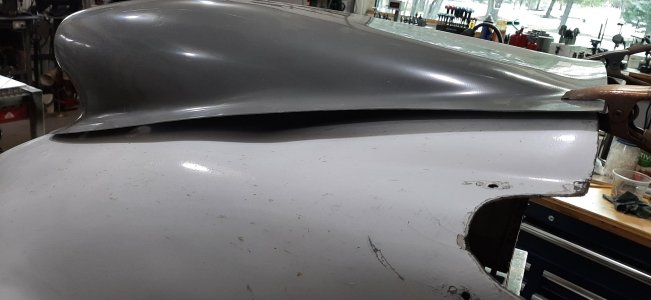
No, I am still at the fitting stage. The one labelled "cowling mod" is where I am at. I built up bondo until the gap was filled under the new intake, then I am going to take a contour out of the old cowl to make a better transition into the new intake. That is where I am going to try spray foam.
No, I am still at the fitting stage. The one labelled "cowling mod" is where I am at. I built up bondo until the gap was filled under the new intake, then I am going to take a contour out of the old cowl to make a better transition into the new intake. That is where I am going to try spray foam.
ahh ok, youll probaly be best off to get the lowest expanding foam, like the stuff for windows. you dont have a massive amount to fill so the higher density less expanding stuff will be best, less voids when you cut into it. I found the best value is with sika expanding foam, price per gram is lowest
OK. Thanks for the input. I was wondering if one type of spray foam had advantages over another. But I was thinking more the sanding/shaping aspect. Will get some low expansion foam tomorrow.
well the best for that, as well as density (voids) is the 2 part liquid, you can buy it on amazon, but you have to pour it, so a lot less convenient
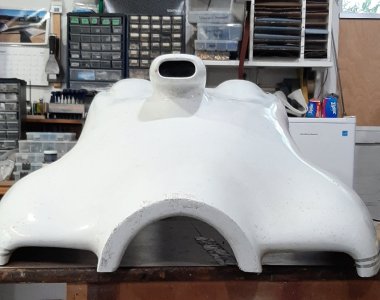
it has been done for about a week now, just removed it from the mold today, here is an update
a little bit every night, sand, drywall mud, add foam to the bottom....rinse and repeat...8 cans of spray foam an a whole bunch of drywall mud later..

getting the foam built up on the bottom has been a slow process, one layer per night, but finally enough is on there to carve some shape to it and start adding the drywall mud


spray adhesive, cellophane and Vaseline as a bit of a release and its ready for some glass


the remnants of the mold, and the cowling pieces baking in the sun, 4 layers of cloth on top and bottom, it will need some strand matt on the inside, they are still quite flimsy and thin...this will probably be on hold for a while, the prop for the other plane came in so i have been back and forth to vulcan getting that bolted on, timed, and working on starting it, hopefully flying will eat into the summer project time


a little bit every night, sand, drywall mud, add foam to the bottom....rinse and repeat...8 cans of spray foam an a whole bunch of drywall mud later..
getting the foam built up on the bottom has been a slow process, one layer per night, but finally enough is on there to carve some shape to it and start adding the drywall mud
spray adhesive, cellophane and Vaseline as a bit of a release and its ready for some glass
the remnants of the mold, and the cowling pieces baking in the sun, 4 layers of cloth on top and bottom, it will need some strand matt on the inside, they are still quite flimsy and thin...this will probably be on hold for a while, the prop for the other plane came in so i have been back and forth to vulcan getting that bolted on, timed, and working on starting it, hopefully flying will eat into the summer project time
Nice work Ryan !!it has been done for about a week now, just removed it from the mold today, here is an update
a little bit every night, sand, drywall mud, add foam to the bottom....rinse and repeat...8 cans of spray foam an a whole bunch of drywall mud later..
View attachment 63161
getting the foam built up on the bottom has been a slow process, one layer per night, but finally enough is on there to carve some shape to it and start adding the drywall mud
View attachment 63162View attachment 63163
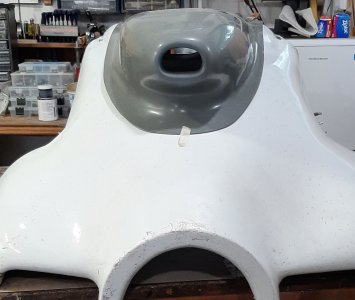
spray adhesive, cellophane and Vaseline as a bit of a release and its ready for some glass
View attachment 63164View attachment 63166
the remnants of the mold, and the cowling pieces baking in the sun, 4 layers of cloth on top and bottom, it will need some strand matt on the inside, they are still quite flimsy and thin...this will probably be on hold for a while, the prop for the other plane came in so i have been back and forth to vulcan getting that bolted on, timed, and working on starting it, hopefully flying will eat into the summer project time
View attachment 63167View attachment 63168
I wish you were around when I was developing ‘aluminum moulds’ for extruded HDPE pipe.
*
You are going to find a lot of interest from the Home-Built aviation enthusiasts.
Might be a little work on the side for you ?
Coming along! I was going to suggest some initial bulkhead / former templates to help you with 'screeding' the filler finish contouring but you were well past that stage. The former grid also helps contain the filler material by kind of compartmentalizing. But looks like you have the Michelangelo eye to carve from the solid!
Depending on how much space you have have (need) between inside of cowl & engine components there are way to add stiffness & strength but at a lower weight expense. You can bond thin strips of foam designed for this purpose & then a thinner layer of reinforcing fabric over that. In section view, it makes what is the 'I' in I-beam whose sole purpose is to separate the inner/outer stress members at a distance. The more distance, the stiffer it becomes. Some foams are pre-scored so they conform to curves & even 3D surfaces to a degree. The foam needs to be compatible with the resin system. It typically comes in a range of densities but I think starts around 2 PCF. There are other products like honeycomb cells, but special techniques to apply & spendy. Another is carbon fiber tow or uni. You can do the layup orientated equivalent to bulkhead hoops. Or even do a criss-cross grid if you want torsional stiffness. One downside to this (depending on the resin & layup thickness) is that over time, cycles of inside heat & outside cold can start to show 'imprint' of the reinforcing strips.
Depending on how much space you have have (need) between inside of cowl & engine components there are way to add stiffness & strength but at a lower weight expense. You can bond thin strips of foam designed for this purpose & then a thinner layer of reinforcing fabric over that. In section view, it makes what is the 'I' in I-beam whose sole purpose is to separate the inner/outer stress members at a distance. The more distance, the stiffer it becomes. Some foams are pre-scored so they conform to curves & even 3D surfaces to a degree. The foam needs to be compatible with the resin system. It typically comes in a range of densities but I think starts around 2 PCF. There are other products like honeycomb cells, but special techniques to apply & spendy. Another is carbon fiber tow or uni. You can do the layup orientated equivalent to bulkhead hoops. Or even do a criss-cross grid if you want torsional stiffness. One downside to this (depending on the resin & layup thickness) is that over time, cycles of inside heat & outside cold can start to show 'imprint' of the reinforcing strips.
Last edited: