• Scam Alert. Members are reminded to NOT send money to buy anything. Don't buy things remote and have it shipped - go get it yourself, pay in person, and take your equipment with you. Scammers have burned people on this forum. Urgency, secrecy, excuses, selling for friend, newish members, FUD, are RED FLAGS. A video conference call is not adequate assurance. Face to face interactions are required. Please report suspicions to the forum admins. Stay Safe - anyone can get scammed.

Xyphota's bicycle related projects

Xyphota

Ultra Member
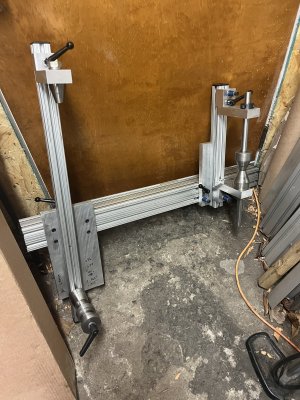
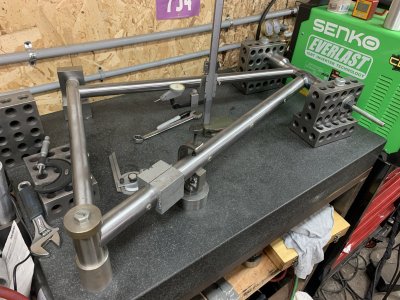
Inspired by @David_R8 's popular shop thread, and especially @eotrfish's gorgeous fly reels thread, this thread will contain mostly bicycle related projects. Over the last few months, most of my shop time has been spent fabricating up jigs and fixtures that will aid in the fabrication of a bicycle frame. I know there are a few members on this site that have dabbled in bicycle framebuilding before, so I look forward to their feedback and constructive criticism. :) I myself worked as a bicycle technician in the biggest bicycle shop in Canada for ~10 years, full time in the summers, and part time during the rest of the school year.

My first frame is going to be a straight rip-off (no shame) of this bike: https://ebscycle.com/vokka/
Every serious bike frame manufacturer will provide most of the geometry of their frames to potential customers for sizing reasons, and also to give the more savvy cyclist an idea of what the bike will ride like.

To start, I am using a bicycle specific CAD program called... you guessed it -- BikeCAD! This program is primarily intended for use by framebuilders constructing bicycles out of tubing. You can very quickly put in the geometry of the bike you want to build and spit out a drawing that will provide all the information you need to get started. The drawing I will be referencing is below. One might be quick to point out that there is a fair amount of information missing, but that will be addressed in the near future.

1679514512949.webp
 
Interested to see your fixtures.

I made my own frame fixture a year or so ago. The rear triangle extension hasn’t happened yet but it will one day I think. It’s not unlike the Cobra Framebuilding design. 80/20 and mic-6 plate. Ended up within .005 at all the fixture points.
 

Attachments

  • 5A0C8FC0-A198-4F2F-8E9C-0E8F278EB1D1.jpeg
    5A0C8FC0-A198-4F2F-8E9C-0E8F278EB1D1.jpeg
    641.4 KB · Views: 16
Last edited:
This should be good. I loved 44 bikes thread over on Garage journal even though I only have a mild interest in bikes (I prefer ones that don't have pedals). I have a HUGE interest in machining, and all the custom fixtures and such that go into a frame build.
 
You may be disappointed by how simple the front triangle fixturing is haha. They are the Alex Meade flat plate fixturing tools. I bought them 2 years ago second hand before I purchased my mill and lathe, and if I had known I was going to end up purchasing a mill before starting my first frame I would not have bought them and just made them instead. In fact I'm still debating on just replicating them and selling the Alex Meade branded ones.

This framebuilding method uses a 1:1 printout of the frame drawing, and using a right angle and a height gauge, you fixture the frame overtop of it. None of the pictures below show any of the fixturing bits yet.

For those who are unfamiliar with bicycle framebuilding, most of the tubing you could use is available as relatively cheap, straight gauge chromoly tubing. I'm plunging straight into the deep end and will be using 'bicycle-specific' tubing, which just means that most of the tubing is butted (thinner wall at the center of the tubes, thicker wall near the welds), and has some other herbs and spices thrown into the chromoly alloy. My frame will be mostly Reynolds 631 for the front triangle and Dedaccai Zero for the rear triangle.

I'm starting with the seat tube. The seat tube I purchased is actually not technically supposed to be cut as short as I am planning on. Ideally you pick an available seat tube that only needs to be trimmed on the bottom end, leaving the seatpost side of the tubing uncut. Unfortunately in my case, if I only removed material off the bottom, I'd basically be removing the entire butted section and then be left welding much too thin tubing to the bottom bracket shell. Fortunately, the upper butt is pretty long and will still extend atleast an inch below the weld from the top-tube and seat-stays joints, and almost 3 inches under the top face after it is trimmed. If the top butt is too short, then it would be prone to cracking from the seatpost.
1679614901550.png

You may be wondering how one measures a butt... Well with a butt checker of course! I put this together with some cut offs and an old beat-up dial indicator I got for free from some other second-hand purchase. This is not really meant to be a precision measuring tool, it is just used for marking out the transitions of where the wall thickness begins to taper in the butted tubing.
1679616037747.png
1679616066736.png

After marking up the butts, I can put the tube into the main fixture I made for framebuilding, which is just a configurable tube mitering jig. In this case the seat tube just has a single 90-degree miter. After the first miter, the tube is flipped around and lined up with a dummy tube section that matches the first miter diameter, using the center of the first miter as the reference. Because I also cut the top of my seat tube, I used this to mill off the end to the correct length. Normally the seattube would be uncut, and I could just reference the top face to make the miter.

1679616537362.png
1679616709376.png
1679616740974.png

The seat tube also needs some holes for the water bottle bosses, and eventually needs to be slit for the seat post clamp. I also mitered up the down tube, and after drilling the holes I cleaned up the tubes to braze in the water bottle bosses. This is my very first attempt at brazing anything as thin as bicycle tubing, and I'll be honest it did not go so well haha. Lets just say a much smaller tip for my oxy-acetylene torch as already been ordered.

1679616951112.png1679616976033.png1679617010136.png

I forgot to take a picture before cleaning off the charred flux LOL.
This one had the most consistent fillet of the four.
1679617196968.png
 
You may be disappointed by how simple the front triangle fixturing is haha. They are the Alex Meade flat plate fixturing tools.

I built off my plate for a while and then I had a jig that I bought and used for a frame of two but really didn’t like it much. Went back to using the plate until I got around to building my own.
 

Attachments

  • CF66BB45-6ECD-4110-B46F-25674F7EE7F4.jpeg
    CF66BB45-6ECD-4110-B46F-25674F7EE7F4.jpeg
    507 KB · Views: 13
Cool stuff, following along.
I quite don't understand rotary table & plate fixture. Do you rotate the entire assembly to make coping angle or something?


1679631931373.webp
 
Yup, thats right! The zero point on the scale is at the center of the rotation on the rotary table, so as long as the hole saw cutting axis coincides with the rotary table axis, the only dimensions needed to miter the tube is the center to center distance of the miters on opposite ends of the tube and the hole saw diameter.
 
After the braze-on adventures, I welded the seat tube to the bottom bracket. I spent about 2 hours of tacking and retacking trying to get it bang on. After deciding the tacks were sufficient, it was removed from the jig (basically what is in the first picture below, just two tube supports instead of one) and an expanding heatsink was installed into the bottom bracket shell and welded all the way around. I did have to cold-work it a bit post weld, but I ended up getting the top of the seat-tube centered relative to the bottom bracket within 0.005", although my measuring method probably had a +-0.010" error so who knows LOL.

From here the rest of the seattube+bb weldment is reinstalled into the jig, and then using a right angle, it is lined up over top of the drawing.
MicrosoftTeams-image (14).jpg

The head tube is lined up in the same fashion.
MicrosoftTeams-image (17).jpg

The top tube and down tube can be finished up for mitering. The picture below is of the mitering jig making an angled cut of 16.2 degrees
1680108314480.png

And with all the tubes done, all the tubes get a light sanding with 320 grit in the weld bead areas, cleaned with acetone, positioned and then everything is tacked together.
MicrosoftTeams-image (16).jpg
 
After the braze-on adventures, I welded the seat tube to the bottom bracket. I spent about 2 hours of tacking and retacking trying to get it bang on. After deciding the tacks were sufficient, it was removed from the jig (basically what is in the first picture below, just two tube supports instead of one) and an expanding heatsink was installed into the bottom bracket shell and welded all the way around. I did have to cold-work it a bit post weld, but I ended up getting the top of the seat-tube centered relative to the bottom bracket within 0.005", although my measuring method probably had a +-0.010" error so who knows LOL.

From here the rest of the seattube+bb weldment is reinstalled into the jig, and then using a right angle, it is lined up over top of the drawing.
View attachment 32904

The head tube is lined up in the same fashion.
View attachment 32905

The top tube and down tube can be finished up for mitering. The picture below is of the mitering jig making an angled cut of 16.2 degrees
View attachment 32903

And with those done, All the tubes are positioned and then everything is tacked together.
View attachment 32906
Looks fantastic!
 
Looking good. If I may ask, where do you buy the tubing? I have a mild interest in building a custom gravel bike and want to see how expensive it is, so I can squash those dreams.
 
You can buy plain jane chromoly tubing from Aircraft Spruce Canada. All my practice welding tubing is from them. I can't find anywhere else that stocks 0.028" and 0.035 tubing.

-Front triangle and fork blades are from TorchandFile
-Rear Triangle from BikeFabSupply
-Dropouts, fork steerer, a few tools and braze-ons from ParagonMachineWorks
-Other braze-ons, brazing rod, and flux from FrameBuilderSupply

There are a few other places for titanium and aluminum tubing. I haven't done any tallying yet, but you'll probably be into your first frame for $500-$800 + tooling, and then future frames will probably be in the $300 range. I've probably spent an extra $150 on shipping that would have been avoided if I planned a bit better LOL.
 
Right now Nova Cycle supply is liquidating, 60% off all stock. Looks like the remaining stuff is limited but still some useful stuff. I got a couple sets of aluminum tubes for like $70/set a couple weeks ago.

Marinoni in Montreal used to sell from their stock, anyone could call them up and get materials from them, only catch is that was limited to what they used for their production bikes. They don’t do that any more so the only North American sources are in the US now. Bike Fab Supply is quite good.

For a steel frame (no fork) you should be able to get all the materials for <$300. If you have machines and time tooling isn’t a big expense. For the most part tooling is just a time saver, you can live without most of it.
 
I should also add, there are a bunch of finishing tools that one would not expect to buy but to get a capable local bike shop to do for you, such as facing and reaming headtube, seattube, bottom bracket, etc. I have a good relationship with the shop I worked at so I’ll get access to these for free or perhaps a case of beer
 
Thanks. That's actually not too bad. I really wish you would have said it was more expensive lol.

I know the expensive parts are all the rest of the components, but still, that's not too bad, to build exactly what you want.
 
I work with a guy that has a $7500 Ti bike. It's beautiful, and insanely light. He has a few very nice high dollar bikes, but then again he's on them every day, 365. I have no business owning anything like that lol
 
Last edited:
Back
Top