• Spring 2024 meetup in Calgary - date Saturday, April 20/2024. discussion Please RSVP Here to confirm and get your invitation and the location details. RSVP NOW so organizers can plan to get sufficient food etc. It's Tomorrow Saturday! you can still RSVP until I stop checking my phone tomorrow More info and agenda
  • We are having email/registration problems again. Diagnosis is underway. New users sorry if you are having trouble getting registered. We are exploring different options to get registered. Contact the forum via another member or on facebook if you're stuck. Update -> we think it is fixed. Let us know if not.
  • Spring meet up in Ontario, April 6/2024. NEW LOCATION See Post #31 Discussion AND THE NEW LOCATION

Welding carts & compressed gases

ShawnR

Ultra Member
Premium Member
Time for show and tell kids. Now that I want to consolidate welders, wondering what it is that I don't know (lots, but....)

I have seen some photos on here of custom welding carts holding welders or welding plasma units. Anyone up for sharing?

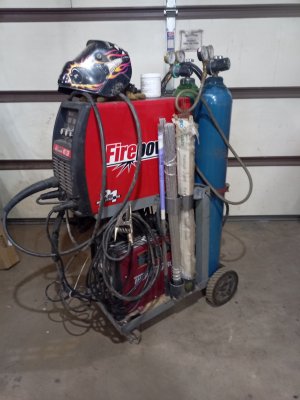
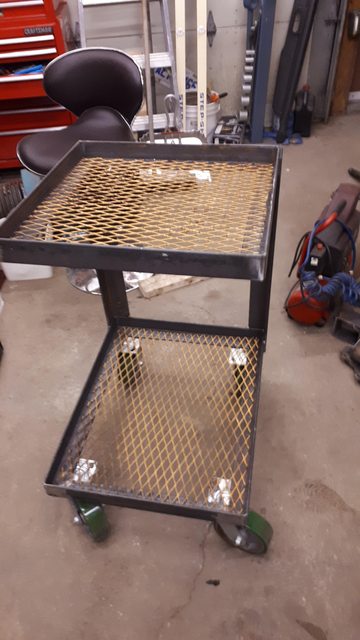
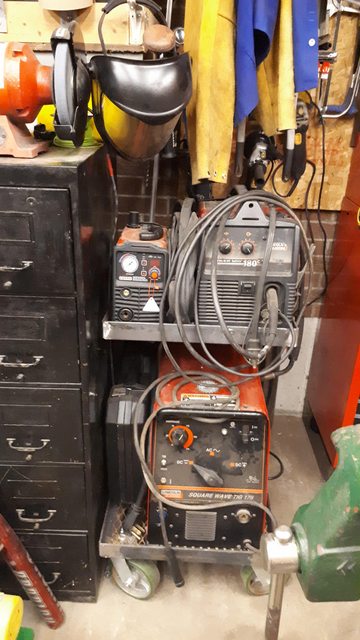
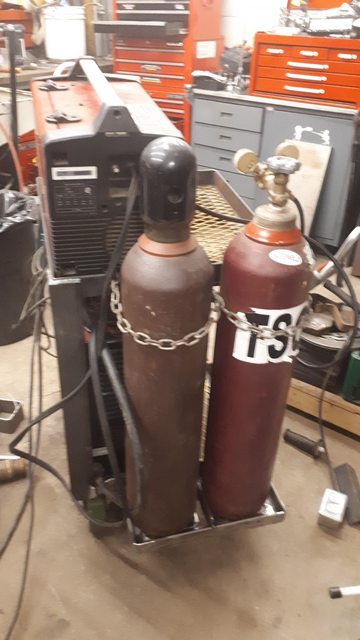
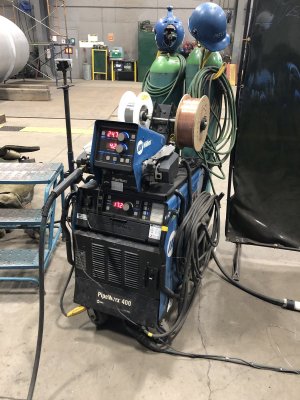
I am thinking angle iron for the corners (most of it I guess) but 1" square would do a nice job too. I am a little concerned about tipping over but also maintaining a small foot print. I think the casters slightly outside of the frame helps with this and does not add much to the square area. Two bottles on the back, one for Mig and one for Tig. Rod storage, accessories....geez, as I type, it is getting more complicated! Show what you did that you like and maybe don't like...?
 
Last edited:

ShawnR

Ultra Member
Premium Member
Thanks @David_R8 Nice job! Did you put the larger welder on top for easier access to the controls? My OCD would have me putting it on the bottom, for that balance, pyramid/stable look but your build makes a whole lot more sense from a user perspective. I think that will be my situation too as the Mig 180 does not have much on the front either. But I need to remember to access the side door for roll changes.
 

DavidR8

Scrap maker
Administrator
Moderator
Premium Member
Thanks @David_R8 Nice job! Did you put the larger welder on top for easier access to the controls? My OCD would have me putting it on the bottom, for that balance, pyramid/stable look but your build makes a whole lot more sense from a user perspective. I think that will be my situation too as the Mig 180 does not have much on the front either. But I need to remember to access the side door for roll changes.
You got it, it's on the top for ease of access to the controls. It's pretty much at eye level when I'm sitting at my welding table.
I need to figure out how to get my plasma cutter on the cart now. The MIG faces forward because the cables stick out so much,
The best feature are the custom made, tank belts. They were made by a member who is local to me. He is a kick-butt fabricator with a to-die-for shop.
 

6.5 Fan

Ultra Member
Premium Member
My mig welder is a large Miller unit on it's own set of wheels, to damn heavy to add anything else to it. My other welder is a large AC/DC gas driven rig that is getting a trailer for it to travel about the farm as needed. I may build something for a plasma cutter that i'm planning on purchasing this spring, haven't made up my mind on which one yet.
 

CalgaryPT

Ultra Member
Vendor
Premium Member
My two cents...I've built a few welding carts in my day although my last couple of machines came with running gear. Some lessons I learned from copying big blue and big red:

1) Consider lowering your tank shelf. I know it is extra design and fab work, but it is worth it. As you get older picking up those tanks is dangerous and no fun for your back. The lower shelf makes it much easier (see pic). Even with the lower shelves on my MIG and TIG, I still had to downsize my tanks to "K's" as I got older so I could handle them without an assistant. It's no biggie when you are in your 20's or even 30's, but those T tanks hurt at 50 years old. The lower shelf means you can just tip them on and off easily because they are only an inch off the ground. The lip on the shelf serves two purposes; it strengthens the sheet metal and catches stuff that falls (like nuts, bolts, screws, etc.), from falling off and getting into the wheels (see #2 below).

2) Consider much larger rear wheels. In a shop environment larger rear wheels means the inevitable rocks, nuts, bolts, etc., that fall on the floor and get trapped under the wheels are easier to navigate. Front wheels with swivels can just be maneuvered around small obstacles, but fixed back ones can get hung up. You don't want to be tugging on anything that big or top heavy if this happens.

3) Hangers for cords, etc., are great, but be careful not to add them in such a way that the cart is too wide or ungainly to fit where you intend to put it. A great option is to install nutserts/rivnuts or PlusNuts in various locations in the tubing or angle iron you build it from. This way you can paint/powder coat the cart and it looks nice, and later bolt on hangers for stingers, ground cables, etc., if needed without having to sand off your paint, weld on a hanger, and re-paint.

4) Do paint it. Unlike a welding table where you want electrical conductivity, there is always a risk of shorting things out on a welding cart. Especially if you build it to also hold a plasma cutter at some point (which many people do), your don't want a clear path to ground through a compressed gas tank. Paint offers some protection.

Happy cart building. It's a great welding project.

1644541102896.png
 
Last edited:

Dan Dubeau

Ultra Member
Here's my stab at the problem. I built the main frame first, then added the bottle holder a few months later (common theme in my projects....) 2x2x1/4" angle
QPih43bl.jpg

bA0EVK5l.jpg

FdbixDyl.jpg

Maybe one day I'll get around to finishing the cord hooks, and painting it.
 

LRSbm146

Member
Holy smokes what are you guys building? That’s some serious welding equipment.
At work we run Miller only and the machines are on wheels but they’re terrible to move. The machine, 2 bottles, dual spool, and 200’ of cable is way to much.
At home my machine is stationary and have enough reach to weld at the neighbors house. But I only use tig and stick.
 

Attachments

  • 9D3F9F13-9969-4ABD-A20F-D3D0D2984AF4.jpeg
    9D3F9F13-9969-4ABD-A20F-D3D0D2984AF4.jpeg
    467.5 KB · Views: 20
  • FC4D9D25-B774-492F-9AE3-FDDAC3BB83F8.jpeg
    FC4D9D25-B774-492F-9AE3-FDDAC3BB83F8.jpeg
    498 KB · Views: 21
I went for go big or go home. The cable holders are square tubing that fits into another piece of square tube they can be removed or turned also.

View attachment 20926
View attachment 20927

I‘m not sure how you all transport your bottles to get filled but this is how I do it.

View attachment 20928
Some advice..... transport it resting (strapped) against the front of the bed so if you crash (head on is the worse) it doesn't break free and become a high pressure launched bomb as those straps won't hold it.

Second have it covered in case you get stopped, there are laws regarding tank transportation, and you don't want to find out its wrong $$$$, even if you've secured it extremely well.
 

Brent H

Ultra Member
Hey @ShawnR : a bit of a twist on the welding “cart” so to speak. I have everything in the table.
0D647BC0-9980-46EA-8C9D-682FE722D239.jpeg
Welding gas is in a quick connect so you can remove it and the bottles are then stored away from the welding and secured to the wall.

4E0CD6CA-F5A3-437D-A5DC-46B7D5D1FD93.jpeg

There is a slide out bin that keeps the crap off the welding stuff. Still requires some cleaning due to grinding dust ext.
58100958-45DE-4438-A8AC-A16D9E776091.jpeg 34F25ED0-2DE9-414D-8FCB-4119918B4AA0.jpeg

Bottles on the wall.
53F81EDC-4FFE-4DB3-80A6-31BD78CA475E.jpeg

The whole table is on castors and is easy to move. In good weather I can push it outside. The vice and bandsaw stand can pullout and you can insert some pipes for plasma or torch cutting. Works great for my application and I don’t have a welding cart and a welding bench. I have enough stick cable to run out to the driveway for fixing things a bit farther away. Welder is grounded to the bench (you can see in pic 1) and there is a connection (yellow cap) where you can extend the ground.

You have more machines but it might be possible to arrange them with some tool boxes and have a kick a$$ bench/welding cart. With the quick connect gas and remote bottles it cleans up fast and you can then use the table for other things - like painting a bell housing - LOL.
 

ShawnR

Ultra Member
Premium Member
@Brent H that is indeed a nice system! I have a welding bench which is kind of my everything bench, and then a cutting table that tucks under another bench. I think I want to stick to relatively the same foot print that the Lincoln 180 takes up, so building up...;)
 

Dan Dubeau

Ultra Member
I thought long and hard about building my welding table like that Brent (nice job!), but at the end of the day, I do a lot of welding outside, and just prefer to wheel the cart to either the back door, or front door and work that way. I will end up building out the base of my welding table for storage at some point though. It was a close decision though. In certain shops, depending on the work you do it would be a good way to go. My space is tight enough as it is to just wheel the cart around, I don't have enough room to move the whole table lol

For stick welding I have about 50' of leads, I just leave it there.
 

Dan Dubeau

Ultra Member
I do mine a similar way except I built a cradle out of 2x4s that slots into my box cross ways. I snap a pic of it tomorrow. It keeps jerry cans , and my milk crate of straps from sliding around too.
 

Six O Two

(Marco)
This is what I'm using these days. I was using those flimsy carts that you always see as part of the entry level kits with the angled top. My tig machine didn't even fit on it, so I screwed a larger plywood platform on it, but once I got a mig machine, I started scheming on how to properly store the welders. I'd seen ZT Fab's welding cart kits and seeing as I had an extra tool cabinet, thought I'd try my hand at fabbing up my own (because I'm cheap, and those ZT Fab ones are spendy). The frame is mostly 1" square tube

welding cart 20210307.jpg

welding cart 20210307_1.jpg welding cart 20210307_2.jpg

As part of the build, I also build myself a sheet metal bending brake to make the additional upper two drawers, top, and bottle tray. Pretty happy with how the drawers turned out, even if they're not 100% identical. Lots of room for consumables, pedals, torches, and all that in the tool chest. I need to modify it to add tig rod storage though.
 

phaxtris

(Ryan)
Premium Member
Premium Member
Here is my mess, it's not pretty but it only cost me those two front casters, everything else was scraps/salvaged, it's ugly but it works
 

Attachments

  • IMG_20220211_141802_745.jpg
    IMG_20220211_141802_745.jpg
    329.4 KB · Views: 20
Top