Agree with John, there should be a large block of something relatively solid, at the base of the post vise, to absorb the energy of the strikes it was designed to take!Do you put a block of concrete under the leg of that vise? Is that to avoid having a large massive workbench to deal with pounding on something in the vise?
-
Scam Alert. Members are reminded to NOT send money to buy anything. Don't buy things remote and have it shipped - go get it yourself, pay in person, and take your equipment with you. Scammers have burned people on this forum. Urgency, secrecy, excuses, selling for friend, newish members, FUD, are RED FLAGS. A video conference call is not adequate assurance. Face to face interactions are required. Please report suspicions to the forum admins. Stay Safe - anyone can get scammed.
-
Several Regions have held meetups already, but others are being planned or are evaluating the interest. The Calgary Area Meetup is set for Saturday July 12th at 10am. The signup thread is here! Arbutus has also explored interest in a Fraser Valley meetup but it seems members either missed his thread or had other plans. Let him know if you are interested in a meetup later in the year by posting here! Slowpoke is trying to pull together an Ottawa area meetup later this summer. No date has been selected yet, so let him know if you are interested here! We are not aware of any other meetups being planned this year. If you are interested in doing something in your area, let everyone know and make it happen! Meetups are a great way to make new machining friends and get hands on help in your area. Don’t be shy, sign up and come, or plan your own meetup!
You are using an out of date browser. It may not display this or other websites correctly.
You should upgrade or use an alternative browser.
You should upgrade or use an alternative browser.
Welcome to my Smithy
- Thread starter Dan Dubeau
- Start date
Dan Dubeau
Ultra Member
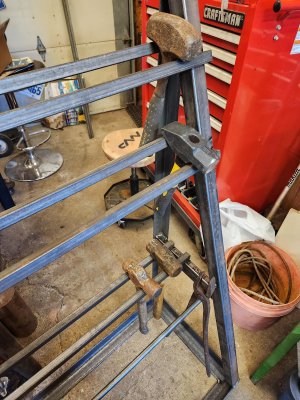
The leg is to direct the force from pounding directly down into the floor. They usually sit in a block of steel, wood, part of the leg of the bench, or in the floor directly. I'm going to make something similar to this, so it will bear onto the stand itself.

a smile
Lifelong hobby - cold iron
Nice...... but what's he building in there?
I like this kind of raw production article. He made me understand the true state of the common lovers on the other side of the distant ocean!Today didn't start as early as yesterday, but I reached my goal. Chimney done*, forge operational before dinner.
Started off just cleaning and removing junk. 2 garbage bags full, and a trailer load of wood for the burn pile.
View attachment 39245
Then I played around with the forge in different positions, but settled on my original one from yesterday lol.
I removed the section of shelf that ran behind, and marked the opening in the roof, then jigsawed it out.
View attachment 39239
Hoisted the chimney in place and just set it down on top of the hood to get an idea of how I'm going to mount it.
View attachment 39243View attachment 39251
It's really tough to work with a building that is SOOOOO out of level. That stack is perfectly plumb right there......It's out about 4" over 24" sloped to the back. The NE corner is also sitting on top of the roots from the big white pine and even worse. Remember when I said this wasn't my first choice of locations....but oh well, I can compensate......
It came with a lower support that would sit between joists, but I didn't feel like building framework to hold it like that, so I went back in the shop, and had a quick peek of what was laying around and came up with this.
View attachment 39249
View attachment 39247
View attachment 39257
View attachment 39258
View attachment 39256
The ratchet strap is temporary until I can make a steel one. But it's pretty sturdy mounted this way. Debating if I need more support. Once I get the flashing buttoned up it should be pretty constrained, but I can always add some more strapping from the inside, or a brace to the ridge outside.
I tossed the roof flashing collar on it, and the cap, but that's all I'm doing today on it outside.
View attachment 39255
I had full intentions of finishing the flashing and making it water tight today, but 2 things stopped me. That roof wont hold me.... and b, I need some caulking. Next weekend I'm going to remove that lean-to on the rh side, so I can more easily access this from a ladder. That roof tin is so full of rust pinholes I'd go right through it. Who'da thunk it that 4" of decomposing leaves and pine needles for a few decades would compromise the structural integrity of roofing sheet metal lol. Anyway, that flashing is just sitting up there looking pretty until next weekend. If it rains it'll leak, oh well.
The pipe to join the hood to the chimney is just 2 sections of 7" duct that I joined together at the seam, then overlapped and screwed together for a slip fit up the chimney. I imagine there will be some ground movement in here during the winter/spring, so I didn't want a rigid joint. Not code I know, but If anyone see any glaring issues with it, I'm all ears, and would love to hear it.
View attachment 39252
Looks wonky because it is. Eeverything is so out of level, but that's a problem for another day.....It was now time to build a fire and test it out.
View attachment 39242
View attachment 39248
Success. It draws pretty good, for being as short as it is. I think I read that it should be 2' higher than any obstruction within 10'
View attachment 39246
I'd need at least another 18" section to meet that, as it only sticks up about 4-6" from the ridge, and no doubt would draw a lot better with more stack height, but as is, it works pretty good. I didn't load it up with green coal, but from a cold fire it started drawing smoke right away, and got better as the fire built. I think it will be fine. It draws better than my basement woodstove..... lol. It was also really gusty outside today, so there were a few times the wind would whip in and blow the smoke around, but then it would start going right back up the hood again.
I still have to drag my anvil in here, torches, and a few other tools I don't want in the garage. Will be nice to start making some hammer and tong racks instead of them just hanging around in piles, and drawers in the garage. I also need to redo the doors, and get them on the track that's hanging around in the pics there. With the snow we get here there's no way I'll be able to swing that door open and get in there in the winter.
*I put the asterisk at the start because although it's "done" for now, it's not done 100%. Still have to do the flashing, install the storm collar, and secure the stack a bit better, maybe an external brace to the ridge beam? but it's 90% and "functions", and I'm pretty satisfied with getting it this far.
May I ask you a few questions? 1. Can I use my neighbor's cottage for free? 2. From the picture you sent, it seems that the cabin is far away from the residents. I think it should be in the remote mountain forest. How far is it from your home? 3. Can the cottage be extended without an application? 4. If it can be expanded, can its height be increased and will there be a final area limit?
To be a blacksmith is quite a few men's dream! If you can find a suitable site, I will add an industrial beating machine, which can be easier to complete the forging work.
Thank you for your sharing, I hope I can continue to watch your progress!
KeeponDragon
no problems... just challenges
my industrial beating machine... it doesn't quite move fast enough to really work damascus...yet...but it does a beauty job othewise...
Dan Dubeau
Ultra Member
my industrial beating machine... it doesn't quite move fast enough to really work damascus...yet...but it does a beauty job othewise...
Nice! A tire hammer, and forging press are two things I would like to build eventually. But it will have to wait for a while, I want to get back on my sawmill build before diving into the smithing tools anymore.
But it will have to wait for a while, I want to get back on my sawmill build before diving into the smithing tools anymore.
You are building a saw mill? Wow!
Please tell us more!
I think about a home made sawmill every 3 days. I'm surrounded by old growth hardwoods - Walnut, hickory, black cherry, oak, maple, ash, etc. There is always something dying and needing a sawmill. LOVE to see what you are planning and doing!
You are building a saw mill? Wow!
Please tell us more!
I think about a home made sawmill every 3 days. I'm surrounded by old growth hardwoods - Walnut, hickory, black cherry, oak, maple, ash, etc. There is always something dying and needing a sawmill. LOVE to see what you are planning and doing!
DIY Bandsawmill build.
This is a project I started back in the fall/winter of 2021, but have recently got going on it again, so I figured I'd start a build thread here. Cliff notes... I built the base frame fall 2021, and was waiting to figure out the carriage until I had a powerplant sorted. Last year was crazy...
Dan Dubeau
Ultra Member
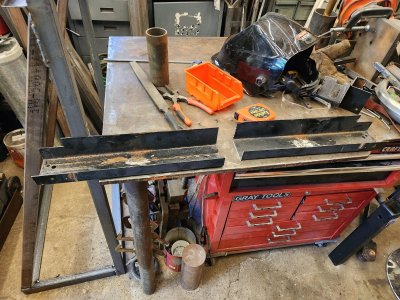
Todays project was to build a hammer and tong rack. Didn't want something too big, but didn't want to to run out of space either. Design and dimensions were driven primarily from the stock I had on hand.
I started by laying out some material, and some hammers to get an idea where I was going.


Satisfied I had a design that was workable, and enough material to build it I started cutting and welding. The base frame took shape pretty quick, but progress was interrupted when My Dad stopped in for a quick visit.

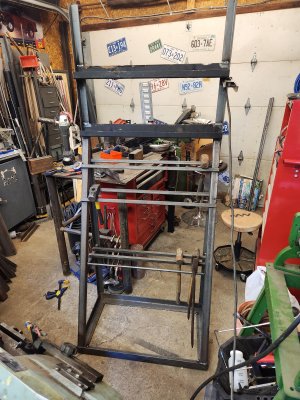
Once he left, I got back to it, and finished it out relatively quickly. I used the side rails from a treadmill carcass for the shelfs. Wife poked her head out when I was cutting it up, and I proudly told her I was finally using the last of that treadmill. She barked back, well I guess you better get another one again then. Not sure if sarcasm, or not, but she's probably right......

There was enough material in the rails to make 3 shelves, but I had to splice the offcuts together to finish the 3rd shelf.

Then I cut some 3/4" square for the hammer racks, and played around with their placement until I was happy and welded it all up solid.


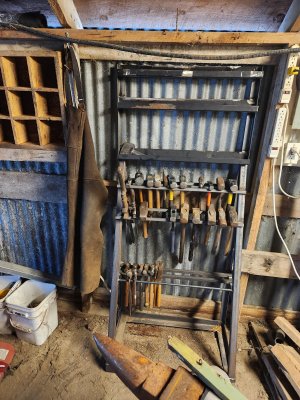
Once done, I dragged it out to the shed, and started filling it.

Fits the space great, and should give me some room for my most frequently used tools with some room to grow into. I'm going to cut some wood blocks for the shelves, and drill holes for punch storage. There are some things I want to add to it, but I want to use it for a while so I get a better idea of what I want and where I want it. I'm also going to add some tong storage on the forge itself, so I only have the one rod for tongs on this.
I don't have very many tongs yet anyway. Still adding to the collection. First couple projects are going to be all tooling. Punches, drifts, and some tongs. Both from scratch, and some "quick" tongs I bought on amazon that need finishing. With stuff all setup ready to use now, I can squeeze a quick forging session into some weeknights after work now. Hopefully.....
I started by laying out some material, and some hammers to get an idea where I was going.
Satisfied I had a design that was workable, and enough material to build it I started cutting and welding. The base frame took shape pretty quick, but progress was interrupted when My Dad stopped in for a quick visit.
Once he left, I got back to it, and finished it out relatively quickly. I used the side rails from a treadmill carcass for the shelfs. Wife poked her head out when I was cutting it up, and I proudly told her I was finally using the last of that treadmill. She barked back, well I guess you better get another one again then. Not sure if sarcasm, or not, but she's probably right......
There was enough material in the rails to make 3 shelves, but I had to splice the offcuts together to finish the 3rd shelf.
Then I cut some 3/4" square for the hammer racks, and played around with their placement until I was happy and welded it all up solid.
Once done, I dragged it out to the shed, and started filling it.
Fits the space great, and should give me some room for my most frequently used tools with some room to grow into. I'm going to cut some wood blocks for the shelves, and drill holes for punch storage. There are some things I want to add to it, but I want to use it for a while so I get a better idea of what I want and where I want it. I'm also going to add some tong storage on the forge itself, so I only have the one rod for tongs on this.
I don't have very many tongs yet anyway. Still adding to the collection. First couple projects are going to be all tooling. Punches, drifts, and some tongs. Both from scratch, and some "quick" tongs I bought on amazon that need finishing. With stuff all setup ready to use now, I can squeeze a quick forging session into some weeknights after work now. Hopefully.....
Attachments

Dan Dubeau
Ultra Member
You are building a saw mill? Wow!
Please tell us more!
I think about a home made sawmill every 3 days. I'm surrounded by old growth hardwoods - Walnut, hickory, black cherry, oak, maple, ash, etc. There is always something dying and needing a sawmill. LOVE to see what you are planning and doing!
I have WAAAAAY too many projects on the go.......Only a couple more little ones, and I'm back on the sawmill for the winter. I NEED to mill lumber next year for a few things, so it's gotta get done this winter. Craig (thanks) linked my build thread above.

DIY Bandsawmill build.
This is a project I started back in the fall/winter of 2021, but have recently got going on it again, so I figured I'd start a build thread here. Cliff notes... I built the base frame fall 2021, and was waiting to figure out the carriage until I had a powerplant sorted. Last year was crazy...canadianhobbymetalworkers.com
Thanks Craig, I see I actually saw the chicken coup components of the thread but didn't realize then that he was making a saw mill.
Unfortunately, I see now there is too much welding involved for my salary grade. 🙁
Dan Dubeau
Ultra Member
Had a bit of time this afternoon, and got my crappy swinging door, converted to a crappy sliding door. Should be much better in the winter, and just in general.


I wish I had the energy for those kinds of projects. Very nicely done.
I wish I had the energy for those kinds of projects. Very nicely done.
I am convinced that it's a disease that is exponentially affected by years in the planet.
At my age, I fall asleep just thinking about a project like that.
I only need to rearrange my barn to make room for my two big tractors for winter. I think the snow will come first.......
I'm very jealous of @Dan Dubeau and @David_R8 and and and 's energy and ambition too. It's amazing really.
Dan Dubeau
Ultra Member
Thanks Fellas, truth is, I wish I had the energy too. I really have to force myself through a lot of things. Especially low dopamine tasks like this, so that I can get to the good stuff I want to do. It's a constant struggle to fight couch gravity, especially after long weeks at work, but it's a lot like exercise. The hardest part, for me anyway, is getting started. After that the motivation and energy to continue are a bit self perpetuating.
A lot of it is simply just filling in the "between time" to chip away at the little stuff that are often barrier projects to bigger, more fun things. Yesterdays door project was done while the girls were getting ready to go to my MIL's for her birthday dinner. They said they'd be 30 minutes. I knew they'd be at least over an hour 😉. And I figured the job would take at least 1.5. It was so conveniently timed, that by the the time the wife came out to bark at me to go, she got there just in time to help me lift the door in place to finish it off 😀.
A lot of it is simply just filling in the "between time" to chip away at the little stuff that are often barrier projects to bigger, more fun things. Yesterdays door project was done while the girls were getting ready to go to my MIL's for her birthday dinner. They said they'd be 30 minutes. I knew they'd be at least over an hour 😉. And I figured the job would take at least 1.5. It was so conveniently timed, that by the the time the wife came out to bark at me to go, she got there just in time to help me lift the door in place to finish it off 😀.
Dan Dubeau
Ultra Member
Right now is a perfect example. I should be out there finishing my post vise striking anvil like I want to, instead I'm sitting on the couch under a blanket with the laptop, and a coffee watching other people build stuff on youtube waiting for the Advil to kick in........
I also have to drag the sled up to the house to get it running, then get the snowblower running. Finish fixing the chute on my snowblower build for my kubota mower. Clean up a bunch more stuff before the snow comes, cut up some deadfall and do some trail maintenance......
One more coffee and I'll head out there.....The couch is winning this morning......
Dan Dubeau
Ultra Member
Yeah, I already wasted it 😀. The couch is still winning.....You have an extra hour today you know...... LOL!
Dan Dubeau
Ultra Member
Despite the couches early morning gravitational pull, I managed to break away and get a good afternoon of work in around here. I cleaned up a lot of outside stuff before winter. Did a last quick check of the bee hive, pulled my honey super and left one for them, then wrapped it (also ate some fresh comb mmmmm). Cleaned up some lingering stuff in the garage that needed to head out to the barn. Moved my Oxy/ac torched to the shed, and brought in my hydraulic press from the barn. I've been wanting it in the garage for a long time and moving the torches freed up room. Also chipped away at the smithy a bit, bringing out a bunch of duplicate tools from the garage, angle grinders, and making some punch racks for all the punches and chisels I've been collecting for a while. I'm pretty sure I got my 10k steps in today....


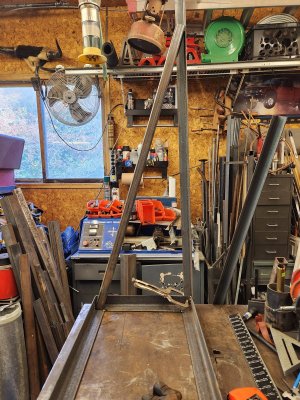
Also repaired a set of broken tongs, and started into my post vise striking anvil stand. Rough cut a new spring, and the fork tine for the anvil face.


Still rolling around design ideas in my head but I have 3 feet of remaining tine to cut up into 12" mini swage blocks too. I'd like to incorporate those into the vise stand too somehow. I'm low on space in there, and want things to have multiple uses. Thinking I'll make a frame that can sit on the anvil face and hold the swage blocks flat on top of it for backing, and a nest for using them on their side beside it. Storing them all below on the stand itself. If I get them cut up this week, I'll machine various shapes and pockets into them.
I wanted to go out and actually forge something tonight after dinner, but my Daughter has declared a game night and challenged us all to a game of Catan so I must destroy her (If I can, she's pretty good). 😀.
Also repaired a set of broken tongs, and started into my post vise striking anvil stand. Rough cut a new spring, and the fork tine for the anvil face.
Still rolling around design ideas in my head but I have 3 feet of remaining tine to cut up into 12" mini swage blocks too. I'd like to incorporate those into the vise stand too somehow. I'm low on space in there, and want things to have multiple uses. Thinking I'll make a frame that can sit on the anvil face and hold the swage blocks flat on top of it for backing, and a nest for using them on their side beside it. Storing them all below on the stand itself. If I get them cut up this week, I'll machine various shapes and pockets into them.
I wanted to go out and actually forge something tonight after dinner, but my Daughter has declared a game night and challenged us all to a game of Catan so I must destroy her (If I can, she's pretty good). 😀.