• Scam Alert. Members are reminded to NOT send money to buy anything. Don't buy things remote and have it shipped - go get it yourself, pay in person, and take your equipment with you. Scammers have burned people on this forum. Urgency, secrecy, excuses, selling for friend, newish members, FUD, are RED FLAGS. A video conference call is not adequate assurance. Face to face interactions are required. Please report suspicions to the forum admins. Stay Safe - anyone can get scammed.

Welcome to my Smithy

Dan Dubeau

Ultra Member
Well, having built a hard fuel forge, and a propane ribbon burner forge this year, it's about time I put together a proper smithy to set them up and use them...... It's a work in progress.......

Here are the links to my forge builds.
https://canadianhobbymetalworkers.com/threads/propane-ribbon-burner-forge-build.4728/
https://canadianhobbymetalworkers.com/threads/coal-forge-build.8106/

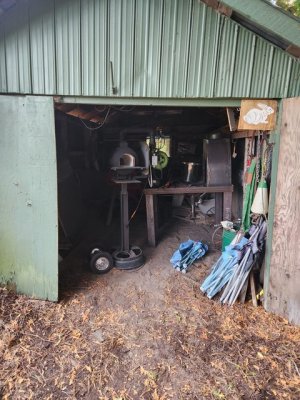
I've debated where to set this up all summer, There are a few outbuildings I could use and better locations, but with winter approaching and a goal to have them setup to use before the snow flies in danger of being missed I settled on a shed in the back/sideyard that a previous owners built years ago. It's not my first choice of locations here, but it's the path of least resistance right now. I fully intend to build a proper shop in the future (when i finish that sawmill project in the foreground....), but for now this will work out. Right now it's full of a bunch of random stuff from both me, and the previous owners, plus it's pretty overgrown, and has a 4" layer of decomposed pine straw and cedar leaf on the roof lol. Today's job was to start cleaning up around and in it.
sIrPXSzl.jpg
Here's a shot from the side showing what I started with.

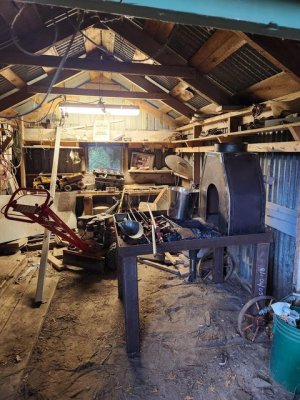
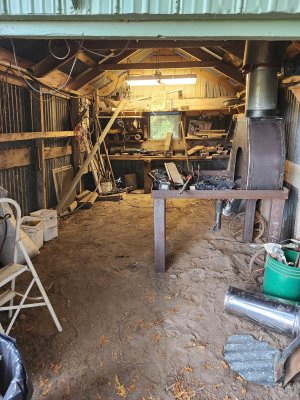
Here's some shots of the inside and some of the junk I started with.
QS85q7Tl.jpg
KFTF2I6l.jpg

Today started off as a tree cutting/trimming day and I was pretty much at it from 8:30 until about 5. I started off with the polesaw standing in the box of the sxs trimming back all the cedars along the side road all the way up to the neighbors (half km). Plus a few trees that needed to come down. That was a few hours worth, then she helped me chip them all up with her big chipper after lunch.
doOx8d5l.jpg
DPrRJCAl.jpg

I didn't get any pics of that, just when I started in the morning. But chipping finished around 3:00 then It was time to focus on the shed. I dropped a couple of the trees leaning over the shed. I'll drop that last cedar sometime, but it gets a pardon for now. Should get a nice post or two from that one.

riOLLAjl.jpg
Z5GrlLrl.jpg

It took 3 heaping trailer loads to clean it up, and I was left with this. I usually end up with a giant burn pile like this every fall after brush cleanup time. I wait until a nice snowfall with good ground cover for before lighting it up. I still have a bunch more trimming to do too. Gonna be a big one this year...
T0niTbcl.jpg

Then I shoveled off the roof. I don't know how long this has been accumulating, but we've been here for 13 years.....and the shed is probably about 25-30..... It was about 4-5" thick at spots, with some really good soil about 2" thick underneath that I'm going to feed back into the garden :D. A Snowshovel and blower made quick work of the east side, but the west side will need a broom to knock the packed wet dirt loose. Is there is a formula for soil load in the building code? :D There are 2 lean-to's that need some attention too, but not a big priority right now. Would be nice to fix them before winter, but my focus is on the inside now.
W9pYoRU.jpg
N0cGLAml.jpg
q7AzrJal.jpg

I'm surprised the metal is still in good shape. The fiberglass roofing on the lean-to's is garbage though. Obviously not designed to be used with an earthen roof system such as this :D.

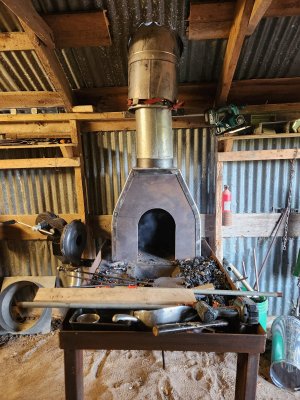
I removed the old windows and a few other low hanging fruit just before the dinner bell rang (I was actually late, and had to reheat my plate....), but I had to tuck the forge into it's new home for the first time to have a quick peek and see if I like it's position.
5zhdSO5l.jpg

also not sure where to put the propane forge either. Any suggestions or good layout ideas?
0REbpYRl.jpg

Not sure which side I prefer it on, but I'm thinking I'd rather stare out the front door into the backyard cranking the blower handle, than through that little window at the back. Plus where it is there, gives me lots of room for my anvil and other assorted tools at the back, and there is a serviceable workbench along the back wall as well. Tomorrow I'll do a bunch more cleanup in there and try it in different spot to better visualize workflow before I commit to cutting the roof for the chimney....

Speaking of, I scored a pretty good deal on this 10" stainless double wall 4' chimney that will be perfect for $120. Lucky find for sure. I'll have to fabricate some supports for it, but shouldn't be too bad of a project.
xyFxv6r.jpg

That's where I'm at as of now. Sitting on the couch, tired and enjoying a nice cold Guinness that I can barely lift up to my mouth lol. Pretty excited to finally have a spot to start setting up the smithing tools I've been accumulating over the years and actually start making stuff instead of just working on the shops, tools and shop related projects that have pretty much consumed all my free time this year. I'm so much more productive when things are setup ready to go, and I can just get to the task at hand. All the work in the garage shop has really paid off lately so its a great source of motivation to finish this one.
 
Last edited:
Today didn't start as early as yesterday, but I reached my goal. Chimney done*, forge operational before dinner.

Started off just cleaning and removing junk. 2 garbage bags full, and a trailer load of wood for the burn pile.
ecbgFWW.jpg

Then I played around with the forge in different positions, but settled on my original one from yesterday lol.

I removed the section of shelf that ran behind, and marked the opening in the roof, then jigsawed it out.
0hhXpVn.jpg
Hoisted the chimney in place and just set it down on top of the hood to get an idea of how I'm going to mount it.
8wLaTJG.jpgTNkwCDe.jpg

It's really tough to work with a building that is SOOOOO out of level. That stack is perfectly plumb right there......It's out about 4" over 24" sloped to the back. The NE corner is also sitting on top of the roots from the big white pine and even worse. Remember when I said this wasn't my first choice of locations....but oh well, I can compensate......

It came with a lower support that would sit between joists, but I didn't feel like building framework to hold it like that, so I went back in the shop, and had a quick peek of what was laying around and came up with this.
n8Ybr6L.jpg
Izi7dr3.jpg
mwgb2yv.jpg
Oa3gl2V.jpg
8pUuXyC.jpg

The ratchet strap is temporary until I can make a steel one. But it's pretty sturdy mounted this way. Debating if I need more support. Once I get the flashing buttoned up it should be pretty constrained, but I can always add some more strapping from the inside, or a brace to the ridge outside.

I tossed the roof flashing collar on it, and the cap, but that's all I'm doing today on it outside.
1ZDRQKP.jpg

I had full intentions of finishing the flashing and making it water tight today, but 2 things stopped me. That roof wont hold me.... and b, I need some caulking. Next weekend I'm going to remove that lean-to on the rh side, so I can more easily access this from a ladder. That roof tin is so full of rust pinholes I'd go right through it. Who'da thunk it that 4" of decomposing leaves and pine needles for a few decades would compromise the structural integrity of roofing sheet metal lol. Anyway, that flashing is just sitting up there looking pretty until next weekend. If it rains it'll leak, oh well.

The pipe to join the hood to the chimney is just 2 sections of 7" duct that I joined together at the seam, then overlapped and screwed together for a slip fit up the chimney. I imagine there will be some ground movement in here during the winter/spring, so I didn't want a rigid joint. Not code I know, but If anyone see any glaring issues with it, I'm all ears, and would love to hear it.
WTBQJaX.jpg

Looks wonky because it is. Eeverything is so out of level, but that's a problem for another day.....It was now time to build a fire and test it out.
6C6AzzO.jpg
loYOHpK.jpg

Success. It draws pretty good, for being as short as it is. I think I read that it should be 2' higher than any obstruction within 10'
HFID6XU.jpg

I'd need at least another 18" section to meet that, as it only sticks up about 4-6" from the ridge, and no doubt would draw a lot better with more stack height, but as is, it works pretty good. I didn't load it up with green coal, but from a cold fire it started drawing smoke right away, and got better as the fire built. I think it will be fine. It draws better than my basement woodstove..... lol. It was also really gusty outside today, so there were a few times the wind would whip in and blow the smoke around, but then it would start going right back up the hood again.

I still have to drag my anvil in here, torches, and a few other tools I don't want in the garage. Will be nice to start making some hammer and tong racks instead of them just hanging around in piles, and drawers in the garage. I also need to redo the doors, and get them on the track that's hanging around in the pics there. With the snow we get here there's no way I'll be able to swing that door open and get in there in the winter.

*I put the asterisk at the start because although it's "done" for now, it's not done 100%. Still have to do the flashing, install the storm collar, and secure the stack a bit better, maybe an external brace to the ridge beam? but it's 90% and "functions", and I'm pretty satisfied with getting it this far.
 

Attachments

  • PnmykDn.jpg
    PnmykDn.jpg
    465 KB · Views: 11
  • nMpiq9L.jpg
    nMpiq9L.jpg
    722.4 KB · Views: 10
  • 0REbpYRl.jpg
    0REbpYRl.jpg
    84.9 KB · Views: 9
  • 5zhdSO5l.jpg
    5zhdSO5l.jpg
    89 KB · Views: 11
  • dgW83hC.jpg
    dgW83hC.jpg
    815.4 KB · Views: 11
Looks good, one thing about having a forge is that you don't need any other form of heating for the shed.

In the first few pics, my eyes homed in on the old Tonka? trucks. lol
 
Looks good, one thing about having a forge is that you don't need any other form of heating for the shed.

In the first few pics, my eyes homed in on the old Tonka? trucks. lol
I'm hoping it kicks off a little heat this winter. Will probably have to fire up the salamander though if I do any mid winter smithing. Truth be told I'll probably just switch to some machining projects in the heated shop and catch up on the backlog of those. Saving the forging for the shoulder seasons.

One of those Tonkas is mine from when I was a kid. One of my earliest childhood memories is sitting in/on it, and riding it down a hill outside of the back doors of my public school. I was probably in sk/grade 1. Couldn't get one foot in it now lol.
 
Would it not be better to just re-sheath the roof at the same time so the roof properly overlaps the flashing around the chimney?
 
Would it not be better to just re-sheath the roof at the same time so the roof properly overlaps the flashing around the chimney?
Yes. It would be the "proper" way to do it, but that's not happening on this shed. I just don't want to put that much time and effort into this as it is going to be temporary and the shed is going to get moved, hopefully next year/next fall, and a new, nicer one built in it's spot.

I have a sheet that will tuck under the ridge cap, and come down to cover the top of the chimney flashing about half way. If you think like water it will be a continuous sheet from the top to the bottom. I was going to do it tonight, but got home too late. I did pickup the screws, and caulk though. I just need some daylight.

Tomorrow is supposed to be nice and dry, so I'll either go in late to work, or leave early. We're pretty slow right now, so I take the breaks when I can get them.
 
haha, seeing that shed in first shot and picturing banging and clanging and orange light spilling through the cracks made me think of that song. Then i ended up listening to Tom Waits for a few hours......not sure if its brilliance or abject weirdness but I like it.
 
That sent me off on a Tom Waits listening spree today too. I'm still not sure how to process being (somewhat accurately) compared to a character from a Tom Waits song. That hits a few different ways across the spectrum :D
 
Not what I would consider a "fun" job, but it's done. Would have looked nicer if I had a sheet of corrugated, but this will do. It's by far not the ugliest thing about this shed....... I will add, the other reason why I didn't pull up the sheets and do it that way is visable in this picture. Nails. It would have been next to impossible to pull it all up, and not make a mess of it.

Fun trying to tuck this up under the "ridge cap" but I got it eventually....Square peg, round hole
c4llIzW.jpg

CC0THxJ.jpg

Then I jammed a tube up roof sealant all around the edges underneath it, and managed to get the last couple of screws into it before it got too dark. Here's a nice shot with the moon in the background as I was cleaning up some tools. Camera gathered a lot more light than there actually was.
Wk1VKC9.jpg

As far as roofers go, I'm a pretty good machinist. It's sure not the prettiest, but I don't think it'll leak anymore than the rest of the roof :D. I'll find out this weekend, looks like a lot of rain coming.

I will keep this thread going for all the projects related to this shop. Should be moving the anvil in this weekend, and some other stuff. I also need to wire in some lights and a few outlets too. Then hopefully make some stuff....there's a long list.....
 
That chimney draws nice!

Dunno what you are used to, but I started 'smithing with crumbles of good coal, that we mixed with a LOT of water before we coked it off. Not too hard to coke off dry coal, but the wet stuff made a better coke than the dry did.

We were able to make a really nice 'cave' in the coke to have really hot areas to use for heating our forge welding stuff, this way.

IIRC, code calls for the chimney outlet to be two feet above the ridge line. One piece of uninsulated pipe should do it!
 
Last edited:
I'm not really used to anything yet, I'm only halfway through my first bag of bituminous coal from Thak Ironworks. I've never used anything else, but this stuff is like a dream compared to what I read about online. Easy to light and keep going, and cokes up easily. I would love to try some different types, but as of now, the next time I'm up near Thak, I'm going to buy a few more bags just because it's really nice to work with and I don't want to run out and not be able to get more.

I'm going to keep my eye out for another section of 10" insulated, but will leave it for the meanwhile. It draws good, and should be better with the door closed keeping the gusting outside winds down. I don't foresee any potential fire issues. But I'm going to buy a couple nice big fire extinguishers for out there before I get going. I want one of those big old fashioned pressurized water types on wheels :D. I could also just drag a hose over from the house too.
 
One of those Tonkas is mine from when I was a kid. One of my earliest childhood memories is sitting in/on it, and riding it down a hill outside of the back doors of my public school. I was probably in sk/grade 1. Couldn't get one foot in it now lol.

Truth be told, I was going to ask if they were for sale Dan. I found the wheel loader I had as a kid, and my wife's brother and cousin donated their old machines...so I can set up a diorama out in front of my workshop. There's a little garden spot there, the PO's wife would grow flowers. Mine has moved the plants out, so I can have use of the space.
But knowing that one of em was yours as a kid....
Yeah, I wouldn't part with it either.
Your smithy looks great by the way. Your solutions to basic issues are effective. Doesn't have to be pretty, so long as it's safe in my book. That chimney bracket looks sturdy enough to hold a fuel tank to an 18wheeler.
 
But I'm going to buy a couple nice big fire extinguishers for out there before I get going. I want one of those big old fashioned pressurized water types on wheels :D. I could also just drag a hose over from the house too.
There are places that sell those fire fighting "piss cans" as they're called. You could make a modern day interpretation with two of those and a little red wagon ;)
 
Truth be told, I was going to ask if they were for sale Dan. I found the wheel loader I had as a kid, and my wife's brother and cousin donated their old machines...so I can set up a diorama out in front of my workshop. There's a little garden spot there, the PO's wife would grow flowers. Mine has moved the plants out, so I can have use of the space.
But knowing that one of em was yours as a kid....
Yeah, I wouldn't part with it either.
Your smithy looks great by the way. Your solutions to basic issues are effective. Doesn't have to be pretty, so long as it's safe in my book. That chimney bracket looks sturdy enough to hold a fuel tank to an 18wheeler.
One of them is mine, and the other is an older friends. They were his kids, and he gave them to my kids to play with. I have the loader, and cement mixer too. I will gift them back when he becomes a Grandfather. They're in pretty rough shape, and I'd like to give them a bit of a rustoleum rebuild before giving them back, so hopefully his kids take a while longer to produce offspring lol.

Thanks for the vote of confidence on my install. I definitely lean towards function over aesthetics in a lot of what I do at home. Making stuff look pretty is usually the part that costs the most money and time. 2 things I don't have a lot of.
 
Moved the anvil in today. I don't have any way to lift it, so I decided to just walk it back and forth into the shed. Didn't take that long, and wasn't as bad as I thought it would be.
42WCQN9.jpg

Little by little, leaving foot prints.
u11TJsv.jpg

The irony of this photo is not lost on me......
SjudtQa.jpg

Home
kSK6nsa.jpg

Then I grabbed the post vise I bought a few years ago from the barn, and went searching for a slack tank..... I knew there was a beer keg under some lumber in one of the old sheds jammed with junk from previous owners.
qW8MDx5.jpg

There it is. I haven't been in this shed in a few years.
FG96lEB.jpg
0Jl0kXF.jpg

Rats. It should work great, but I'll have to weld up that hole first.

Post vise seems like a perfect fit.....
yp3Dsil.jpg

I'm actually going to build that into a mobile striking anvil stand, so it's just there for decoration right now. I'll strip out that bench too, and replace it with something better. I've been scouring marketplace and kijiji for a cheap simple steel one. But so far nothing is jumping out at me.

And last addition for the day was this "rustic" shelf I picked up at the restore today.
Qjgaj66.jpg

I've spent $5 on worse things. I liked the look of it, and thought it would fit in with the general look of the shed. And the wife says I don't have an eye for Decor. Pfffft. Not sure where I'm going to put it, but it should be handy for tooling and stuff.

Took some measurements of the space, and am going to sketch of some designs for some hammer and tong racks. While looking back though all the pictures I've saved off the internet over the past decade plus for inspiration. Debating on going wall mount, or mobile.....

I have a post drill I'm debating on taking out there too. It's actually in really good condition, and I'd hate to see it get all rusty. I might just keep it in the basement, until l can move this stuff into a better shop someday.
 
Do you put a block of concrete under the leg of that vise? Is that to avoid having a large massive workbench to deal with pounding on something in the vise?
 
Back
Top