-
Scam Alert. Members are reminded to NOT send money to buy anything. Don't buy things remote and have it shipped - go get it yourself, pay in person, and take your equipment with you. Scammers have burned people on this forum. Urgency, secrecy, excuses, selling for friend, newish members, FUD, are RED FLAGS. A video conference call is not adequate assurance. Face to face interactions are required. Please report suspicions to the forum admins. Stay Safe - anyone can get scammed.
-
Several Regions have held meetups already, but others are being planned or are evaluating the interest. The Calgary Area Meetup is set for Saturday July 12th at 10am. The signup thread is here! Arbutus has also explored interest in a Fraser Valley meetup but it seems members either missed his thread or had other plans. Let him know if you are interested in a meetup later in the year by posting here! Slowpoke is trying to pull together an Ottawa area meetup later this summer. No date has been selected yet, so let him know if you are interested here! We are not aware of any other meetups being planned this year. If you are interested in doing something in your area, let everyone know and make it happen! Meetups are a great way to make new machining friends and get hands on help in your area. Don’t be shy, sign up and come, or plan your own meetup!
You are using an out of date browser. It may not display this or other websites correctly.
You should upgrade or use an alternative browser.
You should upgrade or use an alternative browser.
Tips of the Trade
- Thread starter thestelster
- Start date

Proxule
Ultra Member
I use chalk, like from a chalk board in school, Kiddo plays with them - He wont mind sharing lolYou will never have that issue, if before you start using the file you take a stick of soapstone
The soapstone is a good idea too, Thanks!
ChazzC
Ultra Member
Real soapstone, not a welding crayonI use chalk, like from a chalk board in school, Kiddo plays with them - He wont mind sharing lol
The soapstone is a good idea too, Thanks!
Last edited:
Ironman
Ultra Member
Yes, it feels soapy, slippery to the touchReal soapstone, not a welding crayon
ChazzC
Ultra Member
I'm familiar with it. use it myself for a number of purposes.Yes, it feels soapy, slippery to the touch
What I was trying to do was caution those not familiar with soapstone from picking up something like the Silver-Streak™ marker strips:
Silver-Streak™ on the left, soapstone on the right (difficult to see the difference, but the SS is silver & soapstone used for marking is white to light grey).
Welding and sheet metal crayons would not be a good choice for keeping files pin-free as they contain waxes which would interfere with the cutting action. Similarly, an offset from a soapstone countertop would not be a good choice if not carefully selected as finished countertops are oiler or waxed to protect the surface and to enhance its appearance.
Mill bed cover / protection
A couple years ago I started using magnetic sheets (the type normally used for advertising signs attached to a vehicle). They worked well - here’s a couple pics of them:

They are about 0.8mm thick and give good protection.

They do not slip or slide because they are magnetic. The light magnetic strength makes them easy to wipe clean. But the swarf does not fall off.
This week I switched to using a tray to catch the swarf. I stole the idea from Clough42. I saw them on his mill (background of a video about his DIY build for a 2x72” belt grinder).
My new trays were installed today - so the verdict is not in yet, but I’m sure the magnetic covers are history. These look great, give good protection, and will be easy to remove and empty.
Pic on mill


They are new - the stainless steel is like a mirror and is difficult to take a picture.
These are common baking sheets for cookies. Available in SS, aluminum, or steel.
I cut them to fit around the mill vise. Here’s a couple more pics:


A couple years ago I started using magnetic sheets (the type normally used for advertising signs attached to a vehicle). They worked well - here’s a couple pics of them:
They are about 0.8mm thick and give good protection.
They do not slip or slide because they are magnetic. The light magnetic strength makes them easy to wipe clean. But the swarf does not fall off.
This week I switched to using a tray to catch the swarf. I stole the idea from Clough42. I saw them on his mill (background of a video about his DIY build for a 2x72” belt grinder).
My new trays were installed today - so the verdict is not in yet, but I’m sure the magnetic covers are history. These look great, give good protection, and will be easy to remove and empty.
Pic on mill
They are new - the stainless steel is like a mirror and is difficult to take a picture.
These are common baking sheets for cookies. Available in SS, aluminum, or steel.
I cut them to fit around the mill vise. Here’s a couple more pics:
Jswain
Joe
Those look great and would be handy for cleanup!Mill bed cover / protection
A couple years ago I started using magnetic sheets (the type normally used for advertising signs attached to a vehicle). They worked well - here’s a couple pics of them:
View attachment 54887
They are about 0.8mm thick and give good protection.
View attachment 54888
They do not slip or slide because they are magnetic. The light magnetic strength makes them easy to wipe clean. But the swarf does not fall off.
This week I switched to using a tray to catch the swarf. I stole the idea from Clough42. I saw them on his mill (background of a video about his DIY build for a 2x72” belt grinder).
My new trays were installed today - so the verdict is not in yet, but I’m sure the magnetic covers are history. These look great, give good protection, and will be easy to remove and empty.
Pic on mill
View attachment 54893View attachment 54894
They are new - the stainless steel is like a mirror and is difficult to take a picture.
These are common baking sheets for cookies. Available in SS, aluminum, or steel.
I cut them to fit around the mill vise. Here’s a couple more pics:
View attachment 54895View attachment 54897View attachment 54896
ChazzC
Ultra Member
Ear plugs plus over the ear muffs while sawing?Mill bed cover / protection
I cut them to fit around the mill vise. Here’s a couple more pics:
View attachment 54895View attachment 54896
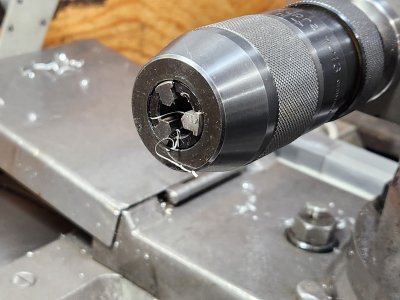
Trying to clean jaws of a drill chuck can be a bit of a pain. I tried these cotto dental dams and they work fairly well.
Attachments
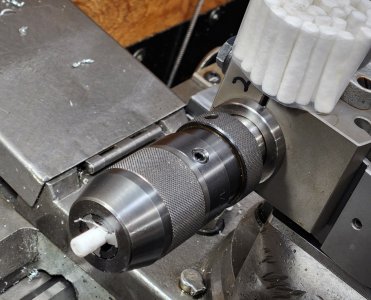
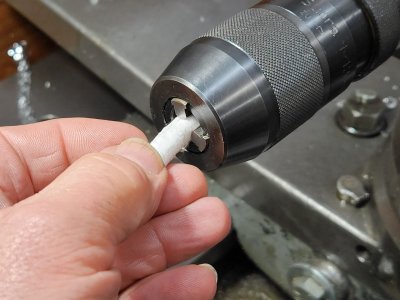
Trying to clean jaws of a drill chuck can be a bit of a pain. I tried these cotto dental dams and they work fairly well.
Hey Stel, what is that bird nest in the first photo?
Also, your pictures disappear. Seems to be a recent problem. Can you redo them for us? Best to use Thumbnails.
The photo insertion issue just started happening.
The birds nest was after drilling into some stock and going into the chuck, which I have to clean out before I use the next drill bit.
The birds nest was after drilling into some stock and going into the chuck, which I have to clean out before I use the next drill bit.
I think that has never happened to me. I say I think because I don't recall looking for it either.
I also stop drilling momentarily with a quick withdraw and re-engage to break the swarf before it ever gets long enough to reach into my chuck.
I'll have to watch more closely in future!
Thanks for the tip Stell!