Tig settings

I have done a little bit of sheet metal, sometime good sometimes bad, biggest thing I find is heat control and IMHO the filler wire acts as the coolant to keep the seam from over heating.

Sometime I find just laying a wire in and flowing the wire to the sheet is the way to go.
 

Doggggboy

Ultra Member
I think you'll find Ryan is right on the money. Use big filler rod and maybe practice a bit on heavier material first.
How do you get to Carnegie Hall, practice, practice, practice.
I've been wondering about that. All the videos I've seen show people welding sheet metal on a steel table for backing but I'm trying to butt weld in thin air because that is what I'll have to do on the Datsun.
Maybe I should start with something easier.
Thanks.
 

Doggggboy

Ultra Member
That is one of my problems too. A stroke left me blind in my left eye. Put a welding hood on and looking through a shaded glass and I cannot tell how far away the work is. The only telltale is the size of the arc.
What has helped me a lot in my quest to see what the hell is going on is an abundance of light on the weld.
I use one of the big Dewalt flashlights sitting on the welding table https://www.amazon.ca/DEWALT-DCL050...78&mcid=7ae92973b324354a82881a8b8e5661b6&th=1
And I recently mounted this on the welding helmet https://www.milwaukeetool.ca/Products/2163-21
I also wear a 1.5x set of glasses under the helmet.
If nothing else, all this gear lets me see what a shitty weld I just did.
 

Susquatch

Ultra Member
Administrator
Moderator
Premium Member
I use one of the big Dewalt flashlights sitting on the welding table

What great ideas! I already have one of the three - the big Dewalt flashlight. But I could sure use the magnification and the welding table.

Pretty sure my Helmut can handle the built-in magnifiers.

My welding table for now is the dirt driveway to the barn.
 

Doggggboy

Ultra Member
What great ideas! I already have one of the three - the big Dewalt flashlight. But I could sure use the magnification and the welding table.

Pretty sure my Helmut can handle the built-in magnifiers.

My welding table for now is the dirt driveway to the barn.
The Dewalt is 38% off now if you need another. I melted the lens on mine so I just ordered a new light as the lenses don't appear to be available separately.
 
Last edited:

Jswain

Joe
What has helped me a lot in my quest to see what the hell is going on is an abundance of light on the weld.
I use one of the big Dewalt flashlights sitting on the welding table https://www.amazon.ca/DEWALT-DCL050...78&mcid=7ae92973b324354a82881a8b8e5661b6&th=1
And I recently mounted this on the welding helmet https://www.milwaukeetool.ca/Products/2163-21
I also wear a 1.5x set of glasses under the helmet.
If nothing else, all this gear lets me see what a shitty weld I just did.
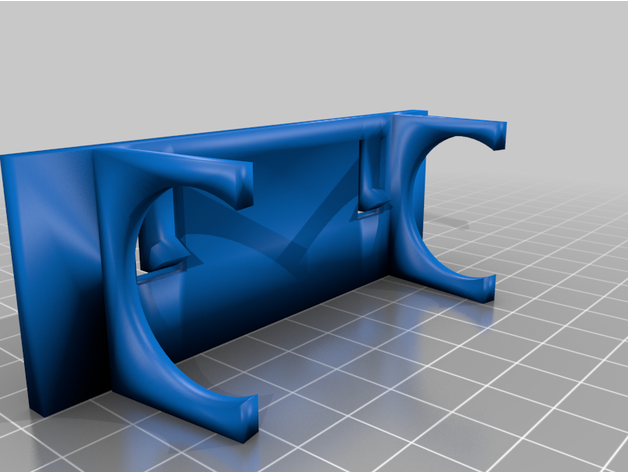
Did you just double sided tape it to the helmet or? I've been thinking about maybe 3d printing a mount of some sort, would definitely be nice when under a vehicle etc.
 

Doggggboy

Ultra Member
Did you just double sided tape it to the helmet or? I've been thinking about maybe 3d printing a mount of some sort, would definitely be nice when under a vehicle etc.
I copied the existing mount as best I could and used VHB tape to stick it to the helmet.
I had to heat it to fit the bend with a heat gun. Seems pretty solid so far.
I put it up on Thingiverse. I love the Milwaukee light.
 

jorogi

Well-Known Member
I find that the reflection off the glass inside my helmet is a real vision blocker so I usually toss a tea towel over my head to block the ceiling lights from getting in there in the first place. I keep meaning to mount a more permanent type shade but, you know, the list.
 

Doggggboy

Ultra Member
I find that the reflection off the glass inside my helmet is a real vision blocker so I usually toss a tea towel over my head to block the ceiling lights from getting in there in the first place. I keep meaning to mount a more permanent type shade but, you know, the list.
I already have trouble not catching fire in the shop. I`m not sure this would be a good idea for me.
 

BaitMaster

Super User
I would try a couple things:

Regrind the tungsten with a clean grinder wheel or clean part of the grinding wheel.

Wipe the tungsten off with acetone and a clean paper towel as well

Make sure you are using a non-greasy and non-used for stick welding wire brush…. I have multiple wire brushes…. One for stick, one for greasy stuff, one for steel TIG, one for aluminum TIG.

I would try it with thin filler. You don’t have to use much but lots of times the filler helps you control the heat and stop burning through. And you can grind it off later. A little filler takes a lot of heat out of your part.

I usually do mild steel with around 12cfm…. The only time I go any higher is when doing stainless. Seems to work fine for me.

Wipe down your filler with acetone as well and keep your TIG gloves clean.

Keep your hot filler tip under the protective argon until it cools.

See if any of that helps….
 
Gas flow it TIG is set by cup size (back flow is different setting that I haven't had to deal with yet), generally its cup size x 2 plus a touch so #8 cup is 8x2+ a bit is 16-18. Less not enough coverage to much turbulent coverage which has a similar effect of not enough coverage (so the tendance is add more just making it worse).
 

Doggggboy

Ultra Member
So much good information coming at me.
I'll get back at it today.
I'll be the confused guy with the burning tea towel on his head vigorously scrubbing acetone
OIG.uJtLYXNz1PPGWGIeKeig
 
Last edited:
Some great suggestions here!

I’m a newbie TIG welder too (actually, newbie ‘welder’ full stop). But I have experienced almost all of your issues and I am struggling through.

I have found that I can reduce burn through by laying a 1/16” filler rod right down on the buttweld seam. Melting the filler and spreading it out on to the two sides of the base metal. While welding really thin sheet metal (like 20 ga), I go from seeing a puddle to an eighth inch hole in a nanosecond. The added mass of the filler material gives me a chance to actually work the puddle before burn through.

The second thing I’ve found helpful is to start my arc a little to the side of the buttweld seam, and work my way to the seam as I add filler. When I try to start the weld right in the seam, I often just evaporate the edge of the sheet metal, making the gap wider like what I see in your picture.

Third, I’ve had quite a bit of success doing a lap joint, but using only a very short overlap (<1/8”). I’ve found I can melt the upper layer fully into the lower layer, eliminating the lap joint and ending up with what looks like a very nice joint.

I have some rust repair to do. I’ve been debating about using TIG, but I’m almost positive I’ll be using MIG. I am way more confident I’ll get a nice product with minimal warping by stitching away with the MIG. Especially when I go from feeling almost competent doing the TIG in the Horizontal, to trying the same in the vertical…
 

Doggggboy

Ultra Member
2 things I don't think anyone has mentioned are cup size and stickout.
And, yes, I'm talking about the torch.
Right now I'm using a #7 cup and 1/2 inch stickout.
I could go down to a 6 or 7 as well.
(I'm more than a little afraid this post is about to go off the rails)
 
Last edited:
Top