• Scam Alert. Members are reminded to NOT send money to buy anything. Don't buy things remote and have it shipped - go get it yourself, pay in person, and take your equipment with you. Scammers have burned people on this forum. Urgency, secrecy, excuses, selling for friend, newish members, FUD, are RED FLAGS. A video conference call is not adequate assurance. Face to face interactions are required. Please report suspicions to the forum admins. Stay Safe - anyone can get scammed.

Tool Test Bar

Tool

slow-poke

Ultra Member
I think it's time I get a known good test bar, actually probably a round and rectangular one. Ideal length would be 20-30" long. I don't want to spend a fortune and don't work to SpaceX tolerances.
Please educate me on:
1) Can I simply order some tool steel, will it be true to less than 0.0005"?
2) I imagine there are standards for accuracy, what standard would reflect something in the tenth's?
3) What are you guys using?
4) This won't be abused, so I'm not sure how important hardness is?
5) Lot's of round ones with MT tapers for lathe alignment on eBay, a bit shorter than ideal but they claim 2/10's and affordable <US$40, almost all made in India and most with brutal feedback ratings, based on those feedback ratings It looks like I should avoid any test bar from India?
6) I don't see any rectangular test bars?
7) What is a fair price to pay?
 
Last edited:
Who'll give me odds that this goes down the rolly polly daddy (or whatever its called) rabbit hole? :D

Flat or cylindrical and straight, to any high degree of accuracy, is challenging and time consuming so usually very expensive.

Stock won't be very flat or straight. I would not believe the claimed accuracy unless it is a well known brand and you can trust it. India, can't see it. China, SOP is fill the calibration sheet with what the market wants to hear. It's imo doing the three monkey thing buying that stuff thinking the stated tolerances are good, and if its not good, what's the point of having it as a precision test piece?

As for rectangular, what is it's intended use and how big? In scraping you have what I like to call reference flats (a more accurate description) and what most others call straight edges. These are a portable flat surface using for what amounts to inspection (just using blue instead of an indicator). Because flat is very expensive, they usually only have one surface made flat, so the balance of the surfaces are not flat square or parallel (to any high degree). In other words, it is just a reference flat not reference rectangular prism.

Is it worth discussing what the need is? Having reconditioned several machines, which deals with every aspect of the geometry, I have never had the need for a test bar. The only place where I've seen test bars used is in the HS to align the HS, not supported by the TS. Its makes sense if you doing it every day all day but its just an expediency; there are other ways to do so without spending big bucks for an accurate test bar.
 
I can't help with everything but hopefully the following is useful.

I think it's time I get a known good test bar, actually probably a round and rectangular one. Ideal length would be 20-30" long. I don't want to spend a fortune and don't work to SpaceX tolerances.

I routinely check for "ground bar" and "straight edge" - prolly for the same reasons that you do. They are not common, but I did get a 24" 1/2x2 straight edge on Kijiji that had belonged to a master machinist before he passed away.

Please educate me on:
1) Can I simply order some tool steel, will it be true to less than 0.0005"?

I doubt it.

2) I imagine there are standards for accuracy, what standard would reflect something in the tenth's?

Mitutoyo & Starrett both list grades. There seems to be a number of them. Sometimes they conflict. My old mind can't hold this information reliably. Hopefully someone else can help.

3) What are you guys using?

I use gauge blocks and pins and a granite surface plate. The plate is my long bar - just not very portable. I also have a few straight edges of various kinds - all hand made.

You can buy instrument quality straight edges from the likes of Mitutoyo and Starrett. Also long gauge blocks and what I'd call reference flats. Precision ground pins are harder to find. Guide rails are easier to find and may be good enough for your needs.

4) This won't be abused, so I'm not sure how important hardness is?

Not sure either.

5) Lot's of round ones with MT tapers for lathe alignment on eBay, a bit shorter than ideal but they claim 2/10's and affordable <US$40, almost all made in India and most with brutal feedback ratings, based on those feedback ratings It looks like I should avoid any test bar from India?

Yup. I have a few things from India including a lathe alignment bar. No way would I ever use it to align my lathe. India is what China used to be. It's all junk. @RobinHood tested one of those bars too but I can't find a link.

6) I don't see any rectangular test bars?

See above

7) What is a fair price to pay?

It's all over the map. New stuff is a few hundred to a few grand depending on grade and manufacturer. Kijiji and marketplace are better sources than eBay.

What do you plan to do with this?

Edit - I see @Mcgyver posted at the same time. Good info there. Maybe @RobinHood or @Dabbler will comment too.
 
Last edited:
Use... generic for example I clamp a piece between two vises and want to support the middle of the span with a machinist jack.

Thanks guys.
 
I think it's time I get a known good test bar, actually probably a round and rectangular one. Ideal length would be 20-30" long. I don't want to spend a fortune and don't work to SpaceX tolerances.
Please educate me on:
1) Can I simply order some tool steel, will it be true to less than 0.0005"?
2) I imagine there are standards for accuracy, what standard would reflect something in the tenth's?
3) What are you guys using?
4) This won't be abused, so I'm not sure how important hardness is?
5) Lot's of round ones with MT tapers for lathe alignment on eBay, a bit shorter than ideal but they claim 2/10's and affordable <US$40, almost all made in India and most with brutal feedback ratings, based on those feedback ratings It looks like I should avoid any test bar from India?
6) I don't see any rectangular test bars?
7) What is a fair price to pay?
1) order a piece of induction hardened turned and ground stock. Used commonly for cylinder rams
2) it will be more accurate than you can be with a lathe
3)I use a piece of this 1.5" X 24"
4) hardness is not important, but you have to live with it anyway with this stock
5)No, don't go there. Test bars are something to use in a 4 jaw chuck or as I do, between centres.
6) me neither.
7) The price is more than you will want to pay if they are determined to sell you a 20ft length. I needed a piece of 3.75" IHTG stock for the ram of my hydraulic press, and the price was thousands, but I found in their Vancouver outlet they had a 32" drop cut of it and the co shipped to their Edmonton outlet and I paid $300 for it. Of course, less price for smaller diameter stuff..
 
wow, this *is* a rabbit hole.

Most of these arguments and differences of opinion come from a difference between the foundations of the discussion.

1) 'what is your accuracy', i.e. to what accuracy is the work you do? There is a world of difference between working to .003 (+/- .0015), .001 (+/- .0005), and .0005 (+/- .00025) and beyond.

2) What can you afford? If you budget is unlimited, buy a New generation Mitutoyo DMM, good to something like .3 millionths of an inch. I daresay all of us fall somewhere else on this scale.

3) What is your current skill level, and what skills are you building? Working to higher degrees of accuracy requires a greater understanding of more factors and deeper skills, etc.

4) What tooling is appropriate for your shop? Not every shop needs or wants a full metrology setup, so the question needs to be rephrased towards: I need to x,y, and z - how do I tool up for this in the most cost effective way? I shouldn't make assumptions about what x,y, and x are.

Have I bored you so far? if so I apologize. But all the other discussions fail at least one of these tests, and results in a totally confusing thread for the OP and all the other casual readers.

------------

I think it's time I get a known good test bar


why? what are you doing with it? what do you mean by a test bar? if you are aligning a headstock, it is a very different requirement than aligning a tailstock, for instance. Not the same tooling.

So I'm going to break my rule and suggest a single scenario for x,y, and z above.

Assumption: aligning a headstock.

Do not mistake ground bar stock with a test bar. the way they are manufactured is completely different resulting in very different inaccuracies and profiles. Ground bar stock is always centreless ground, which results in suitably accurate local concentricity and dimension - which is suitable for holding in a collet. is this even close as a test bar? No, not even close. The bar, due to manufacturing and handling can bend up to 5 thou per foot, an often resembles a snake at 3 thou tolerances.

Hardened chromed stock for hydraulic cylinders are optimized for local dimension and concentricity, but for the purposes of passing seals and wear bands without exerting undue pressure on those elements. For a short test bar in the order of 6-8" this will work well in .003 and even with care work in higher accuracies. In a 24" scenario, my experience with superior shafting (the old name for these) is that is about a foot too far.

Premade 'test bars' with a Morse taper ground into them: This is a case of 'you don't get what you don't pay for' rather than the opposite. Reputable firms, such as Suburban Tool don't make one. There is a reason for this: there is no guarantee that your taper is in line with the thing you want to measure. Furthermore, on careful measuring with precision v blocks on an AA grade surface plate, none of the ones I have personally measured are even as good as centreless ground bar.

So what does Dabbler use?

Caveat: Everyone with experience rebuilding lathes does things slightly different, and there are guys here that i would confidently say have deeper skills than I. No one person owns the gospel on this.

I use an 8" piece of superior shafting, knowing that it is not perfectly straight. It is over 1.5" in diameter to minimize droop provided by gravity - a factor in alignment - and I have mapped it's best end for clamping and it's deviation over the entire length to a half tenth. I can read accurately with the mapped bar to about 2 tenths at 20 degrees C.

One day I will precision grind a hardened test bar between centres, but that is on the 'some day list', about 4,000 projects down the list.

Economy substitutes are:

precision ground parts from large diesel engines, such as link pins (new ones, of course)

Dowel pins - a 5/8 X 4" dowel pin might set you back 10$, and is very accurately ground. Enough that that .0001m accuracy is attainable.

If you go shorter, then you need to buy a ten thousandths plunge or test indicator. My preference is for a test indicator, but use either form a similar result. By using a shorter test piece and a more sensitive indicator, you can extrapolate reasonable results over the normal hobbyist envelope.

[update] I have never owned a 'test bar' - I've used all 3 options above, over the years.

To end this all-to-lengthy tome, don't get me started on machine flats, straight edges and cammelback straight edges - that is a deeper discussing involving much more detail and minutiae.
 
Last edited:
A couple months ago I bought an Accusize 24” straight edge. It’s accuracy is claimed to be +/- 0.001” which is not nearly as good as @slow-poke is looking for but it is good enough for my purposes. Note - it is sold as a draftsmen straight edge, not a machinist tool.


A bit off topic (because not in the same accuracy ballpark) but this may be of interest. The parallels and flat surfaces that I’ve used for many years are very crude. Just cold rolled flat bar but it is actually quite flat, straight and also cheap. My fab table top is anything but flat. I have a piece of 5” x 1/2” cold rolled which is 36” long. It is used to hold parts for tack welding. I also have a collection of various widths and thickness of cold rolled bar that I regularly use in the drill press vise and it’s no big deal if they get touched by the drill bit.
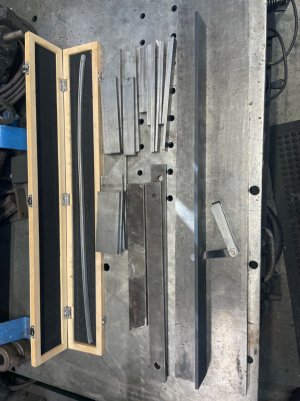
Here’s a pic of the 36” flat bar. The Accusize straight edge is sitting on it and indicates that is has a 0.002” bow in it. In the middle of the pic are the various drill press vise cold rolled flat bars.
IMG_2471.jpeg
 
Last edited:
Use... generic for example I clamp a piece between two vises and want to support the middle of the span with a machinist jack.

Thanks guys.

Not what I was thinking, still not 100% sure what you mean. To align the vises? I would do that with an indicator or large parallel. As a general statement (not always true but odds are...) what one might call a parallel is going to be a lot less accurate than what one might call a test bar. Expect a comparable difference in cost as well

Dabbler is right, we need more info on tolerances and the application to make recommendations.
 
I really know how to stir the pot;-) :D;)

I don't have a specific task in mind and the tolerance comes from the eBay accuracy claims. It seems to make sense if you want to make something accurate to say 0.001" you should use something better as a reference. In electronic metrology we typically use an instrument 4x more accurate than what we are calibrating.

Back to the earlier example if the vises are 20" apart and I want to support the span, it would be nice to place an accurate straight edge in the vises and adjust the jacks to that edge. I would think a known accurate and long straight edge would be in most machinist toolboxes but I guess I'm wrong?
 
I would think a known accurate and long straight edge would be in most machinist toolboxes but I guess I'm wrong?
I've done a lot of accurate work over the last 45 years, but my first straight edge was purchased in 2018. So you don't always *need* a thing when there are alternative ways to do things.

To do what you want to do with vises in Y, it is far more accurate to measure 'in place' You use a test indicator to locate the vises to the accuracy of the unit. Using a test bar, even lapped/scraped to millionths will flex under the weight of the vise as you are adjusting things.

You can do the exact same thing in Z, again using your test indicator. If you desire super precision, use a half-ten-thousandth test indicator from Interapid.

If you want a straight wedge, of course buy one! I needed mine for a different alignment problem, not on a machine but on a part of a machine (inside the housing).
 
In the world most of us inhabit, we work in the .001 to .003 range and the stuff dragged in the door is almost always in much worse shape because of wear and abuse. So a suspension strut or hardened T&G stock is pretty good for alignment checks. In most cases being able to cut to within a 1/2 thou for a press fit bearing is what we need.
But if you are rebuilding a lathe, scraping ways, etc, you want the best. If you are working for SpaceX, you have to be the best.
 
Use... generic for example I clamp a piece between two vises and want to support the middle of the span with a machinist jack.

Thanks guys.
Perhaps your work holding can be changed to clamping directly onto the mill table using one of the T-slots as an alignment guide? You’d be surprised how accurate a well set-up mill table can be and it solves your support issue at the same time.

You can even “leap-frog” strap clamps without the part moving if required.
 
@RobinHood tested one of those bars too but I can't find a link.
I can’t remember if I did a write-up of the test. It was for another member (maybe @YYCHM ?) who had purchased one. We ran some generic test on my A level surface plate using high quality measuring tools. The bar was surprisingly well made (I think it was one from India).
 
I can’t remember if I did a write-up of the test. It was for another member (maybe @YYCHM ?) who had purchased one. We ran some generic test on my A level surface plate using high quality measuring tools. The bar was surprisingly well made (I think it was one from India).

Yes, you measured/checked a test bar for me. It measured ok and you are correct it came from India.

 
Found it! (My mind may work slowly at times, but my memory is still pretty good):


At shortly after 4:45 James discusses using Thompson Quick Shaft for aligning a matched pair of vises.
 
Thompson linear shafting is about twice as accurate for taper as Superior Shafting, and only slightly better concentricity. But it is available, for a price... For 24", you should have 2"+ so that gravity is less of a factor. it would make a great lathe alignment bar, if you don't have a bar ground between centres.
 
Back
Top