• Scam Alert. Members are reminded to NOT send money to buy anything. Don't buy things remote and have it shipped - go get it yourself, pay in person, and take your equipment with you. Scammers have burned people on this forum. Urgency, secrecy, excuses, selling for friend, newish members, FUD, are RED FLAGS. A video conference call is not adequate assurance. Face to face interactions are required. Please report suspicions to the forum admins. Stay Safe - anyone can get scammed.

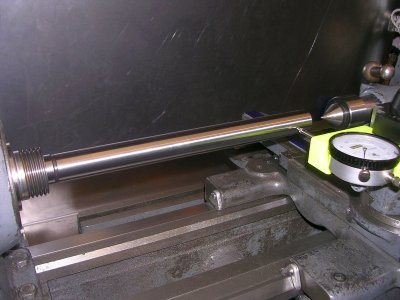
Tool Test Bar

Tool
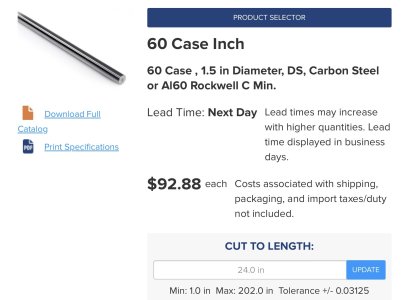
Thompson linear shafting is about twice as accurate for taper as Superior Shafting, and only slightly better concentricity. But it is available, for a price... For 24", you should have 2"+ so that gravity is less of a factor. it would make a great lathe alignment bar, if you don't have a bar ground between centres.
If @slow-poke wants to use it to align a pair of vises the 1.5” diameter would be sufficient to combat gravity since only ~12” would be unsupported.

IMG_8285.jpeg
 
you are right - I was trying to suggest that a 2"+ would be suitable for lathe headstock setup... I wrote it in an ambiguous way. oops!
Not at all, it took a while for the OP to give an example of the intended use, and he did say “general use.”

My real concern on using a 2” rod for aligning a pair of vises would be that the centerline would be very close to the top of the jaws.
 
Yes, you measured/checked a test bar for me. It measured ok and you are correct it came from India.

Based on this, I order an Amazon special, if it checks out I will keep it, if it's no good it goes back, no loss except my time.
Thanks guys
 
Seems like NASA struggles to make a round trip to the ISS, while SpaceX lands their used rockets in reverse on a barge floating in the ocean. Beyond impressive!

It truly is impressive. I don't know what a rocket costs, but I know that a jetliner engine costs between 5 and 50 million EACH.

The CEO of Pratt & Whitney tried to embarrass me at a conference we both spoke at by comparing the extreme quality of a jumbo jet airplane to a crummy automobile. You can't just park a jumbo jet on the side of the highway when an engine fails. Bad move. I didn't choose to embarrass him back about sloppy seats, cheap table trays that sit at 45 degrees, or carpets that look like a 5$ motel room. Instead, I just pointed out that nobody would ever buy a car if they all started at 5 million let alone worry about engine failures

You can do a lot of very difficult things with a fat wallet.
Based on this, I order an Amazon special, if it checks out I will keep it, if it's no good it goes back, no loss except my time.

Even if it checks out, I wouldn't use it. The problem is getting a perfect fit in the spindle taper. All it takes is a microscopic speck of dust and it's out.

I am a huge fan of making a fresh cut on a test bar each time its used. Said freshly machined test bar will be true to your spindle. That purchased test bar might not be. Then what?
 
The CEO of Pratt & Whitney tried to embarrass me at a conference we both spoke at by comparing the extreme quality of a jumbo jet airplane to a crummy automobile. You can't just park a jumbo jet on the side of the highway when an engine fails. Bad move. I didn't choose to embarrass him back about sloppy seats, cheap table trays that sit at 45 degrees, or carpets that look like a 5$ motel room.
Since we’ve veered off topic anyway…

Pratt is not responsible for the interior of any airplane, not even anything beyond the basic engine and the components that make it run.

It’s the manufactures in conjunction with the airlines who decide on the crappy interiors you speak of. It’s all about what they can get away with before they lose enough passengers / revenue that they either smarten up or go bust.

I actually didn't really want to post that. I only wanted to vent my spleen by drafting it and then deleting it. I didn't realize it was included when I replied about the test bar - which was on topic but you didn't comment on...... I was hoping you might - especially since my recollection of the test you guys did was off base. I really really hate getting old.

That said, you are right about Pratt being an jet engine maker. Maybe I didn't make that clear enough. However, the guy was folding his entire speech around how much better airliners are vs automobiles so it wasn't really out of line to talk about the whole plane at the time.
 
Things at Boeing took a serious turn for the worse the day they merged with McDonnel Douglas, the results of the transition from an engineering driven company to an accounting driven company speak for themselves. It's a real shame. Reminds me of GE.
 
And GM, and Chrysler, and Nortel, and and and. Whoever dreamed up wall street should be hung and quartered.
In that respect Wall street is both a blessing and a curse. Without to ability to raise capital, no really forward thinking engineering can be done. And the drive for better, faster and cheaper is generally appreciated by all who have to pay (including us when we buy tools or tickets etc.), but when someone who should say no, this won't work / isn't good enough is pressured to do something else, it is a problem for sure. Apollo I was probably be best example, but there are a litany. Human behavior seems to follow the sine / cosine relationship too ;)
 
Even if it checks out, I wouldn't use it. The problem is getting a perfect fit in the spindle taper. All it takes is a microscopic speck of dust and it's out.

It's an issue, but the test done properly compensates for that.

The key is, you don't run the indicator along the bar, you sweep, rotate the work 180, sweep it again, then move to the second plane and repeat. ...... but this assumes we're testing a lathe HS. We were talking milling vise set up ...... if things have shifted to lathe HS testing? I've lots to say on it starting with don't buy a cheap test bar :) Don't buy an expensive one either :eek: unless you're going to manufacture lathes. This test doesn't rely on the bar being concentric or aligned, it just needs to be very round with a good finish ...... for that matter warped or a slight dia differences shouldn't matter.

The idea of HS misalignment seems to always be out there to some extent. For a well made lathe with the HS registered on an inverted way, which the SM is, and sans a catastrophic crash, meddling or black magic, the HS is not going to be out of alignment. Any taper turned stems from either wear or twist with later likely the biggest culprit. To fix that, turn a stubby test piece in whatever chuck your like, without TS, support and tweak the tailstock end level bolts. You'll be pleasantly surprise how you can dial it in, remove twist and get rid of that taper.

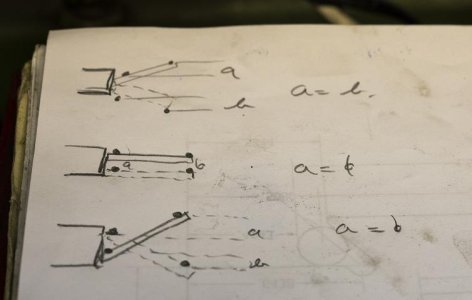
pertinent illustrations I've done - using a test bar (any bar will do). You do two sweeps, 180 degrees apart in plane at the HS , then repeat in a second plane toward the end of bar ...... when a=b, you have alignment regardless of how concentric or straight the bar is held. This test kind of eliminates the bar from the equation and shows the relationship of the spindle axis to the line you move the indicator on (the axis formed by the ways). When scraping you then rotate spindle 90 degrees and repeat ..... so you are checking in the horizontal and vertical planes. Takes forever lol


MWZ_1413 mod-754x480.jpg


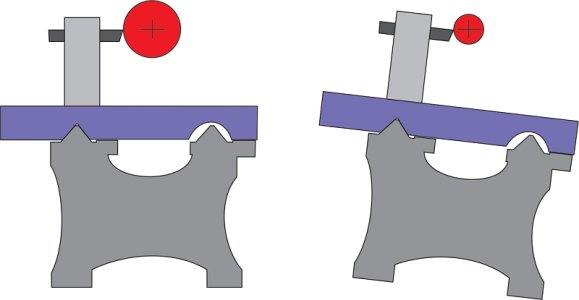
how twist creates a taper

lathe twist 1-800x415.jpg
 
Last edited:
Mcgyver,

Thank you for the great and detailed explanation. The round bar will be for testing and adjusting my lathe. The rectangular bar is for more general use typically on the mill.

When you say "sweep" I interpret this as sweep to find the outside edge of the test bar the maximum diameter point, is that correct?
 
Last edited:
'Sweep' probably means: Attach a DTI to the carriage, ball/plunger contacting the test bar (left red dot). Displace the carriage down the bed, observed DTI readings (at right red dot). IF the bar is seated concentric to the rotation axis and IF its perfectly straight, the it would detect 'something'. That something could be bed twist only, headstock rotation only (viewing from top), bed wear, or some cumulation if all were out. As in post 36, rotation is considered nil on registered headstocks & bed wear would have to be extreme. Twist is the thing we can readily adjust.

But you an probably visualize that everything for this kind of test relies on the test bar geometry & seating/gripping in HS for this specific (idealized) test to work. If its perfectly circular but is banana shaped, all bets are off - its a false reading. Unfortunately this can happen (maybe frequently) with the typical India test bars. I think they might actually be pretty good when new but can stress relive over time & warp. That's what I mean by the banana. Its equivalent to having a hill or bowl in your surface plate topology trying to measure 'flat'. Its just not going to tell you the truth. By grip I mean how is the test bar bar mated to coincide with the rotation axis. If you have it gripped in a chuck & the jaws are off, that's no good. Typically the bars have an MT taper matched to the socket in HS, so the hope is a snug fit delivers a reliable fit. Unfortunately thats not always the case either. Collectively this is why test bars used in this way is kind of frowned upon. The theory is simple, but too many practical 'IFs'.

This subject has been discussed at length previously, search 'bed twist' or 'lathe leveling'

idealized
1728747134874.png
rotated HS
1728747153421.png
(hard to sketch twist, hopefully you can visualize)
1728747831925.png
 
Last edited:
When you say "sweep" I interpret this as sweep to find the outside edge of the test bar the maximum diameter point, is that correct?

Yes, you need a way to sweep the indicator over the work and note the highspot. XZ plane is easy, use the cross feed. ZY is trickier. I use a spindle to hold the indicator. However this test is only relevant if you have to test for HS alignment which is extremely unlikely with this lathe. The test won't accomplish anything as any error could from HS misalignment or twist ...... ergo assume its twist, assume its ZY error (nothing you can do about XZ if not rescraping) so skip this test and start tweaking the TS end mounting bolts while taking fine skim of a piece of work (with TS support).

It seems complex to explain but it really is just Occams razor, the simplest answer, for this lathe, is that the cause is bed twist and theres' a simple way to fix it without need for a test bar

By grip I mean how is the test bar bar mated to coincide with the rotation axis. If you have it gripped in a chuck & the jaws are off, that's no good.

That doesn't matter if doing the test I outlined above which imo is best way to test because, well, concentricity of the test bar doesn't matter. There are imo no chucks that are going hold something concentric to great accuracy in two planes whereas with the test above you can use the three jaw as concentricity and or wobble doesn't matter.
 
Last edited:
'Sweep' probably means: Attach a DTI to the carriage, ball/plunger contacting the test bar (left red dot). Displace the carriage down the bed, observed DTI readings (at right red dot). IF the bar is seated concentric to the rotation axis and IF its perfectly straight, the it would detect 'something'. That something could be bed twist only, headstock rotation only (viewing from top), bed wear, or some cumulation if all were out. As in post 36, rotation is considered nil on registered headstocks & bed wear would have to be extreme. Twist is the thing we can readily adjust.

But you an probably visualize that everything for this kind of test relies on the test bar geometry & seating/gripping in HS for this specific (idealized) test to work. If its perfectly circular but is banana shaped, all bets are off - its a false reading. Unfortunately this can happen (maybe frequently) with the typical India test bars. I think they might actually be pretty good when new but can stress relive over time & warp. That's what I mean by the banana. Its equivalent to having a hill or bowl in your surface plate topology trying to measure 'flat'. Its just not going to tell you the truth. By grip I mean how is the test bar bar mated to coincide with the rotation axis. If you have it gripped in a chuck & the jaws are off, that's no good. Typically the bars have an MT taper matched to the socket in HS, so the hope is a snug fit delivers a reliable fit. Unfortunately thats not always the case either. Collectively this is why test bars used in this way is kind of frowned upon. The theory is simple, but too many practical 'IFs'.

This subject has been discussed at length previously, search 'bed twist' or 'lathe leveling'

idealized
View attachment 52764
rotated HS
View attachment 52765
(hard to sketch twist, hopefully you can visualize)
View attachment 52766
I don't know what your day job is but I think you'd make a great graphical and descriptive writer! I think the Chinese should pay you big bucks to write manuals/ instructions for them.
 
Back
Top