
-
Scam Alert. Members are reminded to NOT send money to buy anything. Don't buy things remote and have it shipped - go get it yourself, pay in person, and take your equipment with you. Scammers have burned people on this forum. Urgency, secrecy, excuses, selling for friend, newish members, FUD, are RED FLAGS. A video conference call is not adequate assurance. Face to face interactions are required. Please report suspicions to the forum admins. Stay Safe - anyone can get scammed.
You are using an out of date browser. It may not display this or other websites correctly.
You should upgrade or use an alternative browser.
You should upgrade or use an alternative browser.
TAF-fy Pulling
- Thread starter TAF-fy Boy
- Start date

BaronJ
Ultra Member
I would run a drop of superglue down the crack just to stop moisture getting in and rust forming, that would push the crack apart.Well, found a crack in the base casting after getting 95% of the muck off.
View attachment 79228
View attachment 79229
View attachment 79230
Hi Taffy,

TAF-fy Boy
Super User
Never heard of it, looked it up, doesn't seem very common in North America regretfully."Electrolube" and work them a few times.
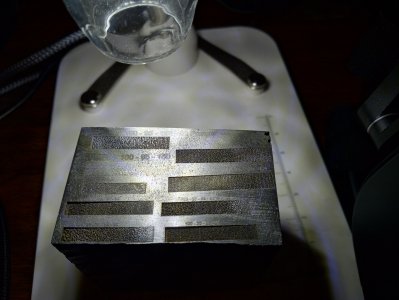
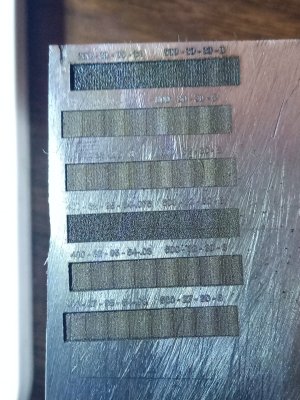
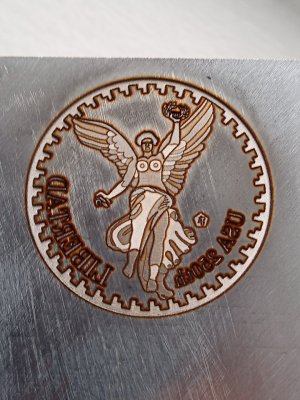
Figured some of you would enjoy seeing the calibrations I went through with my laser to get this one done.
Finally got some of my space back from the fume extractor and laser setup so I can work on the Atlas.
BaronJ
Ultra Member
Hi Taffy,
 electrolube.com
Apparently available worldwide.
Global Solutions Provider - About Electrolube - The Solutions People
Electrolube are a global solutions provider, developing solutions to advance engineering and enhance technological performance since 1941.
electrolube.com
Apparently available worldwide.

TAF-fy Boy
Super User
My partner commented the exact same thing, Heh,Them some big Nipples lol
Remember this is the die to strike with, so how the metal of the Planchet flows into it will produce a slightly reduced set of curves. . . that and with good lighting on a highly reflective metal, they SHOULD, not be so puffy. I admit, I don't have a long history of doing everything myself, when I got the lathe and laser about 2 years ago is when I really went in hard on the whole process, and before that only about 2 years of doing art for dies.
If anyone is interested in seeing my Numismatic work, I can send a DM link to my website where a lot of my pieces are presented in the best light possible. I will not be disseminating my professional profiles on a public forum such as this, trying to keep a clean footprint after-all!
TAF-fy Boy
Super User
Been awhile,
I think I have cleared another milestone in the Atlas MFC project - all the pieces are basically cleaned and treated.
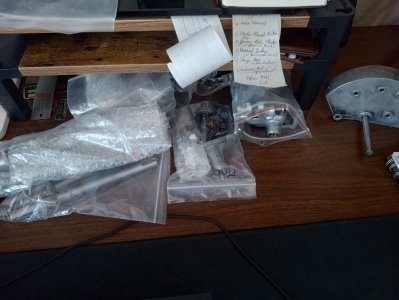
Pile of the pieces that were small enough, sorted by assembly and bagged ready for when the castings are finished. The amount of stuff that came off in the wash must have weighed as much as my cat!
Just waiting on warmer weather to do the paint stripping and repaint of everything that needs it. . . then it can begin to be rebuilt!
Been a long time since I got to play with 'Agesistratus,' but now that the piles of filthy parts and bins of soaking hardware are out of the way, I am finally getting to making the parts I need for the Atlas to be 100%.
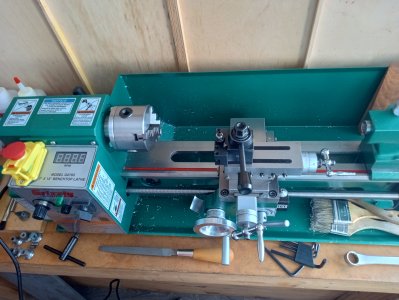
I don't think I ever posted an image of the thing, but its been heavily tinkered with and I loved that when I turned it on and did a few small turning chores, it went perfectly! I really know it well and am comfortable enough I was almost on auto pilot! The pile of zamac in the corner there is first thing I want to address, maybe this weekend. Really felt amazing to do some work with it after a bit of an interim. . .
Big thing to get through is making the fixture hardware for that linear stage I picked up, so I can finish a few engravings.
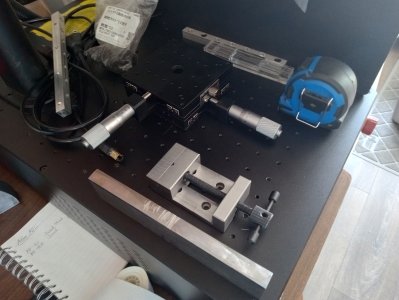
Luckily my little vise off my lathe vertical slide fits the table as is, and its big enough to hold the dies I am making. That piece of 1018 needs to be made into two strips and have some slots cut in it to mount the stage to the bed of the laser. Will probably have to setup the milling attachment in the lathe to get it done.
Still need to address the electrical parts of the Atlas MFC project, need to get the motor out and start getting it up to the same standard as everything else.
It may not be worth my time to do all this for the little mill, but its my only mill for the foreseeable next few years and I value being around things that are beautiful to lookat and functional. . . besides, It'll look better on the shelf when I finally get the floor standing model in my future shop!
Have a great holiday everybody and enjoy some eggs and sugar covered mallows.
I think I have cleared another milestone in the Atlas MFC project - all the pieces are basically cleaned and treated.
Pile of the pieces that were small enough, sorted by assembly and bagged ready for when the castings are finished. The amount of stuff that came off in the wash must have weighed as much as my cat!
Just waiting on warmer weather to do the paint stripping and repaint of everything that needs it. . . then it can begin to be rebuilt!
Been a long time since I got to play with 'Agesistratus,' but now that the piles of filthy parts and bins of soaking hardware are out of the way, I am finally getting to making the parts I need for the Atlas to be 100%.
I don't think I ever posted an image of the thing, but its been heavily tinkered with and I loved that when I turned it on and did a few small turning chores, it went perfectly! I really know it well and am comfortable enough I was almost on auto pilot! The pile of zamac in the corner there is first thing I want to address, maybe this weekend. Really felt amazing to do some work with it after a bit of an interim. . .
Big thing to get through is making the fixture hardware for that linear stage I picked up, so I can finish a few engravings.
Luckily my little vise off my lathe vertical slide fits the table as is, and its big enough to hold the dies I am making. That piece of 1018 needs to be made into two strips and have some slots cut in it to mount the stage to the bed of the laser. Will probably have to setup the milling attachment in the lathe to get it done.
Still need to address the electrical parts of the Atlas MFC project, need to get the motor out and start getting it up to the same standard as everything else.
It may not be worth my time to do all this for the little mill, but its my only mill for the foreseeable next few years and I value being around things that are beautiful to lookat and functional. . . besides, It'll look better on the shelf when I finally get the floor standing model in my future shop!
Have a great holiday everybody and enjoy some eggs and sugar covered mallows.
TAF-fy Boy
Super User
Having to remake things because somebody else lost them in the mail always is a great time, especially on a tight schedule. . .
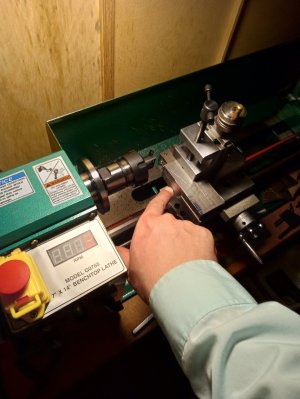
A few highlights for you guys - I had to setup the Lathe to mill some stuff for the linear stage mounting, can't wait to finish the Atlas MFC!
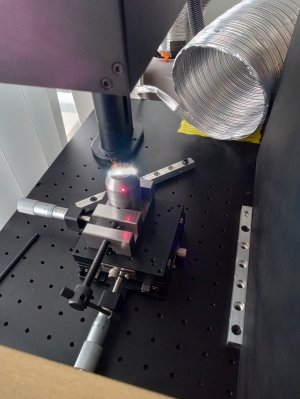
I was short on time however so the stage didn't get the full benefit of being mounted, I was able to sit it on the laser bed and VERY gingerly move the axis, working on finishing it up now.
Atlas MFC stuff - I have the motor out and am considering what to do about it. I think a full replacement of all wires is in order.
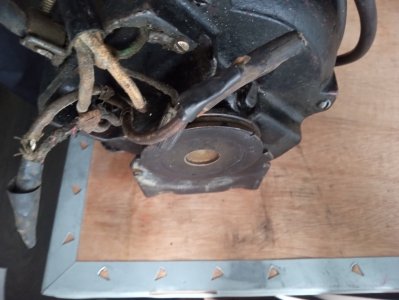
The thing did start perfectly fine when I picked the mill up all those weeks ago. . .
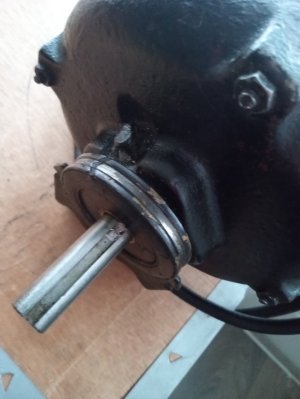
However, It has what appears to be oilers! Now I am thinking I need to go a step further and take the thing apart to cleanup any old lubrication and the like . . . I have never encountered something like this, what kinds of lubrication do I use on it after I clean it up?
For the wires, it looks like I need a 12 AWG - its a 1/4 HP, would appreciate it if someone in the know could check my rudimentary knowledge!
Have a great weekend all.
A few highlights for you guys - I had to setup the Lathe to mill some stuff for the linear stage mounting, can't wait to finish the Atlas MFC!
I was short on time however so the stage didn't get the full benefit of being mounted, I was able to sit it on the laser bed and VERY gingerly move the axis, working on finishing it up now.
Atlas MFC stuff - I have the motor out and am considering what to do about it. I think a full replacement of all wires is in order.
The thing did start perfectly fine when I picked the mill up all those weeks ago. . .
However, It has what appears to be oilers! Now I am thinking I need to go a step further and take the thing apart to cleanup any old lubrication and the like . . . I have never encountered something like this, what kinds of lubrication do I use on it after I clean it up?
For the wires, it looks like I need a 12 AWG - its a 1/4 HP, would appreciate it if someone in the know could check my rudimentary knowledge!
Have a great weekend all.
TAF-fy Boy
Super User
Update on Atlas:
Spent all afternoon cleaning and tuning the brush for the primer, yes it needs a bit of thinning even though the can says 'Do not thin' . . . but no biggie if I need to do 2 coats with the airbrush.
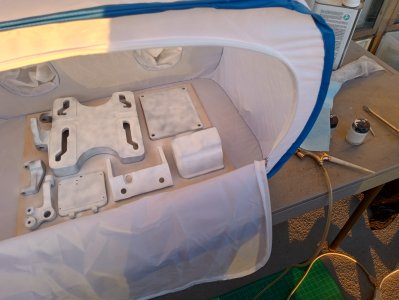
No, its not blue yet, hahah.
Fun tip, 3D printer nozzle cleaning needles work very well for cleaning up the tips of airbrushes . . . it was like my entire adolescence was caked in layers of pigment in the thing.
Hey, for something about 45 years old, that old Binks has dusted more devices than I care to admit!
I am using plastic medical syringes to proportion the mixture, no drips!
Done for today, everything should go a lot faster next chance I get good weather, Christ its going to be a pretty thing.
Spent all afternoon cleaning and tuning the brush for the primer, yes it needs a bit of thinning even though the can says 'Do not thin' . . . but no biggie if I need to do 2 coats with the airbrush.
No, its not blue yet, hahah.
Fun tip, 3D printer nozzle cleaning needles work very well for cleaning up the tips of airbrushes . . . it was like my entire adolescence was caked in layers of pigment in the thing.
Hey, for something about 45 years old, that old Binks has dusted more devices than I care to admit!
I am using plastic medical syringes to proportion the mixture, no drips!
Done for today, everything should go a lot faster next chance I get good weather, Christ its going to be a pretty thing.
TAF-fy Boy
Super User
Not much done on the Atlas the week . . .
HOWEVER.
Since I got my little lathe and have been figuring out how the hell to face large thin plates in one setup, I have been enamoured with a concept I saw a few pints in reading the 'Workshop Practice Series,'
The 'Faceplate Dog,'
To mount my linear stage on the bed of my laser, I have been struggling with how to get the stock flat enough to be within easy finishing distance of some draw filing . . . well, after a few evenings making 6 of the aforementioned dogs, considering many other ways of doing the same thing, realizing my 4-jaw just wasn't going to cut the mustard, I embraced the faceplate.
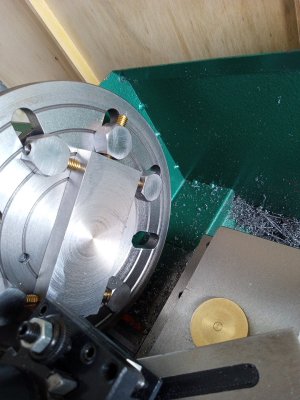
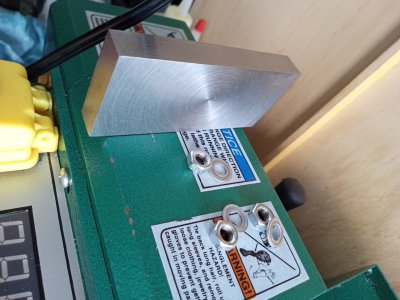
It's within 0.0005" across the two large faces, going to use a 123 block to get the edges nice and squared next.
Old technique, old book, young idiot, pretty metal.
Have a great weekend everybody.
HOWEVER.
Since I got my little lathe and have been figuring out how the hell to face large thin plates in one setup, I have been enamoured with a concept I saw a few pints in reading the 'Workshop Practice Series,'
The 'Faceplate Dog,'
To mount my linear stage on the bed of my laser, I have been struggling with how to get the stock flat enough to be within easy finishing distance of some draw filing . . . well, after a few evenings making 6 of the aforementioned dogs, considering many other ways of doing the same thing, realizing my 4-jaw just wasn't going to cut the mustard, I embraced the faceplate.
It's within 0.0005" across the two large faces, going to use a 123 block to get the edges nice and squared next.
Old technique, old book, young idiot, pretty metal.
Have a great weekend everybody.

Older lathes may have only had a face plate, and a centre. Have no idea when a chuck came somewhat standard equipment for a lathe.
They have been around for at least 150 years. My first lathe (F. E. Reede) was built in mid 1880s. It has both a 3 jaw scroll and a 4 jaw independent.
TAF-fy Boy
Super User
"Oh, how can you be in,
Two places at once when,
You're NOT ANYWHERE ATTTTT ALLLLLLLLLLL. . . "
Updates since I last posted:
Those blocks WERE indeed squared, split, hole positions marked with the lathe cross slide, drilled on my little press, then filed and blued for mounting my linear stage.
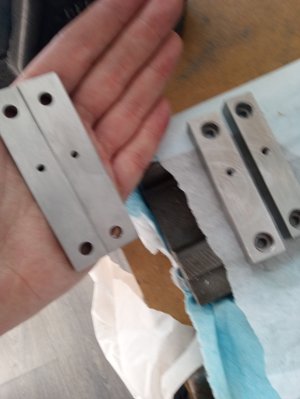
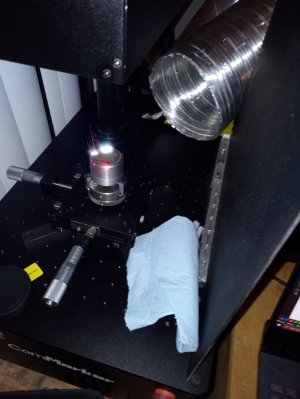
After getting that very time consuming, irritating component of my die engraving process sorted, the next most time consuming component was the polishing of their faces, to a mirror like surface.
As you all know, a lathe can only face a slightly concave feature, even on its best day, so polishing these blanks off the lathe involved several files, and A LOT, of polishing on stones. . .
Half of my desire for a shaper/planer was driven by this very harsh reality, with the knowledge a very well honed finishing tool, could create a flat, mirror-like surface. . .
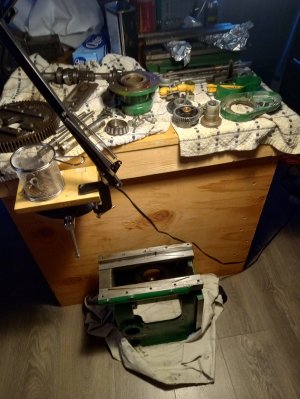
WELL it happened, I am officially an Atlas guy, I got my second Atlas machine and did the ole teardown and rebuild. Unlike the mill, and my lathe before, I had a lot of experience in these matters, and the tools to do it in well, I'd say probably 1/3rd of the hours it took just to teardown the mill!
I can not praise cheap ultrasonic cleaners enough!
Also unlike the MFC Mill (still in pieces, a lot of them primed, will wait till warmer weather to get back at it) this shaper's paint was actually not that bad off, and there was little or no concerning corrosion or damage hidden under grease and zinc pested parts! While I am not crazy about it being green and some yellow - the grizzly lathe has a friend now!
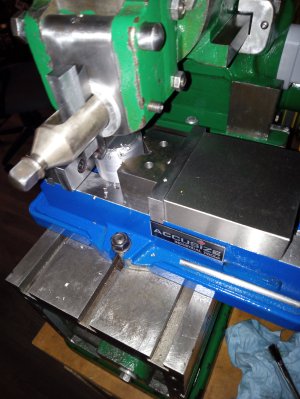
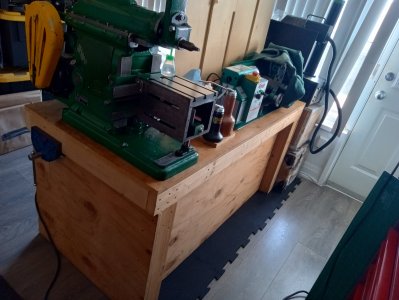
I will say, one of the things I like about having a machine that has already been through someone else breaking its handles and putting awful sheet metal doors on it . . . is I feel absolutely no guilt about chopping her up for parts, or playing games with putting electronics on it! Same goes for the mill, if these were both nicely cared for unmodified machines, I would be less eager to dirty it with chinese stainless hardware, but these are going to be USED. End of the day the shaper surfaces are all fairly pristine, some wear on the ram ways but otherwise, everything is running extremely well, quietly, and accurately!
Oh the rubber matt under the bench is recent, I went a little down the rabbit hole of soundproofing things so nobody in the building knows I am a freak whacking steel bits together at all hours. . . that in of itself deserves a whole thread I think. Its amazing to realize all my stuff clocks in around 50db now, what a little extra carpet and tightening some woodscrews can do!
"Well goodbye for now friends, and happy motoring back on the freeway.
Which is already, IN PROGRESS."
Two places at once when,
You're NOT ANYWHERE ATTTTT ALLLLLLLLLLL. . . "
Updates since I last posted:
Those blocks WERE indeed squared, split, hole positions marked with the lathe cross slide, drilled on my little press, then filed and blued for mounting my linear stage.
After getting that very time consuming, irritating component of my die engraving process sorted, the next most time consuming component was the polishing of their faces, to a mirror like surface.
As you all know, a lathe can only face a slightly concave feature, even on its best day, so polishing these blanks off the lathe involved several files, and A LOT, of polishing on stones. . .
Half of my desire for a shaper/planer was driven by this very harsh reality, with the knowledge a very well honed finishing tool, could create a flat, mirror-like surface. . .
WELL it happened, I am officially an Atlas guy, I got my second Atlas machine and did the ole teardown and rebuild. Unlike the mill, and my lathe before, I had a lot of experience in these matters, and the tools to do it in well, I'd say probably 1/3rd of the hours it took just to teardown the mill!
I can not praise cheap ultrasonic cleaners enough!
Also unlike the MFC Mill (still in pieces, a lot of them primed, will wait till warmer weather to get back at it) this shaper's paint was actually not that bad off, and there was little or no concerning corrosion or damage hidden under grease and zinc pested parts! While I am not crazy about it being green and some yellow - the grizzly lathe has a friend now!
I will say, one of the things I like about having a machine that has already been through someone else breaking its handles and putting awful sheet metal doors on it . . . is I feel absolutely no guilt about chopping her up for parts, or playing games with putting electronics on it! Same goes for the mill, if these were both nicely cared for unmodified machines, I would be less eager to dirty it with chinese stainless hardware, but these are going to be USED. End of the day the shaper surfaces are all fairly pristine, some wear on the ram ways but otherwise, everything is running extremely well, quietly, and accurately!
Oh the rubber matt under the bench is recent, I went a little down the rabbit hole of soundproofing things so nobody in the building knows I am a freak whacking steel bits together at all hours. . . that in of itself deserves a whole thread I think. Its amazing to realize all my stuff clocks in around 50db now, what a little extra carpet and tightening some woodscrews can do!
"Well goodbye for now friends, and happy motoring back on the freeway.
Which is already, IN PROGRESS."