• Scam Alert. Members are reminded to NOT send money to buy anything. Don't buy things remote and have it shipped - go get it yourself, pay in person, and take your equipment with you. Scammers have burned people on this forum. Urgency, secrecy, excuses, selling for friend, newish members, FUD, are RED FLAGS. A video conference call is not adequate assurance. Face to face interactions are required. Please report suspicions to the forum admins. Stay Safe - anyone can get scammed.

TAF-fy Pulling

Small Update -

Been busy with that Numismatics project . . .
I'm going to guess Minerva or Boudicca for the art piece.
Very good guess on Minerva there, shes a bust of 'Liberty,' in a Neoclassical style from the French 2nd Republic! The interpretation of the 'Liberty Cap,' on her is very Roman coded. . .
Anyway, I am doing a 'Liberty,' collection for a 250th Club series, - she has been replaced with the 3rd Republic interpretation of 'Le Semeuse,' that populates postage and stamps, you have all probably seen it in some light. I am doing a rendition on the 5th Republic 2 Franc art, strays much more into Social Realism and I enjoy its simplified geometry.

1771850589691.jpeg

The Atlas MFC Project is 95% torn down, I have only the 'headstock,' with the spindle and 2 overarm support clamps to take out of it. . .
The Backgear 'lever/clutch,' Zamac part was damn nigh impossible to budge, required some ultra-violence with a dremel to get the assembly removed. . . its ok, I put it on the list of things that needed to be remade regardless.
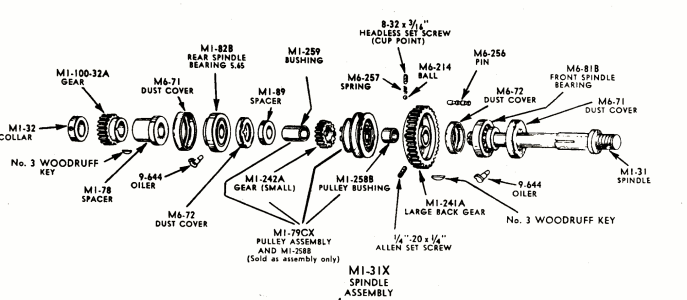
The Spindle presently is rotating and constantly getting hit with penetrating oil wherever possible, however, the collar (M1-32) on the threads near where it transmits power to the powered feed is thoroughly stuck. . .
I have resolved to making a set of 1"-10 Nuts to go on the spindle thread at the front, to get something to put a wrench on, so I can use some vise grips to possibly turn the collar. . . I hope this is the last BIG struggle I have with a part. Its been a slow process making the nuts out of aluminum, checking all my dimensions, boring it out, ready for the actual single point internal threading part (wish me luck), oh yeah, I have never cut a single point internal thread before, no time like the present.

The two overarm support clamps will need to be hammered out with a punch, those zamac pieces really swelled over the years.
1771851216874.png


Got really excited to see the end of the struggle of disassembly, only to get smashed across the face with some basic lathework I need to put the time into learning. . . hard to believe I have only had the lathe for about a year!

Oh, here is a fun question for all you . . . my jacobs chuck with some silver-demming shank drills in my tailstock loves to break free and spin instead of the drill cutting the stock, I tighten up on the tailstock lock and tap it all in with a wooden mallet but it seems like the larger drills are cutting on only one edge, then binding. Is it a tail-stock alignment issue? Or is it more just that I am trying to get my little lathe to use tools that are out of scale? Plenty of cutting fluid, in aluminum, maybe my speeds were wrong? I have not had the patience to align my tail-stock as of yet, but I know its coming soon when I need to work on that cutter arbor. . .

Lots to do, have a pleasant week everybody.
 
Oh, here is a fun question for all you . . . my jacobs chuck with some silver-demming shank drills in my tailstock loves to break free and spin instead of the drill cutting the stock, I tighten up on the tailstock lock and tap it all in with a wooden mallet but it seems like the larger drills are cutting on only one edge, then binding. Is it a tail-stock alignment issue? Or is it more just that I am trying to get my little lathe to use tools that are out of scale? Plenty of cutting fluid, in aluminum, maybe my speeds were wrong? I have not had the patience to align my tail-stock as of yet, but I know its coming soon when I need to work on that cutter arbor.

Big Drills are always hard on machines. It's a big fight between the taper slipping and the cutter grabbing.

Since you say the drill only cuts on one edge, I'd bet the drill isn't properly ground. That almost guarantees problems. It isn't LIKELY caused by an alignment issue. If it is, you should be able to actually see the drill wobbling.

I don't usually drill big holes. I use a boring bar instead.

What size is the drill, the chuck, and the taper?
 
Collar M1-32 has a lead plug under the set screw that prevents the collar from unscrewing. I have used a strap wrench around spacer M1-78 and a pair of channelllock pliers on M1-32 to remove it. This is not an elegant solution and will likely mark up the surface of the collar. You can always put the collar in the lathe and clean up the surface.
 
Big Drills are always hard on machines. It's a big fight between the taper slipping and the cutter grabbing.

Since you say the drill only cuts on one edge, I'd bet the drill isn't properly ground. That almost guarantees problems. It isn't LIKELY caused by an alignment issue. If it is, you should be able to actually see the drill wobbling.

I don't usually drill big holes. I use a boring bar instead.

What size is the drill, the chuck, and the taper?

Yes anything bigger than an inch should be bored ! Particularly on a small lathe.
 
Last edited:
What size is the drill, the chuck, and the taper?
MT2 - 5/8" Jacobs - around 3/4" but I had trouble with others too. . . I suspect a big part of it was running my spindle too slow. . .

Gave myself a nice tension headache knocking the spindle out after all those years. . . lost most of today to it. . .

The 1-10 nuts worked out perfectly for getting the collar off and even loosening a lot of the set screws, gave me a good grip on the spindle, was a real great learning experience making them and I am sure they will come in handy again.

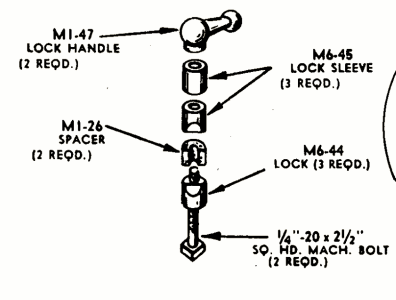
Just need to get the arbor support clamps out of the headstock, I made a little 1/4-20 nut out of some hex bar and am going to use some spacers to torque the assemblies out, I suspect the zamac will be too far gone and I will need to make replacements, also need to replace those rubber spacers. . . .
1771995369191.png
Half of me thinks that since the thing works by compressing the rubber against the Arbor Support, I could just 3D print the M6-44/45 parts and turn them smooth on the exterior to precision fir the holes and get that weird square space for the bolt head. . . if anyone has any clever ideas would be open to hearing it.

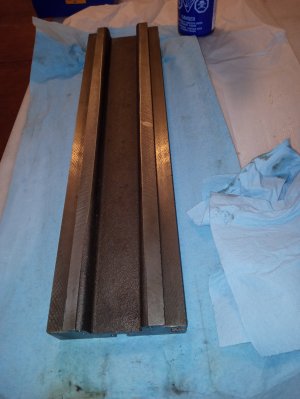
Since I lost my day to illness, I watched videos of people scraping in machine ways and decided to check the mostly cleaned table out with some measurement stuff, and yes, its like .0005" across those dovetails still! My initial impression was very much correct about this machine having had little use!
1771995712966.jpeg

Here is a shot showing all the original tool marks on the thing, pretty wild, I hope the spindle bearings clock in well enough after I get it all back together!

Hope you all stay well and enjoy the end of Winter.
 
The end of winter? We might have 2 more months here, but could turn into more, it’s Alberta. So far not much snow, and not much cold. Course there is that old saying “ in like a lion and out like a lion”. It’s about calving time!!!
 
The end of winter?
BUT THE GROUNDHOG! 😉

Anyway, I am very happy to announce . . .

1772059569884.gif

VICTORY in the teardown. . .

IMG_20260225_172146242.jpg
The last of the pieces, alright, just need to finish a good cleanup of the 80% or so that needs it and make a few parts!

Emailed clausing, they don't have any of the pulleys I need, I think tackling that is my next big task. . . going to readup on what type of mandrel I should use for that slug of 6.5 round and go from there. . . its going to be a tedious all day affair I am sure . . .

Thought about those clamp assemblies, occurred to me I can just turn some aluminum and do a straight cut across to get a slot for a bolt of some kind, especially since I had to destroy those 3 square headed ones to get this far. . . and the rubber spacers, 3D print some out of a TPU or something.
 
Figured I would post something about the Atlas, just finished a lot of work for my Numismatic job so have some time this weekend for hopefully getting out the airbrush and cleaning the big pieces, temperature should be good for a balcony session of smokes and spirits!

1772818829932.jpeg
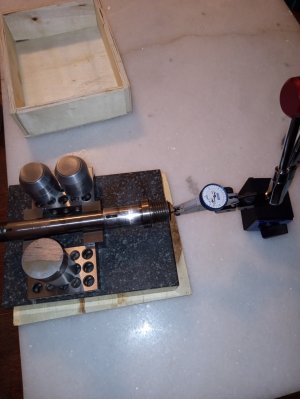
I checked the Spindle best as I could (let me know if any of you have critiques) checked out to within .0005" so I am a very happy boy.

Measured and threwout the old Belts, they had the Atlas Press Co. stamped on them, so were original to the machine, that was my progress since last post.

Am getting ready to address the motor and replacing all the old wires, will most likely need some advice as Electrical stuff is my least knowledgeable subject and my soldering irons are all cheap garbage.

Hope you all have a great weekend.
 
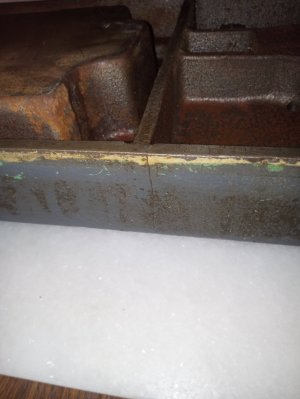
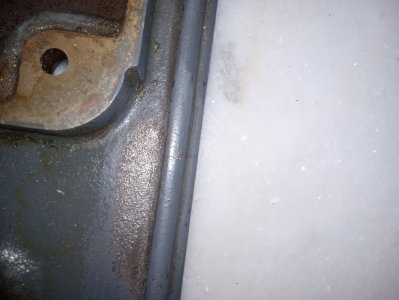
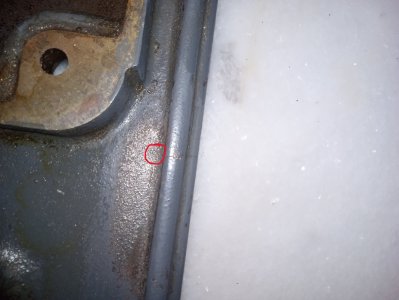
Well, found a crack in the base casting after getting 95% of the muck off.

1772918913319.jpeg
1772918926425.jpeg

1772918935230.jpeg
As you all can hopefully see, its just the edge and the crack stops after the rim there, I tookoff the paint around the area to be sure.

As I am an educated person, my mind says 'its not anything to worry about, its just the base and it gets bolted down to a piece of wood, the idea that any forces were being transferred across that gap in any way that would cause it to expand is mute.'
But the naive young person getting into machining says 'this may require surgery.'

What do you all think?

The part is so gross that its getting scrubbed, striped and primed ASAP, still have to decide on my shade of blue for the thing. . . I have some bondo and JB weld, should I go as far as to file abit around this, do a fill, or do you all think I should just paint it over?

I am very happy with my lookat the ways and spindle, a full repaint is good to go as far as I am concerned so may as well get it right now.

OH, one more thing, the base casting appears to be bowed/cambered on the bottom, I assume this is a feature not a bug as it is relatively even across? When loaded AND bolted down its flattened? Oh should i be worried?
 
Last edited:
I'd drill a hole at the end of the crack to keep it from propagating. My circle is way oversize likely - maybe just a 1/8" hole right there. You can fill it in after with JB weld / whatever, but the hole will help keep the crack from spreading.
Not sure about doing anything else, my guess is its probably unnecessary.
1772918935230.jpeg
 
BUT THE GROUNDHOG! 😉

Anyway, I am very happy to announce . . .

View attachment 78742

VICTORY in the teardown. . .

View attachment 78743
The last of the pieces, alright, just need to finish a good cleanup of the 80% or so that needs it and make a few parts!

Emailed clausing, they don't have any of the pulleys I need, I think tackling that is my next big task. . . going to readup on what type of mandrel I should use for that slug of 6.5 round and go from there. . . its going to be a tedious all day affair I am sure . . .

Thought about those clamp assemblies, occurred to me I can just turn some aluminum and do a straight cut across to get a slot for a bolt of some kind, especially since I had to destroy those 3 square headed ones to get this far. . . and the rubber spacers, 3D print some out of a TPU or something.
Glad to see you have "a brave and cunning plan".
 
This crack is in the base of your drill press? If so, I wouldn't give it another thought.

Stop drilling would certainly work, but seems very unnecessary in a part that has more redundancy in it and is not likely to experience fatigue
 
This crack is in the base of your drill press? If so, I wouldn't give it another thought.
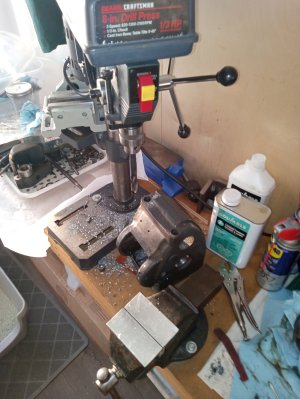
Hah, no . . . that cheapo thing was used to drillout the Atlas MFC headstock where the zamac overarm support clamps had swelled and stuck to the point i was shearing the 1/4" bolts through them off trying to torque them out!

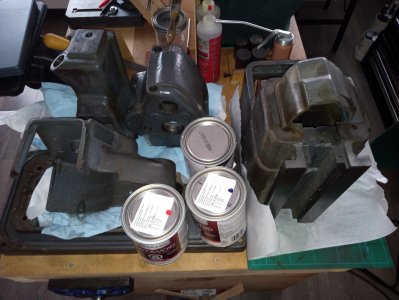
This is the base casting of the Atlas MFC restoration project I was asking about, I cleaned it up pretty well today, 70 years of caked grease and whatnot in a nice 1/2 inch puck of some gelatinous description that kerosene did nothing to affect, had to be scraped out with a knife from the big well in it. I would like to start the rebuild and be putting pieces that I cleanup and repair directly onto the machine, got to go get some paint for the topcoat.
 
I wouldn't be too worried about that crack. You can drill out the ends of it to prevent further creep, but honestly at this point it's probably gone as far is it's going to go and is "probably" of no real consequence to the accuracy and operation of the mill.
 
I wouldn't be too worried about that crack. You can drill out the ends of it to prevent further creep, but honestly at this point it's probably gone as far is it's going to go and is "probably" of no real consequence to the accuracy and operation of the mill.
Good to hear my thoughts were not unworldly on that one.

I love the geometry of castings like these so much, something just alien and yet so Architectural about draft angles and the slender curves, the Atlas Mill Really does resemble some kind of strange townhouse in form when it is just the column and head-stock on the base.
 
Alright - much delayed memo about nonsense I waste my time with 😀

Atlas MFC Project - I have finished cleaning up the large cast iron pieces and fetling them to better than factory condition. Figured since a repaint is in order I would go the whole 27ft and make the form as perfect as possible, aesthetics do matter if it lives in your front room!

IMG_20260316_101245283.jpg
Hope the paint colours come through ok, I wish they sold pints instead of quarts but here I am, at least ill have enough for other projects. Plan was to do just the blue but as I tore down the thing I thought a lovely red accent on the table would match the plates and atlas tags, also I am repainting one of the tags that was too far gone. I will be doing the 'interior' as well as table in the red, exterior in blue, should look pretty sharp when all is said and done. Still have a few baggies of hardware to deep clean and PTFE treat.

For the missing pulley I have picked up some 5/8" aluminum plate I will turn instead of spending a lot of time with that slug of 6.5in, should make the process a tad easier, I have picked up aluminum for the locking sleeves and little chromed knobs, just a matter of doing some lathe work now!

Questions:
For repairing my horizontal arbor, and perhaps making my own of a different size, should I go out of my way to source some 4140 or will my smattering of 1018 stuff be ok? I usually stroll round Mckinnon because they are pretty close and they are friendly - let you pick out of their racks, but I don't think they really carry a lot of more specialty steels and don't know where to go to get some 4140. . . poses an issue.
For buying horizontal cutters, in general, unless they show being well sharpened and stored correctly, what do you all think is fair price for them? I see some people trying to resell milling cutters and end mills and I always wonder if its insulting to low ball the hell out of them with an offer. . . just strikes me resharpening is such a PITA that any cutter not stored correctly is scrap metal.

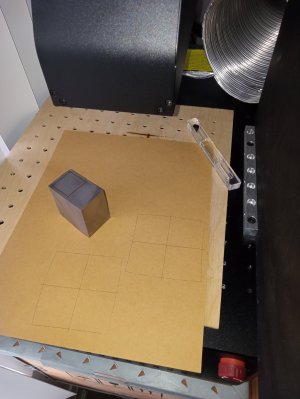
I dashed by brains out on the rocky shores of open source laser controller softwares this weekend, lost a lot of time.
IMG_20260316_101358814.jpg
Getting familiar with a new lens and going to bite the bullet and purchase lightburn, I wouldn't do so if it was a subscription software. At least I think I can write it off as an expense? 🙄

Have a good week all.
 
I think 1018 should be fine for an arbor. The 1" arbor that I made for my mill is 4140, but I bought some 1018 that I plan to use for the next couple of arbors that I make. If 4140 is hard for you to get the start with what you have and see if it works. If it proves unsuitable make another.

KBC Tools sells horizontal cutters, but new cutters aren't cheap. It looks to me like they're trying to get out of that market (lots of them are shown as out of stock and not to be restocked). IMO if you can get pretty much any new horizontal cutter for $30 or less you're doing well. Very often they're double that or even more. Used I try to get them for around $10-15 unless they're something special (e.g. wide cutters with a small diameter).
 
Alright, question for all your more electrically inclined sorts of folks . . .

1773949893167.jpeg
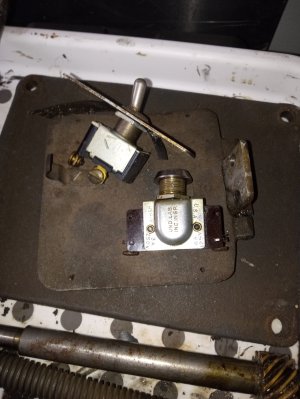
These are the two switches off the Atlas MFC, one takes a little key, I would like to keep both of them, and they did work when I picked up the thing. Question is how to go about cleaning things like this, I don't think it would hurt them to just spray the whole thing down with spirits and polish the terminals with brasso BUT I have never cleaned 70 year old electrical switches.

Probably just me being a bit too cautious but I love the way they click and the action is soo buttery smooth I'd like to keep them.

Once I get the motor out of the crate its been sitting in I will ask more about wire gauge etc and be sure my approach is correct.
 
Alright, question for all your more electrically inclined sorts of folks . . .

View attachment 79805
These are the two switches off the Atlas MFC, one takes a little key, I would like to keep both of them, and they did work when I picked up the thing. Question is how to go about cleaning things like this, I don't think it would hurt them to just spray the whole thing down with spirits and polish the terminals with brasso BUT I have never cleaned 70 year old electrical switches.

Probably just me being a bit too cautious but I love the way they click and the action is soo buttery smooth I'd like to keep them.

Once I get the motor out of the crate its been sitting in I will ask more about wire gauge etc and be sure my approach is correct.

Hi Taf-fy,
About the safest thing with those is to spray them with switch cleaner, something like "Electrolube" and work them a few times. Use an ohmmeter to check that they make&break properly. The Electrolube will provide some lubrication.
 
Back
Top