• Scam Alert. Members are reminded to NOT send money to buy anything. Don't buy things remote and have it shipped - go get it yourself, pay in person, and take your equipment with you. Scammers have burned people on this forum. Urgency, secrecy, excuses, selling for friend, newish members, FUD, are RED FLAGS. A video conference call is not adequate assurance. Face to face interactions are required. Please report suspicions to the forum admins. Stay Safe - anyone can get scammed.

Quick survey on Foundries

I want to get into melting aluminum this summer. I need a furnace big enough to make my pure scrap back into billets. I have over 50 pounds of pure shavings and it grows everyday. I would like to make them into a solid again. I would need to be able to melt about 15 pounds / pour.

One question I have is how much bubbles will be in the loaf?
I have tried melting chips that @Janger provided from his cnc however it does not melt nicely , oxidization is the issue. It doesn’t go liquid, just ashes/slag. I think a workaround is to have a charge of aluminum billet melted then to add the shavings in a shielded container (pop can) but this is a lot of work.
The guys with the electric foundries, what is the experiance with those ? It seems like a less noisy/intrusive way to melt aluminum,

what kind of quantity are you able to smelt down ?

Do they get hot enough for other materials? (Regarding home job, 30-40a 220)

Do you think it's more or less expensive than propane/oil per kg of melted material ?
The electric solved the 4-season problem in Canada, you can melt heat round indoors. No worries on fumes/gases etc. from propane.

I can melt 10lbs of aluminum no problem, it just takes time (propane was faster). . First pour is usually 90 minutes from cold amd then 40-50 thereafter once warm.

I run mine on 220v 15amp. If I factor in my time (transportation) I think cost is a wash.

In terms of what it could melt, I think the limitation is your refractory. Insulated well, it just continues to get hotter.

I use my propane outside in the summer for a change of pace
 
I have tried melting chips that @Janger provided from his cnc however it does not melt nicely , oxidization is the issue. It doesn’t go liquid, just ashes/slag. I think a workaround is to have a charge of aluminum billet melted then to add the shavings in a shielded container (pop can) but this is a lot of work.
I agree. Now if you have a 20T arbor press you could use it to ram the chips into an almost airless solid block. But you'd likely also have to wash the chips first too. Haven't tried that.
It's the same problem with pop cans. People who do use those (expensive giving up the deposit though) use a press to squish them very flat. The surface area and the contamination is where the issue lies.
Better off to sell that scrap by weight or even trade for extruded cut-offs. Be aware though the extruded stuff is very soft after casting. You can improve it by dissolving copper into it. That requires over heating the aluminum past it's normal pouring temperature and making ingots. Then remelting the ingots to pouring temperature.
 

Before I retired from industry, I called that a "roofing torch" used to melt and join asphalt roofing products on flat roofs.

As a farmer I have been firmly told that those city slickers just stole the idea from farmers. It was and still is a farming tool called a field lighter - just like barbeque lighter. It is designed to start field fires in fields of crop residue. Works great in a brush pile too.
 
@jcdammeyer , your molds always look spectacular , can you detail your process for finishing them?
Thank you.
I was into wood working well before metal working so a nice finish is kind of in-grained :D
Whether it's pieces of wood or 3D printed I start with a coat of shellac. Especially for MDF patterns which soaks on the edges. So two coats there. That provides a nice base for the water based Lepages interior wood filler.
The exterior stuff is crap for this purpose. I will also use standard autobody filler for larger surfaces
I use my fingers (wetted) to smooth out the filets and corners etc. Once dry another little bit plus a wet finger will smooth out the dried stuff. It sands nicely too with 150 to 220.
More shellac if more filler is still needed so that the layers under won't dissolve with the wet finger.
Then I use the autobody filling primer. That stuff has gone way up in price but it fills a lot of mistakes. A bit of sanding. Maybe some more filler.
The finishing is kind of a project in process. A few minutes here and there. Set it by the heating vent to dry. A few hours or the next day do a bit more.
Finally wet/dry (with water) sand the primer. Then some glossy paint.
I do have bees wax and some rounded tools and have done it that way. Shellac also covers and sticks to the wax. Probably cheaper too.
The end result is patterns that look really smooth. And the interesting part is even the slightest laziness on my part where a fillet is poorly done actually shows up in the casting.

If you do a large 3D print with say honeycomb fill, don't dry it in the sun where it gets hot. The air expands, plastic stretches, air cools, impression of the honeycomb shows up on the surface.

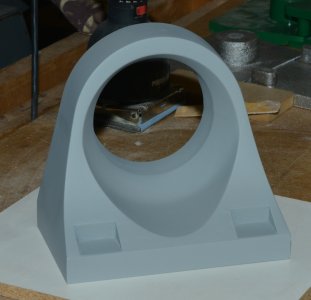
Here's an example of a 4 piece 3D printed pattern glued together. You can see how the primer fills some of it but how it requires multiple coats.
PatternPrep-1.jpg


But eventually you can't see the seams.

PatternPrep-2.jpg


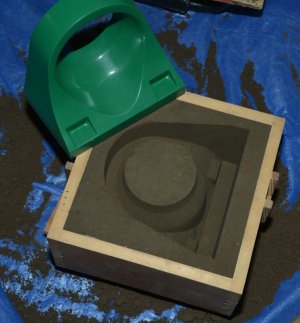
Nor any of the honeycomb from drying in the sun. And a test pull from the green sand came out nicely.
Pulled-1.jpg


Hope that helps. The thing is to be as anal about it as you would when you are putting flared fenders onto your lowered Datsun 510 with really fat Dunlop tires.
 
Does anyone use aluminum rims for stock ? It's already a castable alloy and I've seen a pairs regularly for 30-50$, just gotta Pop the tire off
 
Does anyone use aluminum rims for stock ? It's already a castable alloy and I've seen a pairs regularly for 30-50$, just gotta Pop the tire off
I've read that alot of people use that as a source, you just have to bea ble ro easily break up or saw them down to sizes you can use.
 
I have a propane fired furnace for aluminum. I use green sand for moulds. I have done a few lost foam castings when I need something ”quick and dirt” or a rough billet that gets cut/machined later. It’s amazing the detail that you get, the individual beads of styrofoam and the scotch tape covering up a small slit.
Aluminum rims are nice material but are difficult to break up. A sledge does not work. I didn’t have much luck with a saw either. I ended up using a propane assisted camp fire to get them hot enough to break up.
I hope to melt a bit of brass and bronze in the summer.
 
I agree. Now if you have a 20T arbor press you could use it to ram the chips into an almost airless solid block. But you'd likely also have to wash the chips first too. Haven't tried that.
It's the same problem with pop cans. People who do use those (expensive giving up the deposit though) use a press to squish them very flat. The surface area and the contamination is where the issue lies.
Better off to sell that scrap by weight or even trade for extruded cut-offs. Be aware though the extruded stuff is very soft after casting. You can improve it by dissolving copper into it. That requires over heating the aluminum past it's normal pouring temperature and making ingots. Then remelting the ingots to pouring temperature.
Wouldn't the contamination (oil or grains of dirt and a small amount of paper) turn into slag, which can be taken off the top? I am talking pure 6061. Using a pop can would not be pure 6061 anymore, and also has the paint (more slag). Press into puck sounds promising, but that means a press. Here is a video I saw on YT about using pop cans.

 
@Johnwa it's all about the blades with a sawzall, I have literally cut 12" beams in half with a sawzall, but you gotta have the right blade, usually the expensive ones, I have always been able to cut up aluminum easily with a sawzall

As for the sledge, I have never tried I have just been told it's possible, sounds rather dangerous and messy though if possible... flying bits of aluminum everywhere


I just wonder if it's with the effort at cost to chase down scrap rims
 
I have tried melting chips that @Janger provided from his cnc however it does not melt nicely , oxidization is the issue. It doesn’t go liquid, just ashes/slag. I think a workaround is to have a charge of aluminum billet melted then to add the shavings in a shielded container (pop can) but this is a lot of work.

The electric solved the 4-season problem in Canada, you can melt heat round indoors. No worries on fumes/gases etc. from propane.

I can melt 10lbs of aluminum no problem, it just takes time (propane was faster). . First pour is usually 90 minutes from cold amd then 40-50 thereafter once warm.

I run mine on 220v 15amp. If I factor in my time (transportation) I think cost is a wash.

In terms of what it could melt, I think the limitation is your refractory. Insulated well, it just continues to get hotter.

I use my propane outside in the summer for a change of pace
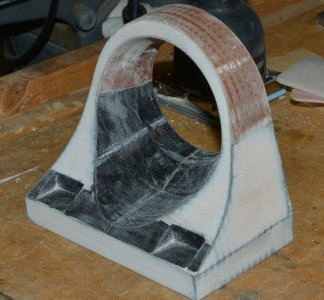
I've got another bag of aluminium swarf. I think if it was washed maybe it would work better? Anybody in YYC want it?
 
I haven't used RIMs yet. Mostly just other scrap castings and extrusions. The above pattern will actually be made from ingot alloy.
I think if you are making toys or tools any old material is probably alright. If you are making a transmission housing for an aircraft reduction drive then a known alloy and using a proper crucible become more important. (like not a steel pipe crucible).

I've not solved the issues of porosity either. Some of my castings are good. Others, even after degassing, still have lots of teensy holes or imperfections.

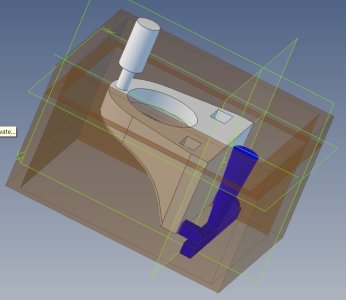
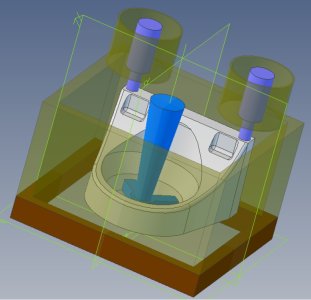
I haven't yet decided how to gate this casting either. One may result in more porosity than the other.
 

Attachments

  • CastingSetup-2.jpg
    CastingSetup-2.jpg
    62.9 KB · Views: 3
  • CastingSetup-1.jpg
    CastingSetup-1.jpg
    56.9 KB · Views: 3
What makes you guys decide to cast it instead of milling it? Especially people with CNC mills. You can cast it, then you have to mill it anyways I assume for precise surfaces. Just wondering what the advantages are having never done any casting myself.
 
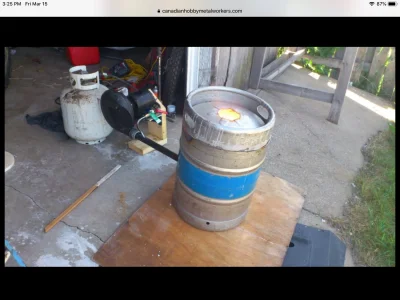
I’ve used a beer keg for mine it has 2 layers of kaowool glued in place with sodium silicate and is big enough for any of my needs. My son cut off the top too high I would have liked it to have been 2” lower to fix that I drilled a few holes in the lid and used nicrome wire to hold it in place. For a floor I used a round shelf for a kiln placed on a clay base.
3A0E44A9-9C1C-49AD-BAED-3995994A4F8C.webp


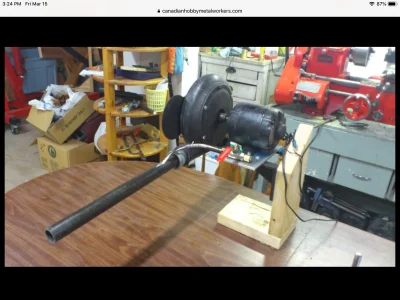
I use a dimmer switch to control the fan and a pressure regulator to control the propane other than that it is a gas tube stuck inside the black pipe.
C7465AE3-61E4-42AF-8987-A8B84243A009.webp
 
I haven't used RIMs yet. Mostly just other scrap castings and extrusions. The above pattern will actually be made from ingot alloy.
I think if you are making toys or tools any old material is probably alright. If you are making a transmission housing for an aircraft reduction drive then a known alloy and using a proper crucible become more important. (like not a steel pipe crucible).

I've not solved the issues of porosity either. Some of my castings are good. Others, even after degassing, still have lots of teensy holes or imperfections.

I haven't yet decided how to gate this casting either. One may result in more porosity than the other.
Do you get porosity in your pre-castings (loafs or pucks)?
 
Back
Top