You were observing National Waffle Day?Ouch 😡
I'll have you know I'm only waiting for my waffles. 😀
-
Scam Alert. Members are reminded to NOT send money to buy anything. Don't buy things remote and have it shipped - go get it yourself, pay in person, and take your equipment with you. Scammers have burned people on this forum. Urgency, secrecy, excuses, selling for friend, newish members, FUD, are RED FLAGS. A video conference call is not adequate assurance. Face to face interactions are required. Please report suspicions to the forum admins. Stay Safe - anyone can get scammed.
-
Several Regions have held meetups already, but others are being planned or are evaluating the interest. The Calgary Area Meetup is set for Saturday July 12th at 10am. The signup thread is here! Arbutus has also explored interest in a Fraser Valley meetup but it seems members either missed his thread or had other plans. Let him know if you are interested in a meetup later in the year by posting here! Slowpoke is trying to pull together an Ottawa area meetup later this summer. No date has been selected yet, so let him know if you are interested here! We are not aware of any other meetups being planned this year. If you are interested in doing something in your area, let everyone know and make it happen! Meetups are a great way to make new machining friends and get hands on help in your area. Don’t be shy, sign up and come, or plan your own meetup!
You are using an out of date browser. It may not display this or other websites correctly.
You should upgrade or use an alternative browser.
You should upgrade or use an alternative browser.
Mill arrived
- Thread starter MooseMeat
- Start date
MooseMeat
Well-Known Member
So I order a boring head, inserted it and put a dial indicator on it after watching it wobble around like an egg visually, any suggestions on an accurate boring head, this is the one I ordered, link below.Since you didn't blink at 10 grand, I'm not gunna hold back. Here is a list to consider. I listed the things I use regularly or that I consider essential. I'm sure I've forgotten a lot. I'm also sure others will disagree. That's ok by me. Especially if they add stuff!
All your tooling should be balanced to the size of your mill.
WORKHOLDING
Workholding is important. You say you have a vise already. I hope it's a good one. Not one of those they usually give you with the mill. Don't cheap out on the vise. Lots of guys love Kurt Vises. I have a Gerardi that I love. This is something to try and get used. @RobinHood got a Chinese Clone of the Gerardi that he liked. The workpiece must be secured to the mill's table to prevent movement during cutting. This isn't just about good finishes, it's also about safety. Please get a good vise.
A set of T-nuts, studs, step blocks, and clamps that fit the T-slots on your mill's table. This is used for securing irregularly shaped parts or when a vise isn't suitable.
A set of precision 123 blocks. These are precision-ground steel blocks used for setup, squaring work, and raising the workpiece to a specific height. A set of these with the appropriate sized machine screws is incredibly useful. I have several sets and I also have a set of 246 blocks. I use them ALL THE TIME!
Parallels - precision ground steel paired bars of equal height, used in a vise to raise the workpiece and keep it parallel to the vise's jaws. You can get thin, standard, thick, and wavy sets. At a minimum, get a 1/8 standard set. Next wavy, then 1/4, and lastly thin.
Soft Jaws or something similar are replaceable jaws for your vise, often made of a softer metal like aluminum. They are used to hold delicate or previously machined parts without damaging them. You can make them if you want.
CUTTING TOOLS
End Mills. Don't run out and get too many of these all at once. Just get a few to begin with. Say two each of 1/4, 3/8, and 1/2. (or 6, 8 10 & 12mm). You can get square end, bottom cutting, side cutting, and ball end. You will use combined bottom/side cutting most often. It won't take long to know what you need and then you can buy more. Don't bother with roughing mills till later - if ever.
You asked about a fly cutter. I'd suggest that you get three. Large, Med, and Small. Or you could consider a few sizes of facing mills with indexable inserts instead. But don't go too big. And be careful to get ones that all share the same inserts.
A collet set - say ER40 or 32. You can buy R8 collets too, but I prefer ER collets and a few standard R8 end mill holders - not R8 collets. The ER style and R8 Endmill Holders are better than R8 collets in my opinion.
You will also need 1 or 2 drill chucks. I'd suggest a small chuck and a half inch chuck. Again, buy good ones. They don't need to be Albrecht, but they need to be decent not junk. I'd suggest Jacobs Ball Bearing with keys. But there are other good ones too.
Get a small high quality drill set to begin with. You can buy individual drills as you need them. Don't buy those big 117 drill sets. If they cost less than $500 they are prolly junk.
Also think about a reamer set.
And think about annular cutters too.
METROLOGY
Precision is what a mill is all about, and you'll need the right tools to achieve it.
A good set of calipers is your primary tool for measuring dimensions. A micrometer is essential for more precise measurements, especially on smaller parts.
Dial Test Indicator (DTI) is used for a variety of tasks, such as tramming the head of the mill (making sure it is perfectly perpendicular to the table), indicating a part's surface, and finding a bore's center. I like Mitutoyo but they are pricey. DTIs are for measuring runout and relative displacement.
Lots of guys also like plain dial indicators. These are what I call plunge indicators. These measure in absolute terms and are used for measuring displacements.
A magnetic base for indicators of both kinds will allow you to mount them securely to the machine. Noga is a really good brand of base that you will be glad you bought. Make sure you get the right size clamp for your indicator(s).
A Center Punch is used to mark the location of a hole before drilling. And a few Center Drills will be useful to start a hole that doesn't wander.
A carbide scribe and some Dykem - or permanent marker, whatever works for you.
A nice 12" and 6" machinists ruler with metric and imperial is very useful.
An edge finder is used to accurately locate the edges of your workpiece, allowing you to set the X and Y zeros or references for your cuts. Both mechanical and electronic versions are available. I like the electronic ones. Accusize makes a really nice one.
Think about a spindle indicator. I use mine all the time but some guys don't.
Metric and Imperial Thread Gauges.
MISCELLANEOUS
A good book on milling.
A recent copy of Machinery's handbook.
A dead blow and wrench for the drawbar.
A dead blow hammer for the vise if you don't get a Gerardi (which doesn't need one).
Everyone needs a good set of Imperial and Metric Allen Keys. Maybe a set of ball end too.
A few different sizes of machinists squares - maybe also a 45.
A good Tap & Die set or maybe buy them individually as needed. You won't go wrong splurging on Starrett Tap Wrenches.
Also a tap follower (or make one)
Cutting fluids for steel and aluminium.
All the oils needed to maintain the mill. Usually spindle oil and way oil.
A swarf brush & dust pan
OPTIONAL STUFF
A flat/vertical rotary table.
A 5C Spin Indexer and collets.
A slit saw set
Gauge Blocks
Pin Gauges
Hole Center Punches
Transfer Punches
SOME DAY - or maybe now.....
3 or 4 axis DRO
X-Y and maybe Z power drives
Stuff I forgot but added here to keep things all in one place.
Boring head and boring bars.
Prick Center
findmall 12Pcs 3 Inch Boring Head R8 Shank 3/4 Inch Carbide Boring Bar Set : Amazon.ca: Tools & Home Improvement
findmall 12Pcs 3 Inch Boring Head R8 Shank 3/4 Inch Carbide Boring Bar Set : Amazon.ca: Tools & Home Improvement
www.amazon.ca
cheers...
are you saying that the body of the head measures inconsistently? That's not really a problem as long as the cutting tip describes a good circle. That's hard to measure with a dial indicator, but hard to mess up no matter how bad the mating surface to the quill. The cutting tip is almost guaranteed to describe some circle - but the scale may be out if the mating is not concentric
MooseMeat
Well-Known Member
So, where the collet screws into the head, the collet had a real visible wobble, then I indicated the head itself and it appeared to compound the issue. I also thought crap is the quill out on this new machine but it was spot on. I cleaned the inside of the quill for any factory goo in there and checked it again but came out the same. then for giggles I inserted a boring bar and indicated the boring bar shaft ( the part that goes into the head) and chased the boring head scale around for a bit to see I could get it to run close to true, that was an exercise in frustration.
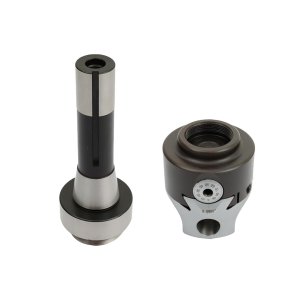
that looks like it fits into an R8. Then the tool comes in two parts. The picture is unclear about how they attach together, but the tool itself doesn't have a collet
unless the R8 surface is very bad, probably the tip will cut a good circle. a scrap test piece is the best test I think
unless the R8 surface is very bad, probably the tip will cut a good circle. a scrap test piece is the best test I think
MooseMeat
Well-Known Member
the two screw together, yup R8 wobbles noticeably when indicated on the round shiny part at the bottomthat looks like it fits into an R8. Then the tool comes in two parts. The picture is unclear about how they attach together, but the tool itself doesn't have a collet
unless the R8 surface is very bad, probably the tip will cut a good circle. a scrap test piece is the best test I think
No, honoring waffle Sunday.You were observing National Waffle Day?
Home made waffles made fresh with Logan berries from the garden, a tiny sprinkle of coarse sugar and whipping cream. Eaten every Sunday morning whilst watching This Old Tony or Rotary SMP. Bugly makes a huge batch and the dogs all line up and enjoy the rest.
One thing to test is this:
First install just the holder and measure runout, horizontally and vertically.
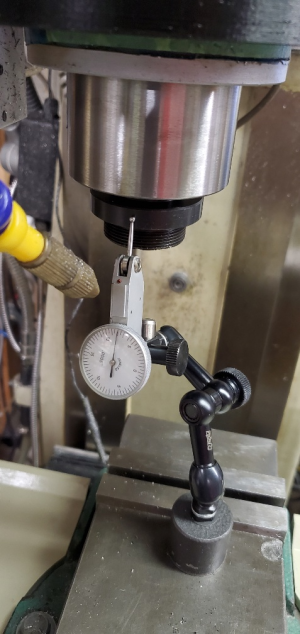
And the seating surface underneath.
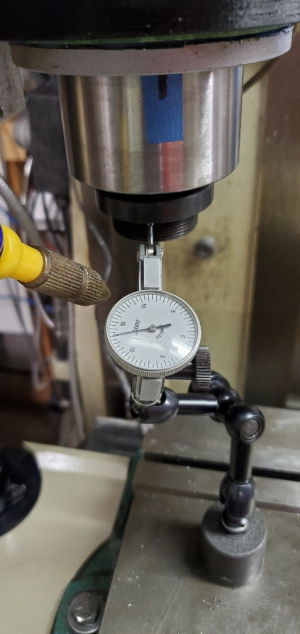
Then screw on the boring holder and see how much it deflects.
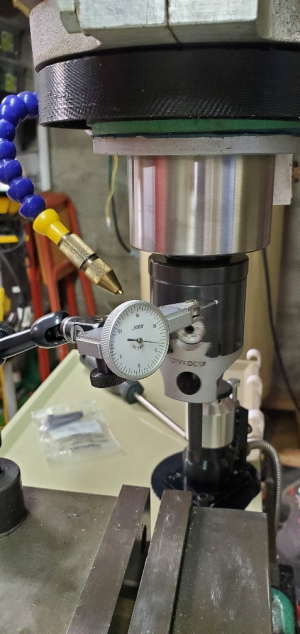
My holder was less than 0.0005 horizontally and vertically. However the boring tool holder moved 0.0095 radially. But then since the cutters are also adjusted radially it shouldn't make a difference since we measure the board after the first pass and then adjust the screw to increase depth of cut.
First install just the holder and measure runout, horizontally and vertically.

And the seating surface underneath.

Then screw on the boring holder and see how much it deflects.

My holder was less than 0.0005 horizontally and vertically. However the boring tool holder moved 0.0095 radially. But then since the cutters are also adjusted radially it shouldn't make a difference since we measure the board after the first pass and then adjust the screw to increase depth of cut.
I would take the time to blue the R8 taper area with a Sharpie marker, snug the draw bar & see if it shows any abnormal contact. If they got the angle wrong then its going to sit cocked & be different angle every installation. If the R8 seat is acceptable, measure where the wobble high/low/whatever on both the arbor flange & the boring head. If runout is repeatable then likely the arbor was machined incorrectly assuming your boring head is OK.
Here it kind of depends where the issue is. Left = arbor threads are in line with spindle, resulting in more like tangent point contact on the boring head vs flush faces.
Right = arbor threads are cocked like the flange face, which means your whole head will oscillate.
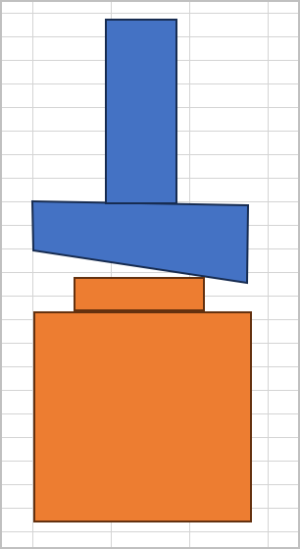
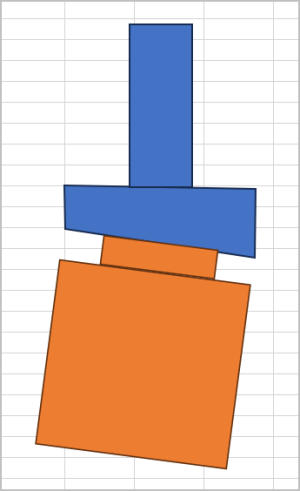
Here it kind of depends where the issue is. Left = arbor threads are in line with spindle, resulting in more like tangent point contact on the boring head vs flush faces.
Right = arbor threads are cocked like the flange face, which means your whole head will oscillate.


MooseMeat
Well-Known Member
NAILED IT, that is exactly what I did, 15thou or more runout, wobbled like an egg, small exaggeration but yes..... got worse on the boring body.One thing to test is this:
First install just the holder and measure runout, horizontally and vertically.
View attachment 69398
And the seating surface underneath.
View attachment 69399
Then screw on the boring holder and see how much it deflects.
View attachment 69400
My holder was less than 0.0005 horizontally and vertically. However the boring tool holder moved 0.0095 radially. But then since the cutters are also adjusted radially it shouldn't make a difference since we measure the board after the first pass and then adjust the screw to increase depth of cut.
MooseMeat
Well-Known Member
😳No, honoring waffle Sunday.
Home made waffles made fresh with Logan berries from the garden, a tiny sprinkle of coarse sugar and whipping cream. Eaten every Sunday morning whilst watching This Old Tony or Rotary SMP. Bugly makes a huge batch and the dogs all line up and enjoy the rest.
MooseMeat
Well-Known Member
yes in this mill there is a "bump" that guides the arbour inside the quill, forgive my terminology, I'm a virgin.....😉Did you make sure that you aligned the internal key inside your spindle with the slot on the R8 Arbour? (The thing you are calling a holder is what is called an Arbour).
yes in this mill there is a "bump" that guides the arbour inside the quill, forgive my terminology, I'm a virgin.....😉
A bump? Can you be more specific?
No worries about terminology. Just it helps us all stay on the same page if we use the right terminology.
FWIW, sometimes they are called holders if they hold a tool directly. In this case, they don't hold the tool directly. They hold a Boring Head which holds the tool.
MooseMeat
Well-Known Member
inside the quill there is a bump/guide that fits the grove in the collet, when I insert the R8 collet I have to turn it to align the "bump" and then cinch it up. Ok, having said that, is that supposed to be there for alignment?A bump? Can you be more specific?
No worries about terminology. Just it helps us all stay on the same page if we use the right terminology.
FWIW, sometimes they are called holders if they hold a tool directly. In this case, they don't hold the tool directly. They hold a Boring Head which holds the tool.

