• Spring 2024 meetup in Calgary - date Saturday, April 20/2024. discussion Please RSVP Here to confirm and get your invitation and the location details. RSVP NOW so organizers can plan to get sufficient food etc. It's Tomorrow Saturday! you can still RSVP until I stop checking my phone tomorrow More info and agenda
  • We are having email/registration problems again. Diagnosis is underway. New users sorry if you are having trouble getting registered. We are exploring different options to get registered. Contact the forum via another member or on facebook if you're stuck. Update -> we think it is fixed. Let us know if not.
  • Spring meet up in Ontario, April 6/2024. NEW LOCATION See Post #31 Discussion AND THE NEW LOCATION

Lathe DRO-Aikron A30 LCD

Susquatch

Ultra Member
Administrator
Moderator
Premium Member
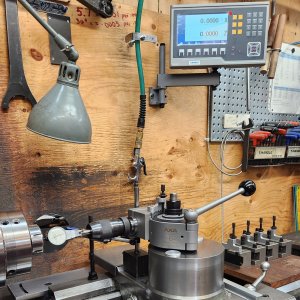
This is the way: it is directly in my line of sight, just need to glance up.

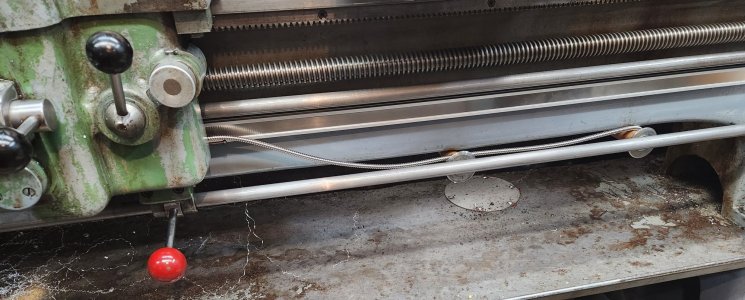
Crappy pic but mine is oriented like so. Just right of the chuck jaws, which seems to be where my attention is focused most of the time.

thems fightin words

I keep things clean by not hosing on the coolant/cutting oil :) Just enough to do the job.
Honestly, I don't know where to put the screen, so I'm going to have to experiment as time goes by. I have my most often used tools on a wooden platform on top of the head stock, and switching tools is quite fluid and quick process, so the screen won't fit in that area.

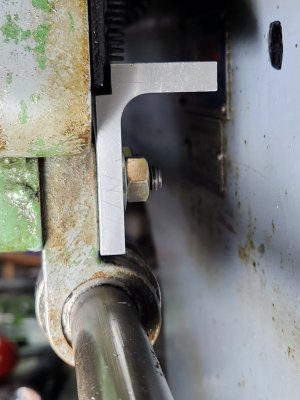
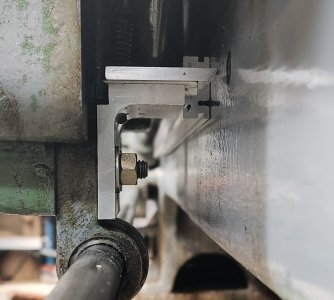
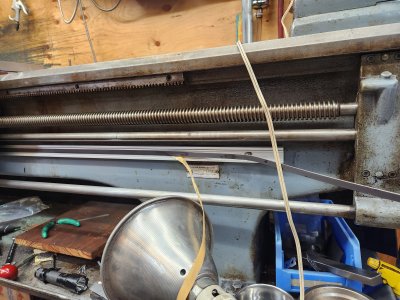
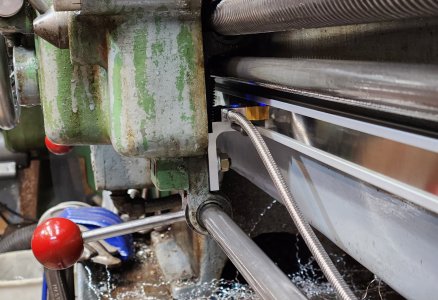
As promised, here is what would happen mounting the DRO behind the chuck. Keep in mind I DO NOT HOSE ON COOLANT. I almost always just dab a bit of cutting fluid on. Most of my work is steel or stainless.

Note the mess on the glass window pane behind the lathe. Ya, I desperately want a DRO there...... NOT!

20230510_083513.jpg 20230510_083538.jpg

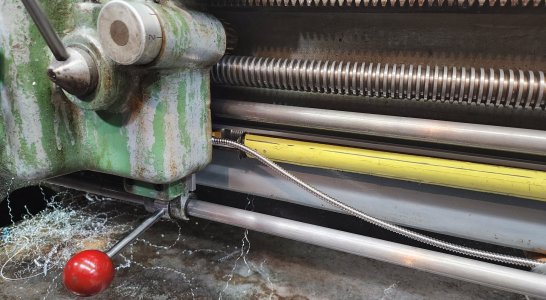
Also note the new Noga behind the chuck. Thanks to all for the price alert. I have a matched pair now! Normally, an indicator would only be there for setup.

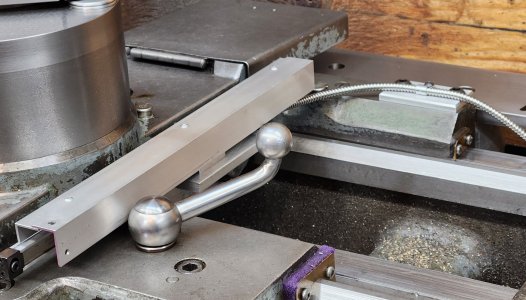
Got a nice tip from @Dabbler and will be adding a thicker steel plate there for better magnetic attachment. Cast iron is not a great attractant nor is thin sheet metal.
 

historicalarms

Ultra Member
Just thinking "out of the box here" , I mounted a very inexpensive (I-Gauge) single dro to the quill on my mill-drill. The mill drill runs pretty much vibration free but that damn dro will pick up whatever there is and continually "bounce" the reading around....would it not be better to mount your screen onto a movable stand that has no machine interference to alter it's accuracy??
I use an independent stand for my digital loading scale from the loading bench and it works wonderfully, no mater how hard I reef on a press bolted to the bench it doesnt effect the scale sensitivity.
 

thestelster

Ultra Member
Premium Member
I just set up 5 of my lathe tools on the Tool Off-Set function in the x-axis. The most important one for me was zeroing the toolpost mounted drill chuck.

I also had to do a slight linear compensation. The scale was off by 2 tenths over an inch.
 

Attachments

  • 20230510_094211.jpg
    20230510_094211.jpg
    842.5 KB · Views: 11

gerritv

Gerrit
Keep in mind when doing the Ref , that you should always do so in the same direction of travel. I was irritated that my drill chuck SDM was sometimes off by 0.024", that went away when I started consistently feeding in one direction to find the Reference.

gerrit
 

thestelster

Ultra Member
Premium Member
Keep in mind when doing the Ref , that you should always do so in the same direction of travel. I was irritated that my drill chuck SDM was sometimes off by 0.024", that went away when I started consistently feeding in one direction to find the Reference.

gerrit
I'll have to test it.

I had that issue when I had an iGaging AbsoluteDRO on the x-axis.
 

thestelster

Ultra Member
Premium Member
I've been playing hooky from work over the last couple days so that I could get the z-axis scales fitted.

I decided to mount the scale on the front. My lathe is very close to the wall, and what space there is, is occupied by 5 gallon containers of oils, bead blast media, and other junk. The lathe is bolted to the floor, and there's absolutely no room to move it. Also my taper turning attachment takes up the space where a rear scale would be.

I had to figure out where to attach the reader head. I attached it to a custom bracket on the carriage by the forward/off/reverse lever. Very tight fit.
 

Attachments

  • 20230515_153435.jpg
    20230515_153435.jpg
    339.4 KB · Views: 11

thestelster

Ultra Member
Premium Member
After making the the bracket, I fabricted a small aluminium piece half the thickness of the reader head and milled a 45° angle on one side which would act as a scriber.

I determined the position of the scale, and marked the spots where the mounting screws will be on the front surface of the lathe. I removed the paint in those sections to bare metal, used a black marker to paint those areas, then holding the "scriber" on the reader bracket, and scribed those spots.
 

Attachments

  • 20230515_145243.jpg
    20230515_145243.jpg
    427.5 KB · Views: 12
  • 20230515_145420.jpg
    20230515_145420.jpg
    354.1 KB · Views: 12

thestelster

Ultra Member
Premium Member
After laying out the positions, center punched and drilled snd tapped. Using a drill freehand can be difficult to determine if you're level, so I decide to attach a level to the drill, which proved quite accurate.
 

Attachments

  • 20230515_121601.jpg
    20230515_121601.jpg
    839.4 KB · Views: 10
  • 20230515_121729.jpg
    20230515_121729.jpg
    582.8 KB · Views: 10

thestelster

Ultra Member
Premium Member
The scale was shipped in two pieces, so I cut to the determined overall length, and attached the two pieces with tig rod pieces which were a perfect fit into the extrusions, and loctited only on the one section.
 

Attachments

  • 20230516_140816.jpg
    20230516_140816.jpg
    283.3 KB · Views: 10
  • 20230516_141346.jpg
    20230516_141346.jpg
    295.8 KB · Views: 10

Susquatch

Ultra Member
Administrator
Moderator
Premium Member
Using a drill freehand can be difficult to determine if you're level, so I decide to attach a level to the drill, which proved quite accurate.

Brilliant! How many times have I fought with this problem and never dealt with it! You are an inspiration to all of us and especially me! I love it!
 

thestelster

Ultra Member
Premium Member
Attached a dial indicator to determine the spacers I needed to put the scale aligned in the x-axis, and DTI for the y-axis.

Degreased the scale with acetone, and attached the tape and stainless strip.

Aligned and spaced the head from the scale.

I just have to make a protective cover, and figure out cable management. Maybe with a drag chain.
 

Attachments

  • 20230516_170335.jpg
    20230516_170335.jpg
    610.7 KB · Views: 15
  • 20230516_171836.jpg
    20230516_171836.jpg
    457.5 KB · Views: 14
  • 20230517_183134.jpg
    20230517_183134.jpg
    392.2 KB · Views: 11
  • 20230517_183102.jpg
    20230517_183102.jpg
    378.7 KB · Views: 12
  • 20230517_183406.jpg
    20230517_183406.jpg
    471.9 KB · Views: 15

thestelster

Ultra Member
Premium Member
Did some linear compensation, and then set up 8 tools into the Tool Offset directory for x and z axis.

Let me tell you, the instruction booklet that came with the DRO, is pretty useless. It took me hours to figure out how to do it, but it works wonderfully well. With the parting tool, I have it set up so that Tool #5 measures from the end of the stock, to the left side of the cutter, say for grooving to a shoulder. And Tool #8 which measures from the end of the stock to the right side of the cutter for parting.
 

Tecnico

(Dave)
Brilliant! How many times have I fought with this problem and never dealt with it! You are an inspiration to all of us and especially me! I love it!

Another little hint:

Make a fixture with a "perfectly" perpendicular hole drilled through it (like on your mill) and clamp it to the work piece as a guide to replicate a "perfectly" perpendicular hole in it. I used this trick on most of the holes I drilled to mount the DRO on my mill. My fixture is a piece of 3/4" square steel bar.

I also adjust the hole size for tapping based on material. Little Machine Shop has a chart that I printed, it has recommended tap drill sizes for 75% for aluminum, brass and plastics and 50% for steel, stainless and iron.

D :cool:
 

thestelster

Ultra Member
Premium Member
I have to get back to real work, you know, make money, pay bills, keep people happy! But, I've been thinking for a long time know, way before getting a DRO for the lathe, about a protective cover for the z-axis scale. Magnetic scales are less likely to be affected by dust, oil and grime than glass scales, but....
So screwing about this morning, I think this would work if I could implement it. This tape measure is 1.25" wide. And even in this funky set up, it works, well, at least following the carriage.
 

Attachments

  • 20230518_103635.jpg
    20230518_103635.jpg
    482.9 KB · Views: 11
  • 20230518_103649.jpg
    20230518_103649.jpg
    361 KB · Views: 11
  • 20230518_104921.jpg
    20230518_104921.jpg
    632 KB · Views: 11

Susquatch

Ultra Member
Administrator
Moderator
Premium Member
Make a fixture with a "perfectly" perpendicular hole drilled through it (like on your mill) and clamp it to the work piece as a guide to replicate a "perfectly" perpendicular hole in it.

I bought a drill guide on Ali to do this. It was a good price if it worked. It is crap. Sucked in by yet another gizmo.....

I like your bar idea MUCH BETTER. I've used plates for that in the past, but they can be hard to get square - a bar would be better. Or an adjustable 3 legged stool type tool.

I also adjust the hole size for tapping based on material. Little Machine Shop has a chart that I printed, it has recommended tap drill sizes for 75% for aluminum, brass and plastics and 50% for steel, stainless and iron.

I use an app on my Android called tap and drill chart calculator. You can select the tap type, metric or imperial, material or %, and then best fit and next best fit. Here is a screen shot.

Screenshot_20230518_212129_Tap And Drill Chart Calculator.jpg

When you click on a thread size it gives even more detailed information. This is just the top of the chart, you can scroll down for many many more threads.
 

Tecnico

(Dave)
@Susquatch , does your drill guide look like this: Busy Bee Drill Block ? that strangely turned up in one of the pop up ads on a page I was looking at yesterday.

I do like the idea of having various Apps hanging out on my Android DRO display but I confess that it's faster to grab the binder on my tooling shelf and flip to the page with my tap/drill chart or whatever on it. :)
The binder also holds the manual for my mill etc.

D :cool:
 

Susquatch

Ultra Member
Administrator
Moderator
Premium Member
@Susquatch , does your drill guide look like this: Busy Bee Drill Block ? that strangely turned up in one of the pop up ads on a page I was looking at yesterday.

I have one of those but never use it. Way too restricted in its limits and too flimsy.

The one I like to use if I can looks more like an inverted funnel with replaceable bushings that you can custom make for your job.

I do like the idea of having various Apps hanging out on my Android DRO display but I confess that it's faster to grab the binder on my tooling shelf and flip to the page with my tap/drill chart or whatever on it. :)
The binder also holds the manual for my mill etc.

Yup, I like quick charts too. I have no binder though, I just use magnets to post them on the wall.

I don't use a tablet, especially not if it's also my DRO display!! I just use my phone. The trouble with charts like the one we are discussing is the variety of input settings. An app lets you select a range of inputs that would require a whole wall of charts to replicate. For example, here is what shows up if I click on 10-24 in the chart I posted earlier above. It would be hard to create charts like that for each thread. You can always calculate what you need, but this allows me to select alternatives for a specific situation by just hitting a few screen spots.

Screenshot_20230519_200818_Tap And Drill Chart Calculator.jpg
 

Susquatch

Ultra Member
Administrator
Moderator
Premium Member
@Susquatch , does your drill guide look like this: Busy Bee Drill Block ? that strangely turned up in one of the pop up ads on a page I was looking at yesterday.

I seem to be having a bad about of acid reflux tonight, so I took some time to look up the guide I mentioned.

Screenshot_20230519_232827_AliExpress.jpg Screenshot_20230519_232947_AliExpress.jpg

Easy to make different size bushings for it. They are just aluminium.
 
Top