• Scam Alert. Members are reminded to NOT send money to buy anything. Don't buy things remote and have it shipped - go get it yourself, pay in person, and take your equipment with you. Scammers have burned people on this forum. Urgency, secrecy, excuses, selling for friend, newish members, FUD, are RED FLAGS. A video conference call is not adequate assurance. Face to face interactions are required. Please report suspicions to the forum admins. Stay Safe - anyone can get scammed.

JCDammeyer's 42 projects

Sad story here. Don't know if it's just the left over head cold or all the political stuff messing with my mind but I made what could have been a very serious mistake yesterday.

I was cleaning up the mill vise and tweaking the adjustment screw. Didn't like the backlash against the back bearing section so thought I'd make up a spacer washer since the threaded collar wouldn't go in any further.

Simple right? First a flat washer in the 3-Jaw with appropriate bits to make sure it stayed square. Then tried to bore the hole to enlarge it to 18.5mm. Broke the tip of a carbide insert. Hmmm. Here's where things went further south. Tried a boring tool with welded carbide cutter. Snapped the tip off that too.

OK must be a hardened washer. Chuck in a piece of aluminum casting. Bore with the other side of the chipped carbide insert. Terrible surface finish. And it appeared wobble even more. And now the carbide tip was also chipped.

What the F? Hey. How come the chuck has almost complete unscrewed. Maybe I forgot to tighten it up after the last set of changes and photos for registering chuck to spindle and it was wobbling and that broke the carbides. Tightened it up.

Tried boring again. Terrible surface finish. Disconnected the belt drive and waited for the chuck to stop. That's when I realized it was turning the wrong way.

Somehow, when I switched on the lathe I had turned the direction switch and nothing had happened. No idea why the spindle didn't turn on. Switched the spindle on/off again and then it started. OK. Some strange anomaly. I'll look into it later.

And there was the mistake. I've never run the spindle in reverse and the ON/OFF switch is red while the direction switch is black. No idea why I did that and didn't clue into it.

Once the spindle was turning in the correct direction and with a new aluminum cutting insert and the boring went fine. Facing went fine. Parting off the washer went fine.

I hesitate to think what would have happened if the chuck had unscrewed just that little bit more and the damage(injury) it could have caused.

I think I was lucky.

This guy says it best!

IMG_1736.jpeg
 
Hand held routers and my dad....

He wanted a light switch on the log cabin wall and the electrician wanted a cavity for it first. Mom had warned him not to touch her machines, but he could not resist making a very small cavity in the log wall. The electrician had told him to use a plunge router. Every member here can picture it......

Hmmm, needs to go right about here, just squeeze this here trigger thingy and then Yeeeowwwrrrooomeeeyoweyowewooommeeeewoooroeeewowww till mom pulled the plug, then followed by "Oh My God....." 6 Rosaries, and a wall art carving that will last forever on half of the wall.
My equivalency to that is a common Dremel tool in the gunsmithing practice...I fondly call it the "OHHH FCK" tool
 
I just couldn't watch the whole thing, but there was value in what I did see.

I never heard of the rule of only cutting as deep as you are wide. But it makes some sense. And I love the integrated air nozzle to reduce recutting chips. Although, I don't really want to run the air compressor.

View attachment 76882

But I have no idea what he means about long curly chips. That's a lathe thing, not a milling thing.

Might need to ask @SkookumRob what he thinks and has for hobbiests like most of us.

Sorry, I don't seem to be getting notifications again so I just saw this!

For hobbyists, my view is to keep things simple, conservative, and repeatable. Slotting is hard mainly because of chip evacuation and heat, so rules like cut no deeper than the tool is wide actually make a lot of sense on lighter machines without flood coolant. Tool choice matters too — fewer flutes and geometry intended for aluminum help chips get out of the cut instead of being recut. The general guidance we outline on our end-mill selection pages is really about matching the cutter to the material and the limits of the machine, then starting shallow and increasing only once you see good chips and stable sound. For most hobby setups, that approach will save tools, save frustration, and still get parts made reliably.
 
Sorry, I don't seem to be getting notifications again so I just saw this!

For hobbyists, my view is to keep things simple, conservative, and repeatable. Slotting is hard mainly because of chip evacuation and heat, so rules like cut no deeper than the tool is wide actually make a lot of sense on lighter machines without flood coolant. Tool choice matters too — fewer flutes and geometry intended for aluminum help chips get out of the cut instead of being recut. The general guidance we outline on our end-mill selection pages is really about matching the cutter to the material and the limits of the machine, then starting shallow and increasing only once you see good chips and stable sound. For most hobby setups, that approach will save tools, save frustration, and still get parts made reliably.
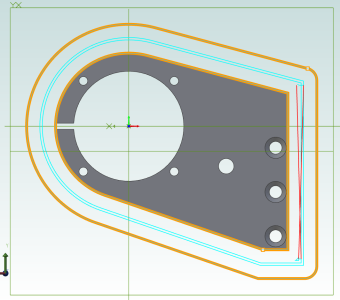
The MESA CAM software was not able to do what I want. The idea was to do the profile leaving 0.5mm to be cleaned up with a single full pass. But the profile method only follows the same path at each new cut level.
So then I tried creating an outside larger perimeter to be a few millimeters wider than the end mill. Then use the pocket approach cut each level starting with the outer one and then the inner.
But as the screen shot shows, it made a funny little jog in on the square corners and stepping through that code shows the cutter rounding the corners. No matter what I did I could not get rid of that.
Otherwise it would have been great.

1769710968568.png
 
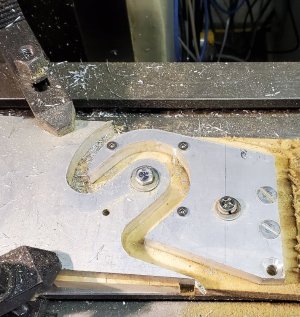
After some CAD work to update the bracket to the AR4-MK4 but with dimensions for the AR3 J2 motor I finally got the part cut. Really need ball screws to get a nicer finish. I did a final pass with climb milling and it took a nice thin 0.5mm layer off and the chips showed it. But still following the curves showed little flat spots. Maybe too fast a feed for size of tool and RPM too. So much to learn.

The reason for the open end is so the gearbox doesn't have to be removed from the motor to install it. Now just undo the screws, slide out the 3D printed clamp and then the motor lifts out.

J2-MotorSupport_Machined.jpgJ2-MotorSupport_Done.jpg

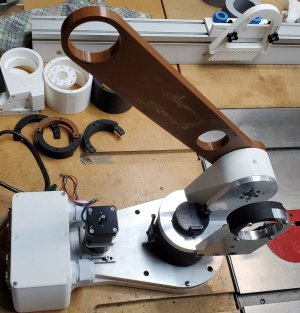
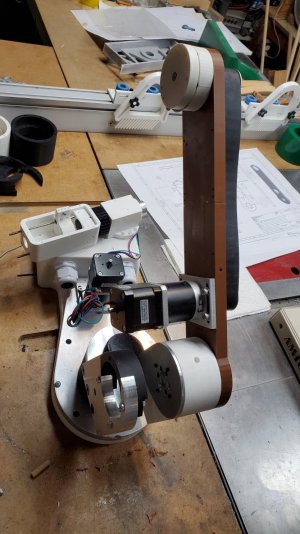
Also 3D printed (in two parts and then glued) the arm to get a better feel for motion. Next find a 2" thick piece of aluminum or cast something.

Can't believe I started this project almost exactly 3 years ago.
 
Might as well surf the web for a while since watching paint dry is boring...
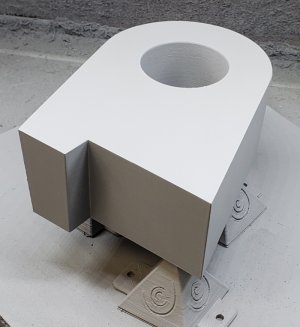
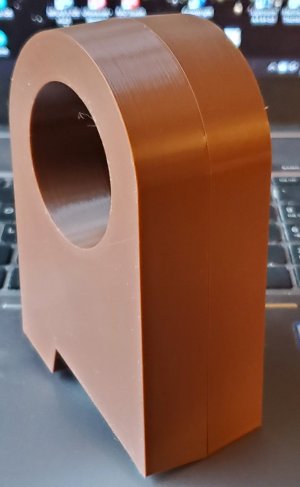
This is the pattern with 3 degrees draft and scaled by 3%. Probably should have scaled it 8% or changed a few dimensions to give me more latitude for milling the casting.

J2TurretHousing_Primed.jpg

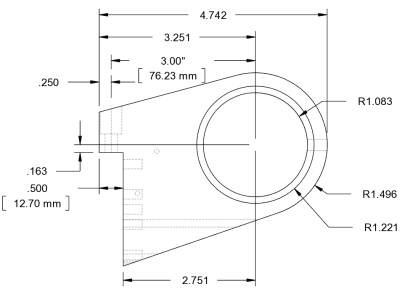
The centre has to be exactly 2.750" +/-0.001" in order to line up with the other part that holds the motor. The drawing is from the imported STEP file created from the STL file by my friend JoeMac. So I think the real dimension is actually 2.750 rather than the 2.751 as shown on the drawing.

The other part is mounted from the side with the 3 holes 3.000" from the center of the motor clamp.

1770250696336.png
 
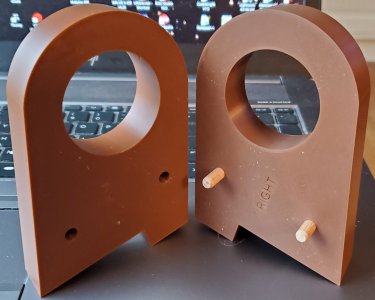
So I really didn't like the larger single pattern with the taper for release from the sand mold. Seems a split pattern will be closer to the final size and look half decent after the reference surfaces are milled and bored.

20260207_095922.jpg20260207_095941.jpg


Now to clean them up and paint them so they are nice and smooth and pull without disturbing the sand.
 
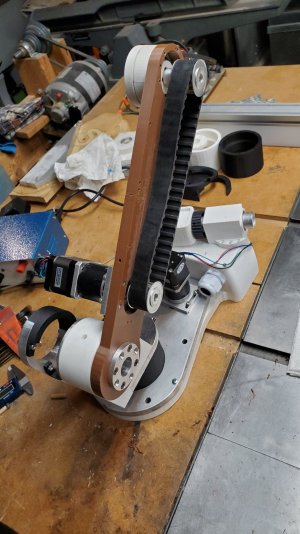
The main arm is definitely going to have to be aluminum. Just can't get decent 3mm threads in the 3D print to hold the motors and bearings.

The toothed belt drive pulleys have been broached for the 2mm and 3mm keys. The top pulley needs to be made narrower. Progress2.jpg

Trying to make the belt tight with the plastic arm will be a problem. It's such a stiff belt.
Progress1.jpg
 
I don't suppose heat set inserts would be an option for those threads? Moot point if the whole thing isn't rigid enough as noted though I guess
It doesn't look like there is room for inserts around the edge. The thing to do here is look and see if I can enlarge that section without interfering with motion from other axis. I do have the raw material to make a metal arm. But any shop work is going to have to take a one week holiday (or longer).

Today is cataract surgery on the left eye.
Add an idler?
I think tension will just bend the plastic arm.
 
Today is cataract surgery on the left eye.

Good luck John. I'm wishing you all my best. I think we are all blessed to live in a time when such surgery is so available.

I have had surgery on my right eye 4 times - twice for cataracts and 2 vitrectomies.

My left eye isn't so blessed. It was due for cataract surgery right about the same time as my stroke. They won't do it now because they say it won't help. This despite the fact that I have learned how to use averted vision in that eye quite well. Ah well, count my blessings.
 
Good luck John. I'm wishing you all my best. I think we are all blessed to live in a time when such surgery is so available.

I have had surgery on my right eye 4 times - twice for cataracts and 2 vitrectomies.

My left eye isn't so blessed. It was due for cataract surgery right about the same time as my stroke. They won't do it now because they say it won't help. This despite the fact that I have learned how to use averted vision in that eye quite well. Ah well, count my blessings.
I had assumed you were totally blind in that eye.
 
I had assumed you were totally blind in that eye.

Almost but not completely. I have some peripheral vision. I can see things coming from outside my normal vision cone and I am learning to use averted vision to obtain limited vision in certain circumstances. I look like I'm cross-eyed when I do that.

Normally, I can only really see with my right eye though. It means I have virtually no hand eye coordination because I have no depth perception. As a result I have become more clumsy and accident prone than I used to be which was never great.

All in all, I can't complain. When I see what others go through with their strokes I consider myself very very lucky.
 
Normally, I can only really see with my right eye though. It means I have virtually no hand eye coordination because I have no depth perception. As a result I have become more clumsy and accident prone than I used to be which was never great.
Same for me. My right retina looks like the surface of the moon due to scar tissue forming after a detachment and briefly successful re-attachment. Completely blind in that eye. I find depth perception loss at long distances doesn't impact me much but for up close work like hammering nails or placing tiny screws or trying to type on my phone, it's a real problem. Also can't level dirt with the rake worth a shit. It all looks level to me unless there are distinct shadows.
 
All in all, I can't complain. When I see what others go through with their strokes I consider myself very very lucky.
I had to rescue a family member from the USA, because of one. I know greyhound is no more up here but you would have to force me at gun point to get back on one. At the time it was $100-ish to get to Houston from Canada.

I don't even know if gun point would do it. To look back on it now, it's absolute insanity to buy a bus ticket to Houston, no cell phones, just blind trust in the drivers. I had it figured out at one point, in a seven day run I crossed something like 22 states and over 4000 miles. Whatever the number was, it was silly
 
Today is cataract surgery on the left eye.
Nine hours after they put in the dilating drops it's still completely open and I can't focus on anything. Hope it gets better because the two round circles surrounding lights weren't there before either. Not so sure at the moment that this was a good idea.

1770694433117.png
 
Nine hours after they put in the dilating drops it's still completely open and I can't focus on anything. Hope it gets better because the two round circles surrounding lights weren't there before either. Not so sure at the moment that this was a good idea.

View attachment 77962
For my surgery the halos on the lights lasted about a week. Just avoid driving at night for a while.
 
For my surgery the halos on the lights lasted about a week. Just avoid driving at night for a while.
Thanks. Apparently the stuff they use to dilate the iris for surgery can last 24 hours so that explains a lot. This all has me very scared to be honest.
 
Back
Top