I have one of these suspended from the ceiling about 2.5' above my lathe & one hanging behind & slightly above my head at the mill. No significant shadows from either location, tons of light. Picked them up on sale for less than half price. At that distance, there's no chance of anything splashing on them, either.
-
Scam Alert. Members are reminded to NOT send money to buy anything. Don't buy things remote and have it shipped - go get it yourself, pay in person, and take your equipment with you. Scammers have burned people on this forum. Urgency, secrecy, excuses, selling for friend, newish members, FUD, are RED FLAGS. A video conference call is not adequate assurance. Face to face interactions are required. Please report suspicions to the forum admins. Stay Safe - anyone can get scammed.
-
Several Regions have held meetups already, but others are being planned or are evaluating the interest. The Calgary Area Meetup is set for Saturday July 12th at 10am. The signup thread is here! Arbutus has also explored interest in a Fraser Valley meetup but it seems members either missed his thread or had other plans. Let him know if you are interested in a meetup later in the year by posting here! Slowpoke is trying to pull together an Ottawa area meetup later this summer. No date has been selected yet, so let him know if you are interested here! We are not aware of any other meetups being planned this year. If you are interested in doing something in your area, let everyone know and make it happen! Meetups are a great way to make new machining friends and get hands on help in your area. Don’t be shy, sign up and come, or plan your own meetup!
You are using an out of date browser. It may not display this or other websites correctly.
You should upgrade or use an alternative browser.
You should upgrade or use an alternative browser.
DavidR8's shop shenanigans
- Thread starter David
- Start date
Do you have a picture of them? The site doesn't have a pic.I have one of these suspended from the ceiling about 2.5' above my lathe & one hanging behind & slightly above my head at the mill. No significant shadows from either location, tons of light. Picked them up on sale for less than half price. At that distance, there's no chance of anything splashing on them, either.
Huh. Does for me. Tried to download the image, couldn't display it from the desktop. It's a 4' fixture w/ 4 LED tubes in it. 10,000 lumens.Do you have a picture of them? The site doesn't have a pic.
DPittman
Ultra Member
I've got a similar lamp on my lathe and really like it. Much better with led bulbs in it. I also use it as a shield (sort of) when I've got aggressive chips flying at me or out of control bird nests that are threatening to take flight.Let there be light!
View attachment 61551
Ok now it worked 🙄🙄🙄Huh. Does for me. Tried to download the image, couldn't display it from the desktop. It's a 4' fixture w/ 4 LED tubes in it. 10,000 lumens.
@David & @JustaDB The image is fine for me too.
For a non-focussed source, light intensity is inversely proportional to the square of the distance from the source. This means that as you move twice as far away from a light source, the light intensity becomes one-fourth (1/4) as bright.
There is also a difference in perceived intensity between directional and distributed light sources. Again, the perceived light intensity is greater for directional sources.
That's why you need less lumens as the light source gets closer or is more beam like.
LUX is a better comparison than Lumens when comparing how a surface will look with a light shining on it.
With my derelict eyesight, more light is better. I prefer a bright diffused overhead light that lights up the entire work area in combination with a directional light source focussed on the work itself. Someday I'll get around to making a spindle light for the mill, but it's way down on my priorities because my directional magnetic post light really does work great.
This is why I like those LED's. Being 4' long, they illuminate the entire lathe and the entire mill bed. I do have a small LED bulb on the mill that shines from the left rear & helps w/ shadows on the backside.I prefer a bright diffused overhead light that lights up the entire work area...
historicalarms
Ultra Member
I'm with you Susq. That handle is sure too close to the working end of that shaft/chuck for me to use as a stop-go lever. I would add an extension with a bend in it to move the control knob up a bit & over to the front of the lathe...basically you would be lifting the knob straight up from in front of and away from that chuck.Huh. Never saw one like that before.
Engaging/disengaging the drive belt from a handle behind the chuck seems a bit risky to me from the other side of the country. What's it like in real life up close and personal?
My practice is to never reach near or over the chuck - this means left hand filing, and no touching the lever during movement...I'm with you Susq. That handle is sure too close to the working end of that shaft/chuck for me to use as a stop-go lever. I would add an extension with a bend in it to move the control knob up a bit & over to the front of the lathe...basically you would be lifting the knob straight up from in front of and away from that chuck.
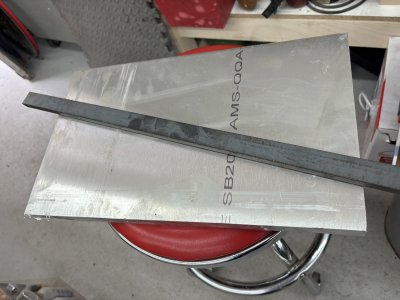
Wow! Good price.
Lloyd Mutrie is the man. I thought that aluminum would be closer to $150-$180 so when he said $85 I couldn't pay fast enough.Wow! Good price.
Last edited:
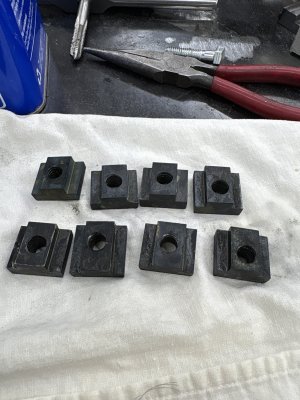
First actual CNC project.
Did you mill those as a strip and then cut, or did you mill them individually?
I made a strip and cut them apart
Exactly what i would have done too. Always interested in the other approach and why.
Dan Dubeau
Ultra Member
Nice job, that's the quickest way to make them IMO. Now, while you're set up, run off a few more strips, but with some different sized holes, and maybe leave a couple blanks. You have a good little obedient metal eating robot now, so you need some more creative ways to hold it's food for it......
You can make some with a couple different sized holes say 10-24, 1/4-20 all on the same block. They don't "have" to be perfectly centered, especially as they get smaller, but they're really handy for bolting plate/flat work directly through the table, and sometimes you need/only have space for smaller hardware to fit. Things like cutting out 2d profiles become so much easier when you can through bolt it to the table, and you don't always have room for bigger hardware. Even just popping a smaller tapped hole on either side of a regular tee nut can be useful sometimes.
You can make some with a couple different sized holes say 10-24, 1/4-20 all on the same block. They don't "have" to be perfectly centered, especially as they get smaller, but they're really handy for bolting plate/flat work directly through the table, and sometimes you need/only have space for smaller hardware to fit. Things like cutting out 2d profiles become so much easier when you can through bolt it to the table, and you don't always have room for bigger hardware. Even just popping a smaller tapped hole on either side of a regular tee nut can be useful sometimes.
Brilliant idea Dan, really like that!Nice job, that's the quickest way to make them IMO. Now, while you're set up, run off a few more strips, but with some different sized holes, and maybe leave a couple blanks. You have a good little obedient metal eating robot now, so you need some more creative ways to hold it's food for it......
You can make some with a couple different sized holes say 10-24, 1/4-20 all on the same block. They don't "have" to be perfectly centered, especially as they get smaller, but they're really handy for bolting plate/flat work directly through the table, and sometimes you need/only have space for smaller hardware to fit. Things like cutting out 2d profiles become so much easier when you can through bolt it to the table, and you don't always have room for bigger hardware. Even just popping a smaller tapped hole on either side of a regular tee nut can be useful sometimes.
Dan Dubeau
Ultra Member
It was one born out of necessity, but proved to be really handy. They got borrowed so often I don't think I have any left lol.


