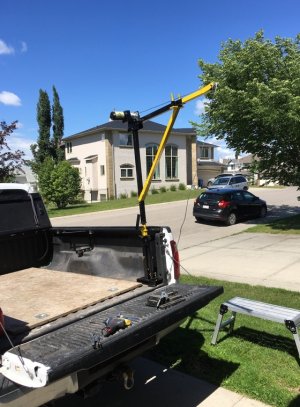
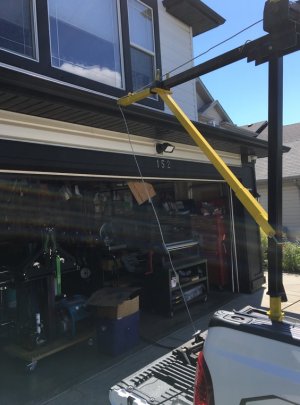
This is my completed 150 lbs truck bed crane. Finally painted and installed. Or Version 2.0 at least. It features an Optima Blue Top Deep Cycle battery and a 2000 lbs Princess Auto Tracker ATV Winch.
I built it because I do a lot of volunteer “Snow Angel" work for 16 neighbours, mostly single moms and elderly people. I have a Honda HSS724 2 stage blower and a Honda HS520 single stage machine. The HSS724 is tracked so I just drive it into the back of my truck on ATV ramps (it’s about 300 lbs). But the smaller single stage that I use more often is about 90 lbs wet. Sadly, its small 3 inch wheels fall between the ramp cross-members. At 90 lbs., it is right in the danger zone for a retired guy like me. Sure, I can lift it (and have before). But it’s only a matter of time before I hurt my back pretending I'm 20 years old again. The pain pales in comparison to the humiliation of knowing better.
So this was my solution.
Yes, I could have bought a permanent $200 truck bed crane from Princess Auto. I also could have used solid floor ramps. But the HS520 has a unique feature that prevents it from inclining backwards, making it difficult to roll up a ramp. I also knew the crane would prove useful as I advance into my senior years. (Damn, this post is getting depressing).
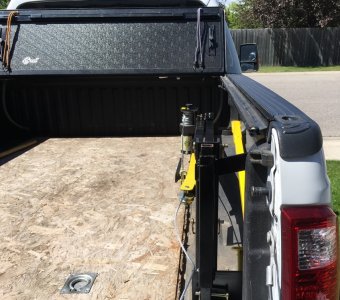
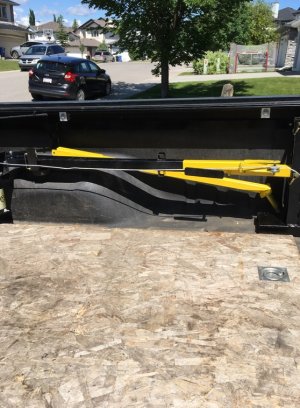
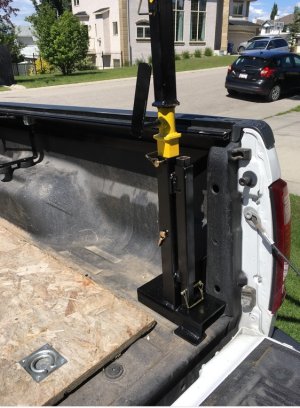
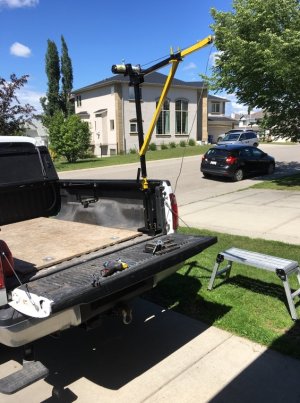
Because I have a tonneau cover on my F250 I wanted the crane to fold up and lay in the bed above the the wheel well and out of the way when not in use. Two other requirements for me were: 1) it had to self-deploy, meaning the winch pulls the crane upright out of the truck bed to use; and 2) I didn’t want to drill into the truck bed as the vehicle is pretty new. This meant fabricating a specialized bracket that utilized the tie-down points in the truck. Obviously this compromised the lifting weight considerably, but I set a maximum weight of 150 lbs., and tested it to 250 lbs. without any deflection of the truck box. The crane can easily hold 250+ lbs., based on the 0.125 wall tubing and the engineering geometry, but my critical points here are actually the truck bed tie-downs. I don’t want to bend my truck box.
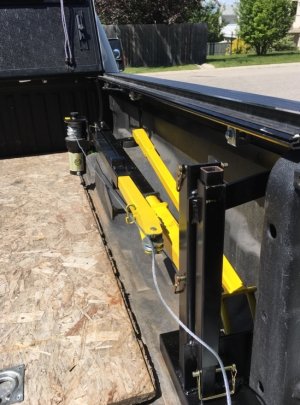
Swivel design is typical "tubing-in-pipe" with standard trust washers that are kept greased. Pivots are 3/8 Grade 8 clevis pins. All bolts are Grade 8s with nylon insert nuts or Loctite 242 where more approriate. The 45 degree support beam (yellow) has a secondary purpose prior to deployment: it attaches to the back of the base bracket in the bed via a telescopic extension. You then clip the winch hook to it and use the winch’s power to pull up the crane into its vertical position. Once vertical, you hold it there with a clevis, remove the support beam from the collapsable extension and reuse it as the arm at 45 degrees to for the horizontal member. If this sounds overkill consider that the winch and crane together weigh almost 40 lbs. If you were to deploy manually this weight must be pushed from either the inside of the bed or pulled up from an odd angle outside the truck in cold weather. You then have to hold it up as you fumble for a clevis pin. Hummm….yeah no….I don’t want to do that.
On the top of the yellow support beam is a yoke that allows me to insert it into the horizontal beam guides and push the beam upwards into place without getting into the truck bed. The first design of the crane lacked this feature. Because it is a 3/4 ton truck, I needed a stool in this first design to stand high enough to attach the support (yellow) beam. Either that or I had to get into the truck. This is easy enough in summer when fabricating, but in winter when cold and nasty…not so much. So the second iteration solved the problem. It also has holes for clevis pins in case I want to drive with the crane deployed. This prevents the horizontal beam from jumping out of place and crashing down into the truck.
Some things I will do differently in version 3.0, which will follow after I test drive this one a bit:
1) Positive stops in addition to the infinite bearing lock mechanism (aka Grade 8 bolt w/ welded handle). This will give me more confidence when driving with it deployed. It will also prevent me from looping the wiring harness around the crane accidentally.
2) A better system for keeping the wire rope in the pulley chase. Originally I had the wire rope inside the telescoping arm, but this proved problematic when collapsing the crane into the truck bed. I have some new solutions now though.
3) A safety holding point/catch for the support beam where it connects to the vertical member so I don’t have to hold with one hand while using my other hand to insert a clevis. This could be dangerous if it arm slips. I can easily modify this now if desired.
4) Incorporation of the battery box in the side bracket that attaches to the inside of the truck bed to hold the crane when collapsed. This is difficult to see in the pics, but is actually a 1/4 flat steel strip with a 1/4 bracket that sits on the wheel well. Interestingly, I needed a firm rubber spacer between it and the wheel well, and it turned out an old hockey puck of all things was the perfect answer!
5) If I continue to use the yoke solution I will curve it next iteration to make it easier to insert. I may, however, abandon this for an articulated support arm.
Yet to do when the paint hardens a bit more:
1) Add conspicuity tape to the crane
2) Metal sleeve the wiring to the battery and control switch
3) Add warning decals for weight capacity
P.S. Sorry again...all my pics look fine on my iPhone and on my Mac but whenever I upload they change orientation.
I built it because I do a lot of volunteer “Snow Angel" work for 16 neighbours, mostly single moms and elderly people. I have a Honda HSS724 2 stage blower and a Honda HS520 single stage machine. The HSS724 is tracked so I just drive it into the back of my truck on ATV ramps (it’s about 300 lbs). But the smaller single stage that I use more often is about 90 lbs wet. Sadly, its small 3 inch wheels fall between the ramp cross-members. At 90 lbs., it is right in the danger zone for a retired guy like me. Sure, I can lift it (and have before). But it’s only a matter of time before I hurt my back pretending I'm 20 years old again. The pain pales in comparison to the humiliation of knowing better.
So this was my solution.
Yes, I could have bought a permanent $200 truck bed crane from Princess Auto. I also could have used solid floor ramps. But the HS520 has a unique feature that prevents it from inclining backwards, making it difficult to roll up a ramp. I also knew the crane would prove useful as I advance into my senior years. (Damn, this post is getting depressing).
Because I have a tonneau cover on my F250 I wanted the crane to fold up and lay in the bed above the the wheel well and out of the way when not in use. Two other requirements for me were: 1) it had to self-deploy, meaning the winch pulls the crane upright out of the truck bed to use; and 2) I didn’t want to drill into the truck bed as the vehicle is pretty new. This meant fabricating a specialized bracket that utilized the tie-down points in the truck. Obviously this compromised the lifting weight considerably, but I set a maximum weight of 150 lbs., and tested it to 250 lbs. without any deflection of the truck box. The crane can easily hold 250+ lbs., based on the 0.125 wall tubing and the engineering geometry, but my critical points here are actually the truck bed tie-downs. I don’t want to bend my truck box.
Swivel design is typical "tubing-in-pipe" with standard trust washers that are kept greased. Pivots are 3/8 Grade 8 clevis pins. All bolts are Grade 8s with nylon insert nuts or Loctite 242 where more approriate. The 45 degree support beam (yellow) has a secondary purpose prior to deployment: it attaches to the back of the base bracket in the bed via a telescopic extension. You then clip the winch hook to it and use the winch’s power to pull up the crane into its vertical position. Once vertical, you hold it there with a clevis, remove the support beam from the collapsable extension and reuse it as the arm at 45 degrees to for the horizontal member. If this sounds overkill consider that the winch and crane together weigh almost 40 lbs. If you were to deploy manually this weight must be pushed from either the inside of the bed or pulled up from an odd angle outside the truck in cold weather. You then have to hold it up as you fumble for a clevis pin. Hummm….yeah no….I don’t want to do that.
On the top of the yellow support beam is a yoke that allows me to insert it into the horizontal beam guides and push the beam upwards into place without getting into the truck bed. The first design of the crane lacked this feature. Because it is a 3/4 ton truck, I needed a stool in this first design to stand high enough to attach the support (yellow) beam. Either that or I had to get into the truck. This is easy enough in summer when fabricating, but in winter when cold and nasty…not so much. So the second iteration solved the problem. It also has holes for clevis pins in case I want to drive with the crane deployed. This prevents the horizontal beam from jumping out of place and crashing down into the truck.
Some things I will do differently in version 3.0, which will follow after I test drive this one a bit:
1) Positive stops in addition to the infinite bearing lock mechanism (aka Grade 8 bolt w/ welded handle). This will give me more confidence when driving with it deployed. It will also prevent me from looping the wiring harness around the crane accidentally.
2) A better system for keeping the wire rope in the pulley chase. Originally I had the wire rope inside the telescoping arm, but this proved problematic when collapsing the crane into the truck bed. I have some new solutions now though.
3) A safety holding point/catch for the support beam where it connects to the vertical member so I don’t have to hold with one hand while using my other hand to insert a clevis. This could be dangerous if it arm slips. I can easily modify this now if desired.
4) Incorporation of the battery box in the side bracket that attaches to the inside of the truck bed to hold the crane when collapsed. This is difficult to see in the pics, but is actually a 1/4 flat steel strip with a 1/4 bracket that sits on the wheel well. Interestingly, I needed a firm rubber spacer between it and the wheel well, and it turned out an old hockey puck of all things was the perfect answer!
5) If I continue to use the yoke solution I will curve it next iteration to make it easier to insert. I may, however, abandon this for an articulated support arm.
Yet to do when the paint hardens a bit more:
1) Add conspicuity tape to the crane
2) Metal sleeve the wiring to the battery and control switch
3) Add warning decals for weight capacity
P.S. Sorry again...all my pics look fine on my iPhone and on my Mac but whenever I upload they change orientation.
Attachments
Last edited:
")