• Scam Alert. Members are reminded to NOT send money to buy anything. Don't buy things remote and have it shipped - go get it yourself, pay in person, and take your equipment with you. Scammers have burned people on this forum. Urgency, secrecy, excuses, selling for friend, newish members, FUD, are RED FLAGS. A video conference call is not adequate assurance. Face to face interactions are required. Please report suspicions to the forum admins. Stay Safe - anyone can get scammed.
  • Several Regions have held meetups already, but others are being planned or are evaluating the interest. The Calgary Area Meetup is set for Saturday July 12th at 10am. The signup thread is here! Arbutus has also explored interest in a Fraser Valley meetup but it seems members either missed his thread or had other plans. Let him know if you are interested in a meetup later in the year by posting here! Slowpoke is trying to pull together an Ottawa area meetup later this summer. No date has been selected yet, so let him know if you are interested here! We are not aware of any other meetups being planned this year. If you are interested in doing something in your area, let everyone know and make it happen! Meetups are a great way to make new machining friends and get hands on help in your area. Don’t be shy, sign up and come, or plan your own meetup!

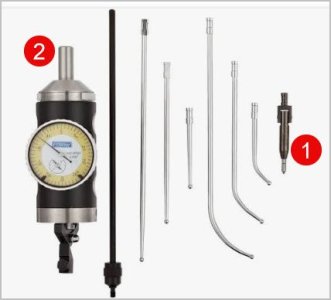
Tool Coaxial indicator

Tool
My Shumatech DRO has the ability, with a simple electrical touch probe to find the center of a round object. So until I had the probe used with LinuxCNC it's been fine for finding the center point between two edges or the middle of a hole.
Now I rarely use the DRO although considering lead screw backlash the DRO is probably more accurate but again only to the nearest 0.0005".
 
I’ve seen videos of a coaxial indicator being used to align a tailstock . . .

Now maybe the COAX springs or mechanism is different but I'd want to confirm beforehand.

Unless we are doing high precision work, I doubt that the difference matters.

Personally, my goto method for most tailstock alignment work is a pair of tailstock alignment buttons. Usually, your fingers are good enough. But a 1" micrometer works when more precision is needed.
 
I don't have my clone anymore to test, but I would evaluate if it is being affected unequally by gravity acting on the probe/mechanism. Its apparently a no-no with a DTI. Richard King? (scraping guy) speaks to this all the time. If I recall at best you could evaluate the vertical plane but not the horizontal plane (top & bot of center). Now maybe the COAX springs or mechanism is different but I'd want to confirm beforehand.
I would think it depends on whats rotating: if a straight, ground round is being held in the headstock chuck/collet and the DTI/Coaxial Indicator held in the tailstock, gravity won't matter as it would be constant at the point of measurement. But then, you don't need a coaxial indicator to do that.

MrCrispin has a video:

 
I would think it depends on whats rotating: if a straight, ground round is being held in the headstock chuck/collet and the DTI/Coaxial Indicator held in the tailstock, gravity won't matter as it would be constant at the point of measurement.

I was thinking the same thing but I need to do some testing.
 
Project number on my list.

Project 42, sub project x, sub sub project B, sub sub sub project 3, sub sub sub sub project F.

Basically, all shop projects are 42. X is testing projects. B is lower priority than A. 3 is confirmatory tests. And F is order on the confirmatory test list.

Too many projects, not enough time, getting old fast.
 
I would think it depends on whats rotating: if a straight, ground round is being held in the headstock chuck/collet and the DTI/Coaxial Indicator held in the tailstock, gravity won't matter as it would be constant at the point of measurement. But then, you don't need a coaxial indicator to do that.
Agreed. For this kind kind of conventional runout measurement I would set up a DTI on an arm & it does not matter where its mounted.
I thought you meant holding the COAX in the HS chuck so the probe rotates about the TS arbor to quantify HS-TS coaxial alignment. Now the COAX is seeing gravity effects & I have my doubts it would be accurate in this mode.
 
I thought you meant holding the COAX in the HS chuck so the probe rotates about the TS arbor to quantify HS-TS coaxial alignment. Now the COAX is seeing gravity effects & I have my doubts it would be accurate in this mode.

I thought he meant holding the COAX in the tailstock and letting the probe touch a center or something in the headstock while the headstock rotates. I would think that would negate gravity, but I want to test it.

Just goes to show how bad English is. Three different readers read the same thing and think it says 3 different things.....
 
Project number on my list.

Project 42, sub project x, sub sub project B, sub sub sub project 3, sub sub sub sub project F.

Basically, all shop projects are 42. X is testing projects. B is lower priority than A. 3 is confirmatory tests. And F is order on the confirmatory test list.

Too many projects, not enough time, getting old fast.
Damn, and I thought I was anal!

I assume you include links in your list to help you remember what the hell you’re testing? The recent “torque” thread (I saved your last post) reminded me of an item on my list and fortunately I included a link to the thread (on CHMW) so I could see what I wanted to do/check/test.
 
I assume you include links in your list to help you remember what the hell you’re testing?

Nah, even if I suddenly forgot everything I ever plan to do, I'd still have more to do than I have time left to do them because new projects arrive faster than I can do them!
 
It's a nice to have not a necessity, but is sure nice to have! Besides, part of fun is building up the collection and it does speed stuff up. I use it often enough. It's graduated in 1/2 thous and you get can get the needle so it doesn't move... here's a shaky video I did with a steady indicator hand (see 1:59 to about 2:12). No movement - that has to be pretty well centred. Mine is a used blake bought in good condition. Tools like this imo are in a category where it makes sense to buy quality, both for accuracy and longevity, so I'd watch for a used blake to come up.


(
1:59 to about 2:12)
What about 20mm to 5/8 bushing to slip on the arbor? Ah, we don't know how to make a bushing like that. I see...doh :rolleyes: Nobel prize there waiting for someone.
 
I thought he meant holding the COAX in the tailstock and letting the probe touch a center or something in the headstock while the headstock rotates. I would think that would negate gravity, but I want to test it.

1) a centering tip is included in the kit
2) but to indicate, the driveshaft has to be rotating & the body held in position with the side rod, so not sure how that would occur being held in TS?
 

Attachments

  • EDT-11-07-2025 8.11.02 PM.jpg
    EDT-11-07-2025 8.11.02 PM.jpg
    19.5 KB · Views: 0
Well as usual, I post a question and all the resulting posts not only answer my question but lead me to another topic i.e. test probes. I'm going to start a new thread on that topic because my test probe "search" led to a multitude of disjointed threads.

Thanks for all the responses.
 
I have a genuine Blake. Gift from a departed friend, so no, not parting with it. Meh. I figure it's about as fast to dial in on a bore or pin, using a dial test indicator. Might be useful if I was chasing down a bunch of irregularly spaced holes or pins, for the purpose of, say, mapping them using a DRO, or some such. Won't claim it's not a nice bit of gear, just that it's really not a bunch faster, if at all, than stuff you probably already have... I mean, how much time do you save, by not having to tilt your head to one side, then the other, really?

Do remember that you only need to be able to see the face of the dial test indicator for three sides. If the reading stays zero'd both sides of the X axis, swing it to face front and if it is still zero,'d, there is no point in contorting yourself to read the back side (for which purpose I have seen guys contort themselves stupider, claim that one does need to read it in a mirror, and such).

This was routine, on the military so-called "Advanced Machining" course, essentially an intro into the capabilities of a well set up 1950's era manual machine shop environment, every time we stepped up to a machine, we dialed in on the center hole of the mounted Rotary table, so we always knew with confidence, that the spindle and the center of the axis of rotation of the R/T, were zero'd to each other. the rest was just basic math and a lot of Trig...
 
Back
Top