• Scam Alert. Members are reminded to NOT send money to buy anything. Don't buy things remote and have it shipped - go get it yourself, pay in person, and take your equipment with you. Scammers have burned people on this forum. Urgency, secrecy, excuses, selling for friend, newish members, FUD, are RED FLAGS. A video conference call is not adequate assurance. Face to face interactions are required. Please report suspicions to the forum admins. Stay Safe - anyone can get scammed.
  • Several Regions have held meetups already, but others are being planned or are evaluating the interest. The Ontario GTA West area meetup is planned for Saturday April 26th at Greasemonkeys shop in Aylmer Ontario. If you are interested and haven’t signed up yet, click here! Arbutus has also explored interest in a Fraser Valley meetup but it seems members either missed his thread or had other plans. Let him know if you are interested in a meetup later in the year by posting here! Slowpoke is trying to pull together an Ottawa area meetup later this summer. No date has been selected yet, so let him know if you are interested here! We are not aware of any other meetups being planned this year. If you are interested in doing something in your area, let everyone know and make it happen! Meetups are a great way to make new machining friends and get hands on help in your area. Don’t be shy, sign up and come, or plan your own meetup!

Cincinnati No 2 Cutter Grinder Restoration

That is a bummer. Mine is a 240 three phase. My cutter/grinder came from a small sharpening shop near Brantford so perhaps the motor had been changed? Since you need a new motor you can just go with a 120 or 220 single phase as the grinder should only run in one direction and the belt rail offers 2 speeds.
 
I have a pdf of the manual and several other manuals on the tools. If you PM me with your emails I can set you up. I should be up and running mine in a few weeks. Sorting out the shop has taken quite a bit of time and the sharpener took a bit of a back seat.
 
Thanks Brent, the easiest suitable motor to source here is a 3 phase. All the single phase ones that I could find are only 1400 rpm unless I go 2HP or bigger. We have a very small market in Australia so our choices are always limited.
 
I have a pdf of the manual and several other manuals on the tools. If you PM me with your emails I can set you up. I should be up and running mine in a few weeks. Sorting out the shop has taken quite a bit of time and the sharpener took a bit of a back seat.
Hi Brent, thanks for the offer. I had to look on line what a #2 tool sharpener looked like, only to realize that I have #1. Apparently these being smaller were often purchased for school training purposes and I
the fellow that I purchased it from picked them up from Barton High School on the Hamilton Mountain. With that in mind I started looking for the manual that it came with and found it in a filing cabinet at home.

I took pictures, see below. Judging by the condition, I don't think anyone ever looked at them as there is not a dirty finger print to be found. The sharping instruction, well that is a different matter.

TonyK.

Grimsby Ontario Canada.
IMG_5081.JPG
IMG_5082.JPG
IMG_5083.JPG
 
Hi Brent,

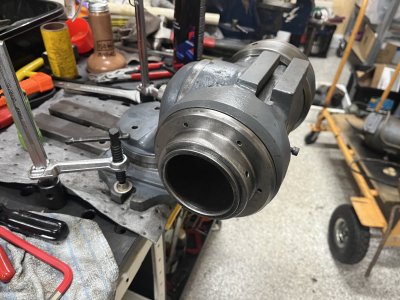
Still a couple of weeks before I get the Cincinnati delivered, but I did grab all the loose accessories and brought them home. The work head was in pretty bad shape and wasn’t rotating very well. I stripped it down enough to give it clean and noticed there wasn’t any grease in the bearings (not even old dried grease). There was a fair bit of grinding dust inside. I’m not sure if you have had yours apart or not, but do you know if yours has grease? Interestingly, the bearings were engraved with the date I assume they installed in 1949.
IMG_3659.jpeg

IMG_3660.jpeg
IMG_3659.jpeg
 
Here is a few shots of my #1 with some tooling that it came with. I don't have a set of centres for it. There is also an electro magnet surface plate for it I forgot about. I managed to find a vintage 600 volt twist lock cord cap set and install it so that I could move the work head motor away from the machine. I will say the worst part of a tool grinder is the amount of grit and grindings it spreads over the machine. The work head uses 5C collets and also there is a MT #4 3 jaw chuck with both inside and outside jaws. My machine is 600 volt 3 phase and uses a 240 volt to 600 volt roto phase converter. Built on electrical theory it self starts with the use of a 1/4 HP motor that drives the monster 5 HP motor sitting on the floor. That motor I found at Triple M Demolition that had been rewound bolted to a skid for $50. When turned on the 1/4HP motor runs up the main 5HP motor by way of a drive belt and pulley. After 5 seconds a timer disengages the 1/4HP run up motor and a contactor closes putting 240 volts across the low voltage winding of the 7.5KVA transformer and now produces 600 volts single phase that goes across 2 of the 3 wires of the 600 volt roto phase motor that is sitting on the floor. The 3 terminals of the roto phase motor are now producing 600 volt 3 phase power to run the grinder head motor and the work head motor. Commercial units normally use a 208 volt 3 phase motor and then use a 208/600 volt 3 phase step up transformer to now produce 600 volt 3 phase power. The single phase transformer is cheaper and easier to find used than a 3 phase unit. I found that too at the Triple M yard for $50. I built this unit in 1992 and never had issue with it working. I have not used the machine in years and it really needs a good cleaning and some paint. Hmmm, I am retired, I will put that on the to do list.

TonyK.

Grimsby Ontario Canada.

IMG_5167.JPG
IMG_5168.JPG
IMG_5169.JPG
IMG_5170.JPG
IMG_5171.JPG
 
@JohnH - yes, I took the work head all apart and then some. I had to weld the base all back together and I have mine filled with oil, not grease. Spins very easy. Mine is a 50 taper and I have a number of adapters- the main one is an OZ 32 collet set. Also other adapters for saw wheels and other cutters.
 
So I have located a bunch of the pictures I had originally posted so here they are in no particular order but all dealing with the Cincinnati No2. perhaps this will spurn on some questions. In all I rebuilt everything except the grinding head and the motor as things were and are running fine. I did remake most of the shafts and the only gears not remade (yet) are the 12DP gears for the linear motion. The one gear on the planetary drive system is bronze and needs to be renewed.


IMG_E3642.JPG


IMG_E3638.JPG
IMG_E3637.JPG
IMG_E3636.JPG
IMG_3662.JPG
IMG_3656.JPG
IMG_3649.JPG
IMG_3652.JPG
IMG_3645.JPG
IMG_E3812.JPG
IMG_E3803.JPG
IMG_3642.JPG
IMG_3643.JPG
IMG_3986.JPG

I will keep looking for pics. I was stripping a 9" Utilathe and shipping it to various people as well as rebuilding my Utilathe and the Cincinnati as well as making gears and tailstocks etc - and of course buying tool boxes full of stuff off Kijiji so 2020 was crazy ! LOL
 
Two items I did not have for the grinder was the pin wrench and a spanner so you could tighten up the wheels! I also made up some extra “nuts”’for the wheels shafts and they are kinda odd as the pin hole spacing corresponds to 45 mm. So here was yesterday and today’s grinding project. Both wrenches are made out of a piece of 3/8 thick angle iron scrap. I made a wood template- tested the fit and then traced out the patterns. I cut the steel with a plasma cutter by hand and then used the grinder and the mill to clean things up and set the pins at 45mm. The pin wrench has hardened 1/4” tool steel pins and the spanner is a lot of filing a pin out of the rough cut.

IMG_3869.jpeg

IMG_3867.jpeg

IMG_3857.jpeg


I will blacken the spanner and try to make the pin wrench look a bit less blotchy!
 
So, having a sharpener is … amazing!! After several years, the rebuild, the move and now having it running is super great! Lots of bushings, jig parts and other items to make as I go but ….

IMG_3877.jpeg

Ten inch saw blades for the wood stuff and ….

IMG_3879.jpeg

Rotary grinding old worn slitting saws back to original!! So much to read and then screw up! The future looks sharp!
 
Brent H.Nice!
If you spray your blades with Super Clean. Comes in a purple bottle from Canadian Tire. Will remove the pitch and make your wheel last longer. Doesn’t gum up your CBM wheel. I spray the carbide and wait 5 min. Then rinse with hot water. Removes all the pitch.
Martin
 
@JohnH - yes, I took the work head all apart and then some. I had to weld the base all back together and I have mine filled with oil, not grease. Spins very easy. Mine is a 50 taper and I have a number of adapters- the main one is an OZ 32 collet set. Also other adapters for saw wheels and other cutters.
Does the workhead retain the oil? I was thinking oil, but there are no seals and I was thinking the oil would just leak out. Maybe that is a good thing to flush the grinding dust out?
 
@Gennady I have the gear grinding attachment and the 10” saw blades fit well with a spacer plate to lift them up and then the finger sits centred.

IMG_3921.png

Without the attachment above the setup for saw blades takes some home made mods to the base plate of the work head - this piece is standard and indicated by the red arrow. You remove the circled yellow parts and use the base as the main part of the jig.

IMG_3922.jpeg

To the base you need to make a support to raise the blade and include a 5/8” pin to rotate the blade. The finger set up is as in these pics:
IMG_3919.png

IMG_3920.png

I am just getting things set up but am side tracked building a new deck, installing a new compressor etc etc
 
Back
Top