• Scam Alert. Members are reminded to NOT send money to buy anything. Don't buy things remote and have it shipped - go get it yourself, pay in person, and take your equipment with you. Scammers have burned people on this forum. Urgency, secrecy, excuses, selling for friend, newish members, FUD, are RED FLAGS. A video conference call is not adequate assurance. Face to face interactions are required. Please report suspicions to the forum admins. Stay Safe - anyone can get scammed.
  • The 2026 Calgary Area Meetup is set for Saturday May 30th at 10am. The signup thread is here! Robinhood has graciously offered to host the meetup again this year. Please note that you MUST RSVP to the notice linked above if you wish to come.

Brent Builds!!

So ….. life in the fast lane of retirement!! Hahaha - been building like crazy.

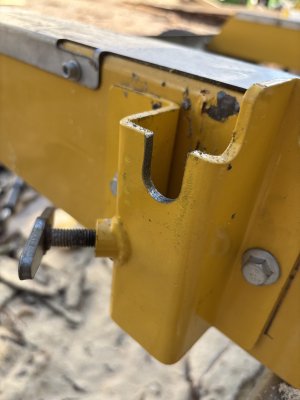
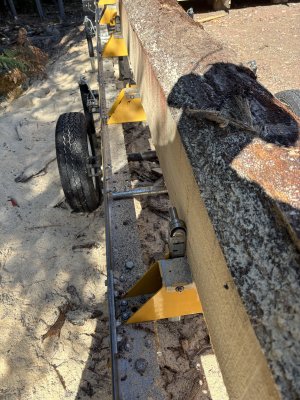
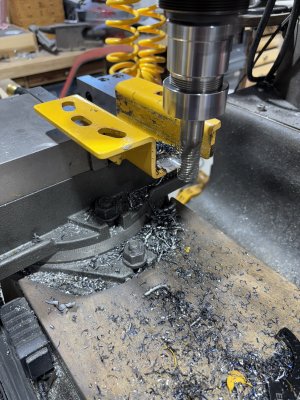
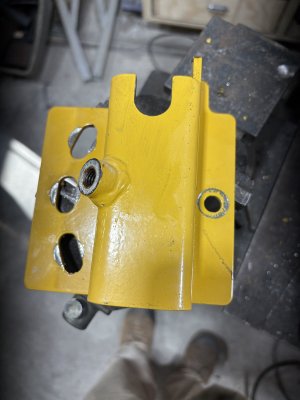
Anyone Milling lumber on a Frontier or similar sawmill? If so I made some log stop modifications that work amazing:
IMG_4608.jpeg
IMG_4609.jpeg
IMG_4603.jpeg
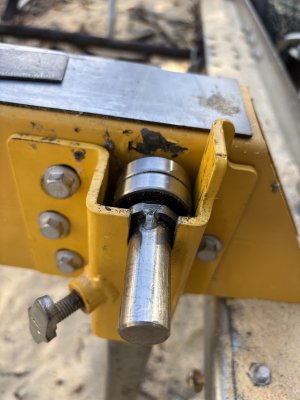
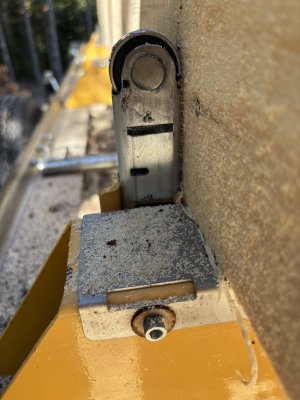
After that I machined the stops and added roller bearings to allow turning the logs much easier. The stops are 40mm x 40 mm and the bearings are 40 mm x 17 mm. I machined 17 mm pins to fit the bearings and they are 19 mm stainless. The slots are 20 mm.
IMG_4604.jpeg
IMG_4602.jpeg
IMG_4601.jpeg

I went a bit over the top and milled in gradients at 2 inch intervals and then added the 1 inch grads in between. Anyway so easy to grab the pin to adjust and they drop out of the way for final cuts.

I apologize for my lack of posting but it has been busy - hosting summer visits, restoring a 14 foot fishing boat and trailer, shop upgrades, milling wood, building the deck, brewing beer and making wine …. All those days wondering if you drank the wine or brewed the mill?? So much fun!

More to follow as I have some sand blasting cabinet media to put out there (haha) - some other things I am working on as well.
 
Good to hear from you glad you're busy with fun things!

I have also been terribly busy with life (not metalworking) and not retired so enjoying see all the things you've been up to!
 
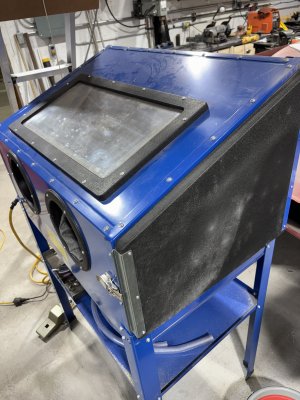
Anyone bought or considering a PA sand blast cabinet?
IMG_4615.jpeg
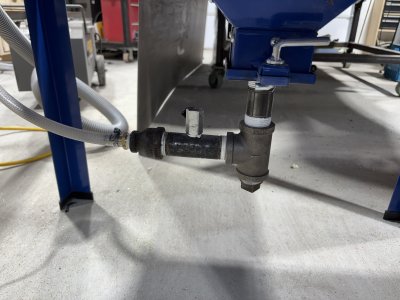
Got this on sale and immediately upgraded certain parts. Media suction tube gone and added the bottom mod. For me, I peeled back the foam in the bottom of the media door and welded in a 1” pipe flange (PA)

IMG_4616.jpeg
The media tube is about 5/8 OD. All the fittings are 1” pipe and you need a 1” reducer to a barbed hose connection.

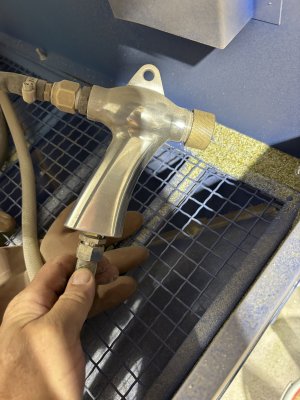
I bought an online Chinese replacement blast gun and have modified it to work great. I also fixed the supplied trigger gun and it works well now too.

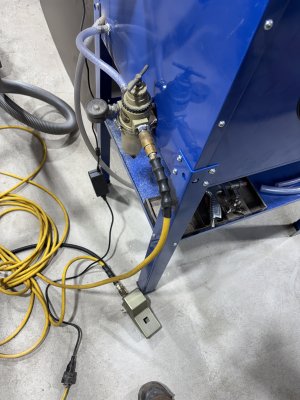
I added the foot peddle control for the gun and a water separator.

IMG_4618.jpeg
IMG_4619.jpeg
IMG_4621.jpeg
So the main issue with the “gun” the “function” of the system is how to match the blast system with your
Compressor output and the tools you have. I will add more tomorrow about my research and what I did to make this blast cabinet rock!!

IMG_4622.jpeg
 
Anyone bought or considering a PA sand blast cabinet?
View attachment 70635
Got this on sale and immediately upgraded certain parts. Media suction tube gone and added the bottom mod. For me, I peeled back the foam in the bottom of the media door and welded in a 1” pipe flange (PA)

View attachment 70636
The media tube is about 5/8 OD. All the fittings are 1” pipe and you need a 1” reducer to a barbed hose connection.

I bought an online Chinese replacement blast gun and have modified it to work great. I also fixed the supplied trigger gun and it works well now too.

I added the foot peddle control for the gun and a water separator.

View attachment 70637
View attachment 70638
View attachment 70639
So the main issue with the “gun” the “function” of the system is how to match the blast system with your
Compressor output and the tools you have. I will add more tomorrow about my research and what I did to make this blast cabinet rock!!

View attachment 70640
I have that exact cabinet and am curious about your mods.
 
Anyone bought or considering a PA sand blast cabinet?
View attachment 70635
Got this on sale and immediately upgraded certain parts. Media suction tube gone and added the bottom mod. For me, I peeled back the foam in the bottom of the media door and welded in a 1” pipe flange (PA)

View attachment 70636
The media tube is about 5/8 OD. All the fittings are 1” pipe and you need a 1” reducer to a barbed hose connection.

I bought an online Chinese replacement blast gun and have modified it to work great. I also fixed the supplied trigger gun and it works well now too.

I added the foot peddle control for the gun and a water separator.

View attachment 70637
View attachment 70638
View attachment 70639
So the main issue with the “gun” the “function” of the system is how to match the blast system with your
Compressor output and the tools you have. I will add more tomorrow about my research and what I did to make this blast cabinet rock!!

View attachment 70640
If you need various blasting materials . . , contact ALL-REDDI in Hamilton, Ontario.
They have depots across Canada or ship direct to your site.
 
@David :

So, the gun that comes with the cabinet can work well, but may have some issues that need some attention. Compressor size with respect to CFM output at a decent pressure is also important.

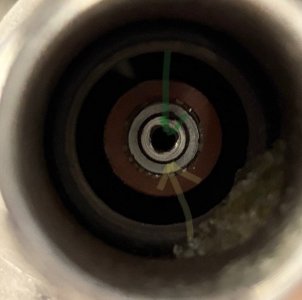
The nozzle the gun uses and the orifice the air passes through are important as well. My compressor will put out about 12 cfm at 90 psi - not a huge amount but decent for lots of applications. The gun that comes with the cabinet has a 1/8” orifice. That is at the limit for my compressor. The Chinese gun I bought had a 5mm or 0.196” orifice. Needless to say when connected it didn’t work at all and just shot air. What happens is the orifice size allows for the media suction to be optimized at a lower CFM. I machined a plug about 0.197” and pressed it into the original orifice. Then I drilled a through hole at 3/32” (0.0937”). This matches more closely to my compressors output. With a vacuum gauge connected to the media input of the gun I was getting -8 in hg ! The blast beads flowed and the metal was cleaned in spectacular fashion!
IMG_4620.jpeg
The yellow arrow is the original orifice diameter and the green is the new reduced diameter.

My blaster gun now puts the 20/30 glass media through at 60 psi steady. The nozzle (the ceramic or boron or….) part of the gun is optimized at 2 x the diameter of the orifice. In my case a 5mm nozzle would be the best. The Chinese gun came with 6mm and it works ok.

For the original gun, it has a trigger and I found it clogged up a lot. After careful inspection I did some clean up. The orifice piece can be unscrewed (11mm). The port the blast media comes in had casting material still in it so I drilled that crap out after removing the orifice piece. Then I chamfered the inlet for a smoother passage. The orifice had some retaining compound build up in the passage for the media so I scrapped it out with an end mill (hard stuff) and that cleared the way for the blasting media. After re-assembly the gun worked fine but could do with re-machining orifice to the 3/32” size.
There are a lot of videos on “upgrading” this type of cabinet but not many explain the gun and how it all goes together. One video had a fast explanation of the chart that matched gun orifice size to your compressor - that proved to be the TSN turning point for me and sorting out the gun/CFM issues.
I noted that one manufacturer offered the 3/32” orifice and made that size.

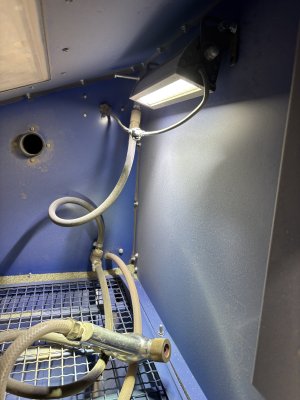
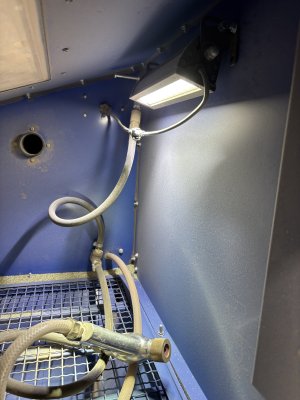
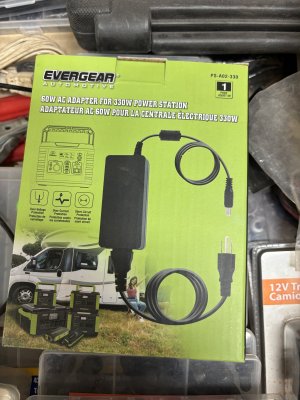
The light in my cabinet is an LED light bar for an ATV/SxS so it is all sealed. It is 12 volts so I power it with a 120/12 power supply from Princess Auto.
IMG_4621.jpeg
IMG_4623.jpeg
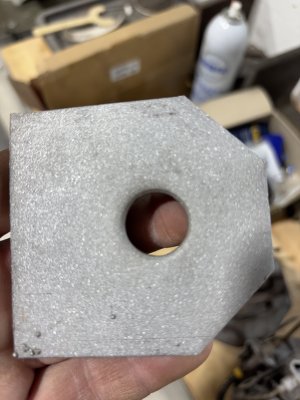
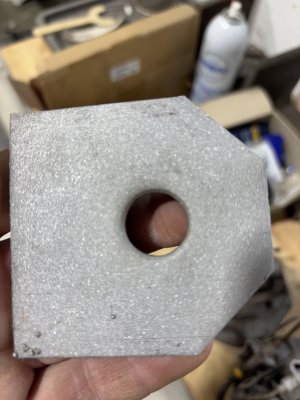
The results are awesome
IMG_4622.jpeg
That was maybe a minute and all the mill scale is gone!
 
@David :

So, the gun that comes with the cabinet can work well, but may have some issues that need some attention. Compressor size with respect to CFM output at a decent pressure is also important.

The nozzle the gun uses and the orifice the air passes through are important as well. My compressor will put out about 12 cfm at 90 psi - not a huge amount but decent for lots of applications. The gun that comes with the cabinet has a 1/8” orifice. That is at the limit for my compressor. The Chinese gun I bought had a 5mm or 0.196” orifice. Needless to say when connected it didn’t work at all and just shot air. What happens is the orifice size allows for the media suction to be optimized at a lower CFM. I machined a plug about 0.197” and pressed it into the original orifice. Then I drilled a through hole at 3/32” (0.0937”). This matches more closely to my compressors output. With a vacuum gauge connected to the media input of the gun I was getting -8 in hg ! The blast beads flowed and the metal was cleaned in spectacular fashion!
View attachment 70644
The yellow arrow is the original orifice diameter and the green is the new reduced diameter.

My blaster gun now puts the 20/30 glass media through at 60 psi steady. The nozzle (the ceramic or boron or….) part of the gun is optimized at 2 x the diameter of the orifice. In my case a 5mm nozzle would be the best. The Chinese gun came with 6mm and it works ok.

For the original gun, it has a trigger and I found it clogged up a lot. After careful inspection I did some clean up. The orifice piece can be unscrewed (11mm). The port the blast media comes in had casting material still in it so I drilled that crap out after removing the orifice piece. Then I chamfered the inlet for a smoother passage. The orifice had some retaining compound build up in the passage for the media so I scrapped it out with an end mill (hard stuff) and that cleared the way for the blasting media. After re-assembly the gun worked fine but could do with re-machining orifice to the 3/32” size.
There are a lot of videos on “upgrading” this type of cabinet but not many explain the gun and how it all goes together. One video had a fast explanation of the chart that matched gun orifice size to your compressor - that proved to be the TSN turning point for me and sorting out the gun/CFM issues.
I noted that one manufacturer offered the 3/32” orifice and made that size.

The light in my cabinet is an LED light bar for an ATV/SxS so it is all sealed. It is 12 volts so I power it with a 120/12 power supply from Princess Auto.
View attachment 70647
View attachment 70648
The results are awesome
View attachment 70649
That was maybe a minute and all the mill scale is gone!
Thanks for the tip on the orifice size. I had done all the common mods to the same cabinet but nothing really made much of a difference. I was blaming the compressor, 6CFM@90psi, until I made the orifice smaller. I plugged it with a slug of brass and drilled it out to 3/32, my smallest drill size. Wasn't really expecting much of an improvement but it works like a dream now.
 
I still think more psi is going to be better because,..,,MORE IS BETTER!
Right?
but honestly, this was night and day difference for minimal effort.
And cost me nothing but a little time.
 
Cool stuff Brent H

I did the mods on mine using a kit from Tacoma company which is pretty nifty. It can operate as low as 5 psi so you can get pretty detailed.
 
By all means kind sir...... post away. 😛
And on the flip side of that...... great, Brent's back,🙄 now we have you to the east and David to the west, and the rest of us slackers are just peanut butter in the middle......😳😛😉

Hopefully you fully intend to bore us with a multitude of pictures and comments as you progress along. I am sure that at the pace you operate you've been driving the opel since the end of September and are just getting to posting the pictures now however....😉
 
Back
Top