-
Scam Alert. Members are reminded to NOT send money to buy anything. Don't buy things remote and have it shipped - go get it yourself, pay in person, and take your equipment with you. Scammers have burned people on this forum. Urgency, secrecy, excuses, selling for friend, newish members, FUD, are RED FLAGS. A video conference call is not adequate assurance. Face to face interactions are required. Please report suspicions to the forum admins. Stay Safe - anyone can get scammed.
-
Several Regions have held meetups already, but others are being planned or are evaluating the interest. The Calgary Area Meetup is set for Saturday July 12th at 10am. The signup thread is here! Arbutus has also explored interest in a Fraser Valley meetup but it seems members either missed his thread or had other plans. Let him know if you are interested in a meetup later in the year by posting here! Slowpoke is trying to pull together an Ottawa area meetup later this summer. No date has been selected yet, so let him know if you are interested here! We are not aware of any other meetups being planned this year. If you are interested in doing something in your area, let everyone know and make it happen! Meetups are a great way to make new machining friends and get hands on help in your area. Don’t be shy, sign up and come, or plan your own meetup!
You are using an out of date browser. It may not display this or other websites correctly.
You should upgrade or use an alternative browser.
You should upgrade or use an alternative browser.
Worn nuts for mill leadscrew
- Thread starter Gennady
- Start date
It means - it is a lunch time !So what does it mean when I see a garlic press ?
Thanks Ironman. that was already suggested in earlier posts. Few caveats here - I don't have acetal (I asked few local suppliers - they are asking too much), second , I need nut with the flange - not sure how to press flanged cylinder equally and uniformly to the led screw.Here is the solution I would use
Is there acetal filament , BTW ??? 😀
I've seen guy on youtube creating pouring pool around lead screw and poring babbitt. To avoid babbittHas anyone ever heard of using Babbitt for something like this? I know it comes in different hardnesses.
sticking to lead screw he is covering it with soot from alcohol lamp. Pretty clever.
I made nuts from HDPE for testing. Currently gearing up for melting some bronze - I have copper and tin/led allow solder to create friction grade bronze. I have already prepared 3d printed casting model and cores from sand . Somebody from this forum will help me to melt it down and to pour nuts. I have experience in melting aluminum and casting lost foam method, but afraid will not be able to melt bronze...are you trying to source plastic for thread practicing on or are you contemplating making the nut itself from it?
I will provide details and photos, should this gentleman will agree.
Tobho Mott
Well-Known Member
...I will provide details and photos, should this gentleman will agree.
"Gentleman" might be a bit of a stretch, but I'll try to live up to it...
Post away! If it all somehow all goes sideways, at least it will provide some entertainment for the rest of the group! 🙂
Today's the day. This is gonna be fun!
Jeff
Tobho Mott
Well-Known Member
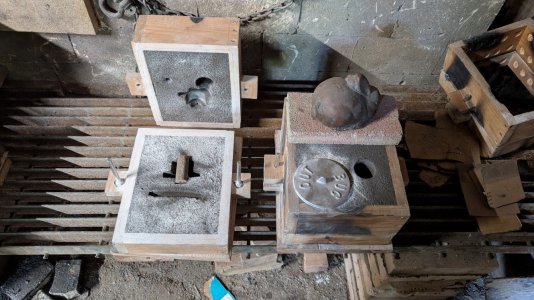
OK. So first and foremost - HUGE THANKS to Jeff. He was doing, everything - molds preparation, furnace, crucible load and actual pour. I was just a happy spectator. Sorry for being metaphorical - but it was like he is a Hephaestus and his furnace is a volcano,
Here is a short video of the pour
I have to say - pouring aluminum is nothing compare to melting bronze, it is so much more ... powerful...
Here is a short video of the pour
I have to say - pouring aluminum is nothing compare to melting bronze, it is so much more ... powerful...
Last edited:
There were many of unknowns - composition, oxidation, temperature, but I see Jeff managed that. Here bronze is cooling in the molds
This one is complete with cavity and core
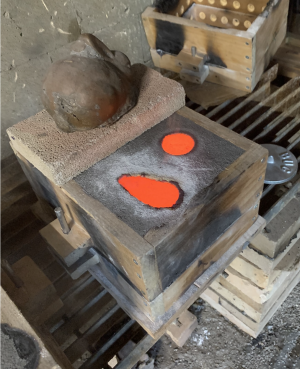
This is just a cylinder for other type of nut restoration that I have in mind.
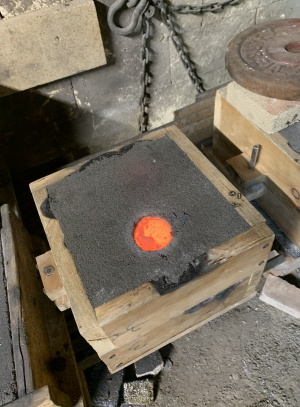
Thisrd mold was half full but we knew in advance it will not enough bronze
This one is complete with cavity and core

This is just a cylinder for other type of nut restoration that I have in mind.

Thisrd mold was half full but we knew in advance it will not enough bronze
Tobho Mott
Well-Known Member
Alloying bronze isn't something I have a huge amount of experience doing. I do know that molten copper oxidizes like crazy though, so in addition to keeping the burner tuned rich to create a slightly reducing furnace atmosphere, a scoop of small bits of charcoal was added to the crucible as the copper began to melt, to try and shield the melt further. That might have been a mistake. Big commercial foundries use phosphor copper shot to deoxidize copper. I have tried to buy some, but the foundry supplier was all out of it last time I was there.
The charcoal didn't all float nicely and skim off easily when we hit pouring temperature like I hoped... you can see in the video @Gennady posted above that some of it somehow stayed at the very bottom of the crucible and was the last thing to dump out. Weird.
I don't think any got into the molds, but the machining will reveal all.
Jeff
OK. One nut is complete - few lessons to learn:
1. I need to give bigger allowance, especially to radial dimensions - it is juuuust barely enough to get diameter cleaned up. Axial dimensions are OK - plenty of material to clean. Need to read more theory about bronze casting
2. Quite a porosity, especial close to the surface. Internally it is almost none, and even if there is some - it will better hold oil in these pores. 🙂 . And need, again, to read theory of what flux to use, may be some degassing additives, so on.
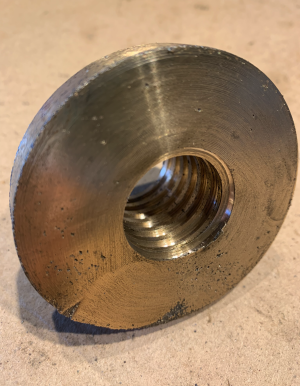
Another thing - riser pice that originally ment to be remelt is just right in dimensions to make insert for another nut. Plan is as follows - clean up existing nut and bore it slightly bigger then major diameter of the nut. Solder insert in the bore, make a hole, cut the thread. Any thoughts, objections ?
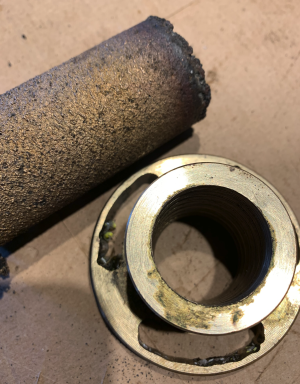
1. I need to give bigger allowance, especially to radial dimensions - it is juuuust barely enough to get diameter cleaned up. Axial dimensions are OK - plenty of material to clean. Need to read more theory about bronze casting
2. Quite a porosity, especial close to the surface. Internally it is almost none, and even if there is some - it will better hold oil in these pores. 🙂 . And need, again, to read theory of what flux to use, may be some degassing additives, so on.

Another thing - riser pice that originally ment to be remelt is just right in dimensions to make insert for another nut. Plan is as follows - clean up existing nut and bore it slightly bigger then major diameter of the nut. Solder insert in the bore, make a hole, cut the thread. Any thoughts, objections ?

Tobho Mott
Well-Known Member
Degassing coppers is usually done with phosphor copper shot. But it's done with just a tiny amount to 100 pounds of copper and if I recall correctly, overdoing it can be worse than not doing it at all. Tricky to get the right dose with just a few pounds of copper. If we had some scrap parts that were already made of our target alloy to use (even just to get the melt started with), it likely might have come out better.
Arrgh, I hate porosity. New alloys and new patterns don't always come out perfect on the first try. Even before seeing these pics my bet on the source of the porosity would be mainly oxide films generated while we were melting the copper. Could be some core gases involved too.
Most porosity is usually either related to air/gas bubbles and/or localized shrinkage nucleated on oxide bifilms floating around in the melt. So they say.
Copper is very prone to oxidation while molten. We tried using a charcoal cover (which mostly just seemed to make a mess), and I had the furnace running a reducing flame which should have helped some, but that may not have been enough. Next time I alloy bronze, I'll try using a molten glass cover on the melt to shield it from oxidation.
The offset pouring basin and tapered sprue used SHOULD have prevented any (most) air bubble entrainment. The runner and gating system SHOULD have prevented any (most) of the turbulence during filling, therefore stopping too many more oxide films from being generated there inside the mold. Even if the sizes of my hand cut runner and gate were off a little from what they should have been, tin bronze is supposed to be somewhat forgiving. What remains is the oxides that came out of the crucible. Rule #1 is start with clean metal. So that's our #1 suspect.
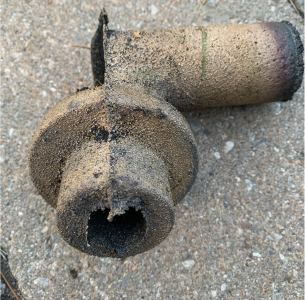
I'm hesitant to blame the porosity on core gases too much as those types of defects often cause big blow holes in the cope side of the casting, these are more like small pits. However, in my photos from the other day you can see that the vent on the in-gate side (the fat end of the nut) of the coreprints got blocked by a bit of bronze that got around the end of the core, and therefore would not have been effective at venting core gases.
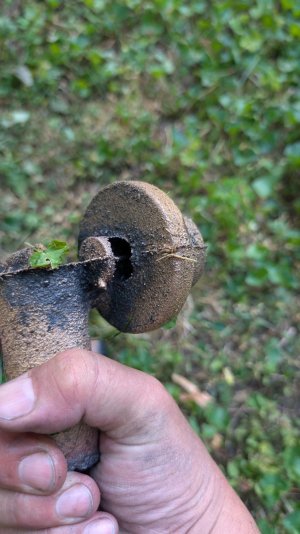
So it's possible the gases from the core didn't vent very well. And we weren't sure how much epoxy was in the core to begin with. The porosity does look to be a fair bit worse directly above the core too. Hmm...
If you want to try again, perhaps with a slightly bigger pattern for the added shrink/machining allowance, I'm game to do another session and we can try a few things differently. Like that glass cover. Or else we might be able to clean up the metal a bit just by remelting what we already poured and skimming off more of the crud that floats up instead. Bronze should melt much cleaner than the pure copper did. But every melt does introduce new oxides, so that can really only be taken so far. We could also try less binder in the core.
Jeff
Arrgh, I hate porosity. New alloys and new patterns don't always come out perfect on the first try. Even before seeing these pics my bet on the source of the porosity would be mainly oxide films generated while we were melting the copper. Could be some core gases involved too.
Most porosity is usually either related to air/gas bubbles and/or localized shrinkage nucleated on oxide bifilms floating around in the melt. So they say.
Copper is very prone to oxidation while molten. We tried using a charcoal cover (which mostly just seemed to make a mess), and I had the furnace running a reducing flame which should have helped some, but that may not have been enough. Next time I alloy bronze, I'll try using a molten glass cover on the melt to shield it from oxidation.
The offset pouring basin and tapered sprue used SHOULD have prevented any (most) air bubble entrainment. The runner and gating system SHOULD have prevented any (most) of the turbulence during filling, therefore stopping too many more oxide films from being generated there inside the mold. Even if the sizes of my hand cut runner and gate were off a little from what they should have been, tin bronze is supposed to be somewhat forgiving. What remains is the oxides that came out of the crucible. Rule #1 is start with clean metal. So that's our #1 suspect.
I'm hesitant to blame the porosity on core gases too much as those types of defects often cause big blow holes in the cope side of the casting, these are more like small pits. However, in my photos from the other day you can see that the vent on the in-gate side (the fat end of the nut) of the coreprints got blocked by a bit of bronze that got around the end of the core, and therefore would not have been effective at venting core gases.

So it's possible the gases from the core didn't vent very well. And we weren't sure how much epoxy was in the core to begin with. The porosity does look to be a fair bit worse directly above the core too. Hmm...
If you want to try again, perhaps with a slightly bigger pattern for the added shrink/machining allowance, I'm game to do another session and we can try a few things differently. Like that glass cover. Or else we might be able to clean up the metal a bit just by remelting what we already poured and skimming off more of the crud that floats up instead. Bronze should melt much cleaner than the pure copper did. But every melt does introduce new oxides, so that can really only be taken so far. We could also try less binder in the core.
Jeff
Thanks Jeff. Really appreciate your notes and thoughts. As I mentioned - porosity is not terrible. In my application it might be, actually, a plus.Degassing coppers is usually done with phosphor copper shot. But it's done with just a tiny amount to 100 pounds of copper and if I recall correctly, overdoing it can be worse than not doing it at all. Tricky to get the right dose with just a few pounds of copper. If we had some scrap parts that were already made of our target alloy to use (even just to get the melt started with), it likely might have come out better.
Arrgh, I hate porosity. New alloys and new patterns don't always come out perfect on the first try. Even before seeing these pics my bet on the source of the porosity would be mainly oxide films generated while we were melting the copper. Could be some core gases involved too.
Most porosity is usually either related to air/gas bubbles and/or localized shrinkage nucleated on oxide bifilms floating around in the melt. So they say.
Copper is very prone to oxidation while molten. We tried using a charcoal cover (which mostly just seemed to make a mess), and I had the furnace running a reducing flame which should have helped some, but that may not have been enough. Next time I alloy bronze, I'll try using a molten glass cover on the melt to shield it from oxidation.
The offset pouring basin and tapered sprue used SHOULD have prevented any (most) air bubble entrainment. The runner and gating system SHOULD have prevented any (most) of the turbulence during filling, therefore stopping too many more oxide films from being generated there inside the mold. Even if the sizes of my hand cut runner and gate were off a little from what they should have been, tin bronze is supposed to be somewhat forgiving. What remains is the oxides that came out of the crucible. Rule #1 is start with clean metal. So that's our #1 suspect.
I'm hesitant to blame the porosity on core gases too much as those types of defects often cause big blow holes in the cope side of the casting, these are more like small pits. However, in my photos from the other day you can see that the vent on the in-gate side (the fat end of the nut) of the coreprints got blocked by a bit of bronze that got around the end of the core, and therefore would not have been effective at venting core gases.
View attachment 68281
So it's possible the gases from the core didn't vent very well. And we weren't sure how much epoxy was in the core to begin with. The porosity does look to be a fair bit worse directly above the core too. Hmm...
If you want to try again, perhaps with a slightly bigger pattern for the added shrink/machining allowance, I'm game to do another session and we can try a few things differently. Like that glass cover. Or else we might be able to clean up the metal a bit just by remelting what we already poured and skimming off more of the crud that floats up instead. Bronze should melt much cleaner than the pure copper did. But every melt does introduce new oxides, so that can really only be taken so far. We could also try less binder in the core.
Jeff
I would be happy to repeat this casting somewhere in the first half of September -we can work on exact date/time.
I've seen people covering aluminum with mix of K/Na chloride (salt) I did not now about bronze covering with glass - thanks. Is that really glass? Bottle glass ?
Actually, having perfectly working nuts for the mill (not yet, but soon will be) I feel like one leg of mutton draws another one LOL. I have heavily worn split nut in my ancient Hendey lathe. It is made out of white allow (babbitt ? ) It is well overdue and I would be more than happy to cast that one. I will prepare new models with bigger allowances. Regarding core - I will reduce amount of epoxy to minimum possible. I also afraid to contaminate your green sand with inclusions of core
Tobho Mott
Well-Known Member
I think it's just any normal glass, window or bottle or whatever, to form an airtight barrier between the metal and the atmosphere and shield it from oxidizing. But I've read about guys who swear it has to be brown bottle glass, lol.
Jeff
Jeff

