-
Scam Alert. Members are reminded to NOT send money to buy anything. Don't buy things remote and have it shipped - go get it yourself, pay in person, and take your equipment with you. Scammers have burned people on this forum. Urgency, secrecy, excuses, selling for friend, newish members, FUD, are RED FLAGS. A video conference call is not adequate assurance. Face to face interactions are required. Please report suspicions to the forum admins. Stay Safe - anyone can get scammed.
-
Several Regions have held meetups already, but others are being planned or are evaluating the interest. The Calgary Area Meetup is set for Saturday July 12th at 10am. The signup thread is here! Arbutus has also explored interest in a Fraser Valley meetup but it seems members either missed his thread or had other plans. Let him know if you are interested in a meetup later in the year by posting here! Slowpoke is trying to pull together an Ottawa area meetup later this summer. No date has been selected yet, so let him know if you are interested here! We are not aware of any other meetups being planned this year. If you are interested in doing something in your area, let everyone know and make it happen! Meetups are a great way to make new machining friends and get hands on help in your area. Don’t be shy, sign up and come, or plan your own meetup!
You are using an out of date browser. It may not display this or other websites correctly.
You should upgrade or use an alternative browser.
You should upgrade or use an alternative browser.
Worn nuts for mill leadscrew
- Thread starter Gennady
- Start date
You can add a pdf attachment by using the "Attach files" button.I recently emailed @Tomc938 a note about making acetal lead screw nuts. I can't upload the pdf here, but you make want to consider this route. I'm not sure how or if I can post a pdf on the forum.
Great idea!Voila!
I have not tried this myself, but have heard of nothing but good results.
Still did not figured out how to squeeze halves of nut with flange evenly on the lead screw.
My sonewhat lousy suggestion is to make a short duplicate section of your leadscrew, then squeeze a full nut onto it. Then unscrew the full nut and cut the nut in half.
Might be easier to single point the nut a bit loose first, then squeeze it to fit.
Well... It is getting close to making an acme tap...My sonewhat lousy suggestion is to make a short duplicate section of your leadscrew, then squeeze a full nut onto it. Then unscrew the full nut and cut the nut in half.
Might be easier to single point the nut a bit loose first, then squeeze it to fit.
Also - nut consist out of two shapes/parts: cylindrical part and flange. How to squeeze it evenly on screw ? Any bright idea ?
Well... It is getting close to making an acme tap...
Ya, but I think single pointing with a custom HSS bit makes more sense.
Also - nut consist out of two shapes/parts: cylindrical part and flange. How to squeeze it evenly on screw ? Any bright idea ?
The best I can suggest is to start with a very poor fit and then melt that over the small leadscrew stub by heating the stub first.
But to be honest, I'd prolly have thrown the towel in quite a ways back. At this point in your journey, I'd forget the whole idea of a plastic half nut and machine a whole new nut out of bronze. If mine ever goes, that's where I would start anyway. I like all this 3D printed parts stuff, but sometimes you just need to bite the bullet and do it the old fashioned way.
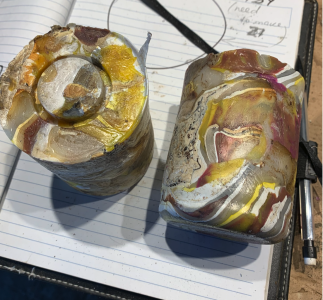
I'm not understanding the picture. Why is the material marbleized? You melted different materials & squeezed it into a female mold or something?Short update - I prepared some HDPE as a test to cut or "melt on"
It is just different colours of the same HDPE. Some bottles, containers, other HDPE stuff. I was checking that it is not mixed types of plastic. I cut all bottles into small flat pieces and filled up cylindrical mold ( small LPG cylinder) . When plastic became soft and sticky (it is never melting into liquid) I pressed mold in with fitted cap. That is why it looks like twirled.You melted different materials
Indeed not. This is parts to try single thread cutting like Susquatch suggested and I think this is right way to go. I am currently gearing up for single thread cutting - ground bit to a suitable profile, prepared boring bar, already cut short piece of male lead screw. Quite a chatter, several times missed thread dial indicator, several times stalled the lathe with too deep cut... What a drama !!!but I'm not at all sure that HDPE will behave like Acetal does.
Next - to practice on plastic internal threading.
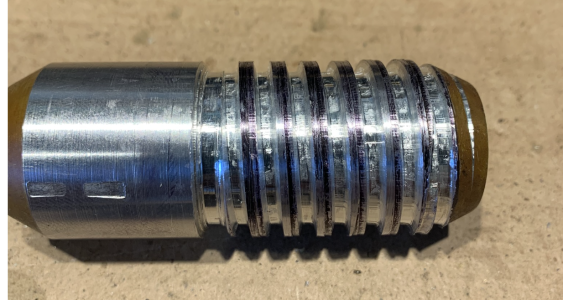
Because I was stalling lathe, I decided to change setup a bit and cut advancing compound slide and moving crosslide to and from established zero. Still practicing on external threading.
this is my first video on youtube - no editing or voice, sorry for the clunking sound - backgear on SouithBend sounds terrible. you can see I am moving crosslide to the established zero point and backing it freely, while advancing compound to 0.1 mm each time.
It took me a time to learn how not to miss thread dial indicator - I am holding threading level very close to be engaged but not just yet and "feel" when it is ready on Dial, so slightly pressing in. Usually half nut readily locking on a thread.
It took me a time to learn how not to miss thread dial indicator - I am holding threading level very close to be engaged but not just yet and "feel" when it is ready on Dial, so slightly pressing in. Usually half nut readily locking on a thread.
It took me a time to learn how not to miss thread dial indicator - I am holding threading level very close to be engaged but not just yet and "feel" when it is ready on Dial, so slightly pressing in. Usually half nut readily locking on a thread.
This is what I do too. You get used to feeling the threads below the half nut and watching the position of the dial such that it drops into place perfectly every time.
I prepared two round pieces of HDPE and cut internal thread in each. There was no any accidents or mishaps, though tension was very high - I was checking and rechecking cut depth and back to zero every time. It looks a bit messy due to "marbeling" colours and twirls, but profile and dimentions are OK. I decided to finish those cylindrical blocks into nuts - until I am waiting for bronze pieces I can reassemble table and see how it works. Not a big deal to remove table again and put bronze nuts.
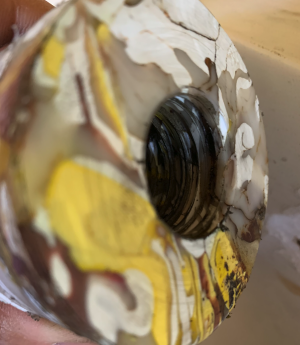

It looks a bit messy due to "marbeling" colours and twirls, but profile and dimentions are OK.
Just curious, what are those marbeling colours all about? At first I thought it was blown glass art! Then I had to correct my perspective from a black button to a threaded hole. Very cool!
LOL . No any hidden agenda. I had several plastic bottles and containers made of HDPE with different colours. i chopped them into relatively small pieces, mixed altogether and then reheated and pressed into form. That has created that "marbleized" look. It holds together very well, though. No splitting, delaminating or anything else.Just curious, what are those marbeling colours all about? At first I thought it was blown glass art! Then I had to correct my perspective from a black button to a threaded hole. Very cool!
LOL . No any hidden agenda. I had several plastic bottles and containers made of HDPE with different colours. i chopped them into relatively small pieces, mixed altogether and then reheated and pressed into form. That has created that "marbleized" look. It holds together very well, though. No splitting, delaminating or anything else.
Thank you for putting up with my dumb question. I see you answered the same one earlier in the thread. Sometimes you gotta tell the old guy to just read the damn thread.....
Sorry about that..... But much appreciated.
Did you notice how the threaded hole also looks like a button cap?
It is close up camera barrel distortion. End is perfectly square , I verified 🙂threaded hole also looks like a button cap?
Anyway, remember, I told it does not splitting or chipping - I jinx it 🙂 I started to drill mounting hole in the flange and it broke.
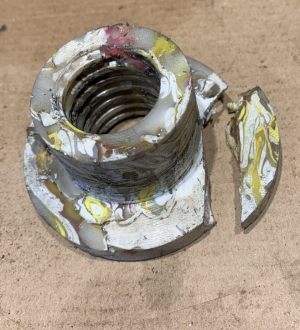
Had to rebuild one - luckily I had enough of the threaded block length, so made a third one.
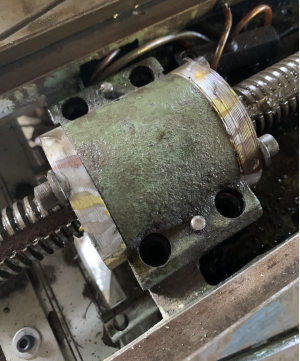
Here are both nuts mounted to the mill. Time to get everything back together.
It is close up camera barrel distortion. End is perfectly square , I verified 🙂
I think you misunderstand. I'm talking about the optical illusion that is present in your photo.
When I first looked at it, I saw a button not a threaded hole. It's like one of those illusions where they ask you if you see a duck or a rabbit first. Some see the duck, some see the rabbit. A few see both right away.

You are predisposed to see the threaded hole because you took the photo so you know exactly what it is. I didn't, so I saw a button first.
I think it's cool when that happens spontaneously!

