Whoa there big fella, in consideration of budgetary restraint you don't need guage blocks. One or two nice clean pieces of material the same thickness are the same thing only without a specified dimension. I am of course assuming you have a micrometer. And obviously if you start with one piece you'll have to cut it in half. 123 blocks ? drill rod ? I didn't watch the vid but if the blocks are to raise the level above v-ways they don't have to be the same size as long as you keep them in the same orientation.Okay, blocks are going on the shopping list...

-
Scam Alert. Members are reminded to NOT send money to buy anything. Don't buy things remote and have it shipped - go get it yourself, pay in person, and take your equipment with you. Scammers have burned people on this forum. Urgency, secrecy, excuses, selling for friend, newish members, FUD, are RED FLAGS. A video conference call is not adequate assurance. Face to face interactions are required. Please report suspicions to the forum admins. Stay Safe - anyone can get scammed.
You are using an out of date browser. It may not display this or other websites correctly.
You should upgrade or use an alternative browser.
You should upgrade or use an alternative browser.
Working on my South Bend 9C
- Thread starter Golem Pens
- Start date

Golem Pens
Michael
I can swing the $40 for some accusize 1-2-3 blocks (and have been meaning to get a set for a while). I don't have much material just floating around, so I'd be buying something for that route anyway.Whoa there big fella, in consideration of budgetary restraint you don't need guage blocks. One or two nice clean pieces of material the same thickness are the same thing only without a specified dimension. I am of course assuming you have a micrometer. And obviously if you start with one piece you'll have to cut it in half. 123 blocks ? drill rod ? I didn't watch the vid but if the blocks are to raise the level above v-ways they don't have to be the same size as long as you keep them in the same orientation.

In case it got buried, a HS shim test yesterday showed promise.
It didn't get lost. It should work.
Okay, blocks are going on the shopping list... Probably need some new shim stock too. Aaaaand a level, but that is a future month purchase.
As @jorogi says, the key here is consistent blocks placed consistently. They don't even have to be the same. They don't need to precision either. As long as they are always oriented the same way as you go back and forth, they will work fine. The truth is that I often use feeler gauges or gauge blocks to level up the gauge block system. This makes it easier to get started.
The objective is to get both ends of the bed the same level - Ie, not twisted. That is not at all the same as being level.
Yes I see. Do the same setup and measurement, but shim the HS instead, yes?
Yes.
At least for bed twist I can measure at the extremes where there is less wear.
Yes.
It would affect a dumbbell/cut test more significantly, yes?
Sorry, I have no idea what you mean by this.
Golem Pens
Michael
Not terribly important. I meant that for untwisting, the worst of the bed wear can be avoided by measuring at the ends of the beds where there is minimal, if any wear. And then conversely, any testing done where precise cuts are a factor, that is where bead wear could be more noticeable.Sorry, I have no idea what you mean by this.
Anyway, other than the need for a level, I have a clear set of next steps.
I can swing the $40 for some accusize 1-2-3 blocks (and have been meaning to get a set for a while). I don't have much material just floating around, so I'd be buying something for that route anyway.
The only caveat is that low cost 123 blocks are not always precision blocks - Ie not always identical.
But even if they are not identical, they will still work if you keep them oriented identically. Same block at the back at both ends, and both at the same orientation at both ends. I like to use a felt marker to ensure they are always positioned the same.
This is as good a place as any to mention that it's important to avoid canting of the level on the blocks. The level should sit flat on both blocks. That is easier said than done. So you are actually better off with a lot of cant than a little because it's easier to see.
This is also a good time to confess that I cheat on all this gauge block stuff. I actually like to use two V-blocks with gauge pins instead. This provides a cant proof setup and it allows me use different size pins to get one side level for a clean fast initial level. I mention it mostly to help you visualize the objective. If you are still following me, by now you know exactly what we are trying to do. Consistent placement is the key here, not true level.
At least for bed twist I can measure at the extremes where there is less wear. It would affect a dumbbell/cut test more significantly, yes?
Look at these 2 sketches. The upper represents a lathe with exagerated wear near the HS. We are looking at the front way but the rear way is presumably identical if we assume wear is equal, a good enough assumption for now. I think what you are missing is the bubble level is going accross the blocks, into the paper. The measurements relative to one another represents TWIST. Your objective is to remove TWIST as priority #1 for the reasons demonstrated. Can you see that wear does not enter the picture as long as the block pairs are positioned along the way in the same position? If you put the level along the bed way & compare front to rear it tells you essentially nothing in terms of the lathe geometry & taper cutting issues.
The lower picture represents the exact same bed now residing at some angle relative to the horizon. It is not plumb to the world, so it is not level. But LEVEL has nothing to do with lathe bed twist. This lathe can be mounted to the floor of a ship moving up & down with the waves & will perform perfectly fine. We cant change old text books that use the word level to mean twist, but we can improve understanding by defining exatly how we are using the word.
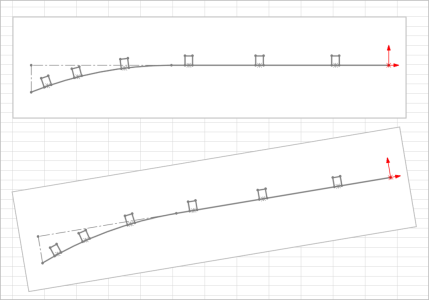
a definition of level

Last edited:
Golem Pens
Michael
Yes, it will still be a far cry better than anything else I have access to, especially within the limits of my metrology. https://accusizetools.com/products/precision-block-setsBut even if they are not identical, they will still work if you keep them oriented identically. Same block at the back at both ends, and both at the same orientation at both ends. I like to use a felt marker to ensure they are always positioned the same.
Yes, I understand. Bed wear thoughts were about what comes next, after twist.The measurements relative to one another represents TWIST. Your objective is to remove TWIST as priority #1 for the reasons demonstrated.
Yes, I understand. Bed wear thoughts were about what comes next, after twist.
Exactly. But as @jcdammeyer pointed out earlier, bed wear has far less impact on end results than twisting or head alignment does. It's really only for tiny diameters that it really becomes important, and tiny diameters are usually very short.
Yes, I understand. Bed wear thoughts were about what comes next, after twist.
IMO what comes after twist is headstock alignment. Your 0.012-0.015" over 12" or so is a lot. What are your remedial options for bed wear? The carriage follows the worn ways. The cutting tool is attached to the carriage, it has no choice but to come along for the ride resulting in a very slight taper as a function of bed position all other things equal. I doubt you will regrind the ways. But remember we already quantified that issue with a numerical example. A 0.020" drop in bed (by wear or by bed sag or any Y-axis mode) equates to 0.0004" of diameteric difference. Miniscule!
Next time you have your indicator running along the stationary test bar, pull your toolpost in & out laterally accross the bed with reasonable force. Tell me how much free play you observe on the dial. My guess is it will be a lot more than this amount. And this is what people tend to gloss over when they are coupon cutting & trying to diagnose lathe geometry measuring resultant diameters down the coupon. Its not just a theoretical trace of the cutting tool tip in 3D space. Cutting forces & material deflection are now coming into play to the extent they can completely mask geometry issues alone. You can do a much better job of correcting geometric alignment issues with direct measurements. Save the coupon cutting as a final sanity check for when you have arrived at the best compromise setup.
Last edited:
This is also a good time to confess that I cheat on all this gauge block stuff. I actually like to use two V-blocks with gauge pins instead.
@Golem Pens - here is a photo of my preferred setup for the level. This is the fastest method I've ever found. Note the gauge pins between the V-blocks and the precision level.
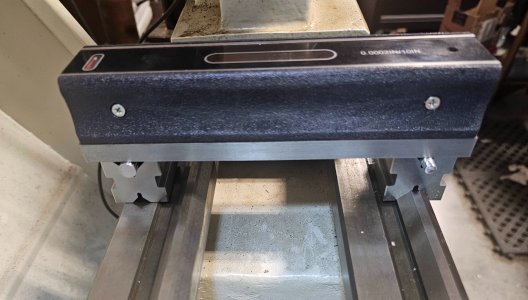
Golem Pens
Michael
Just to clear the air I think my mention of bed wear has been a bit overblown. I understand the relative impact, I am not concerned with it, I just like keeping an eye on the various elements.
If I can find a local with a precision level to use for addressing bed twist, that's what's up next. If not, I will buy one a few paycheques down the line.
If I can find a local with a precision level to use for addressing bed twist, that's what's up next. If not, I will buy one a few paycheques down the line.

BaronJ
Ultra Member
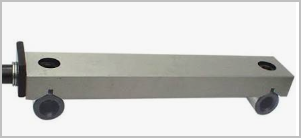
In a pinch I often use two or more pieces of HSS tool bits for precision. I have a box of 3/4" tool bits that I commonly use, usually between the jaws of which ever chuck I'm using to square something in the jaws.I can swing the $40 for some accusize 1-2-3 blocks (and have been meaning to get a set for a while). I don't have much material just floating around, so I'd be buying something for that route anyway.
Last edited:
The setup Susquatch is showing in #1690 is the classic twist detector. You observe angle readings at stations along the bed & compare the relative differences. The important thing is to use the same setup for the complete session. Dont swap in different blocks or risers. Also, good idea to mark off some felt pen station lines down the bed like, I dunno, 4" apart so that you can replicate the readings at those stations & will help with data outliers or averages if you have other issues. Because presumably you will be doing some kind of mechanical adjustment & then repeating the measurements to re-map the bed, compare to prior & hopefully converge on the best twist minimization compromise.
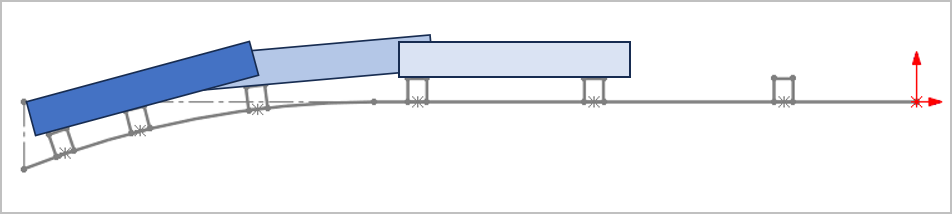
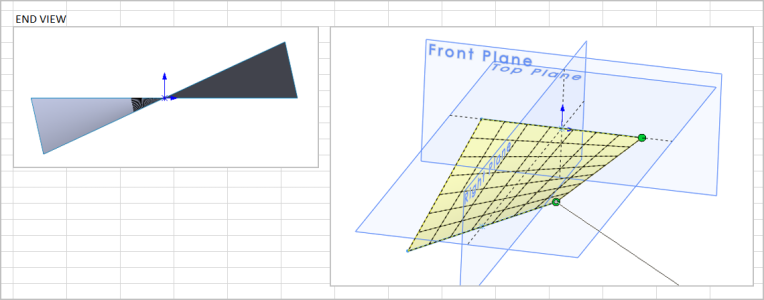
Refering to the sketch below - the next part almost goes without saying, but shockingly is worth mentioning because many people get it wrong. Probably because of that f*cking 'level' word again. Lets say you started at front plane & worked your way closer in this this picture. A) you measure 0.00, 0.10, 0,20, 0.30, 0.40 deg (a constant twist progression). Is that any different that B) 0.35, 0.45, 0.55, 0.65, 0.75? Answer: No, not from a lathe bed twist perspective. They are identical. Each increment is 0.1-deg apart & the total twist is 0.4 deg over the range. In A, station zero happens to be level to the horizon, plumb to the world. Heck even the neutral axis of twist can be level. WHO CARES! It is not addressing twist. Now if you want the lathe to be plumb with the world for some reason AND no twist, thats fine. Probably best to do some initial coarse jigging of the feet or whatever. But for the initial mapping where you are trying to get a handle on current cutting issue problems, just map it the way it is & see what you are looking at. If you have twist, then temporarily fix it & confirm with same readings down the MT test bar. If you happen to have a very planar bed, its putting even more suspicion to HS rotation as primary cuplrit.
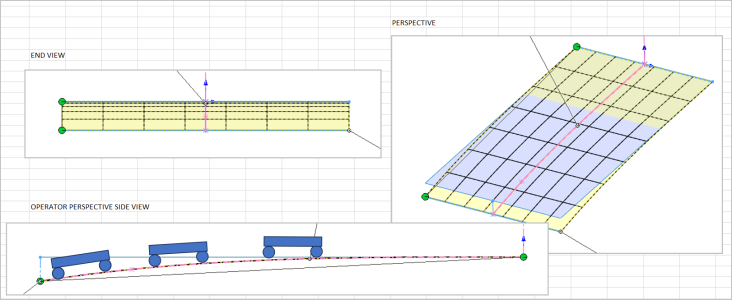
Next scenario. Lets say we have bed droop, no twist as defined above. I'm showing it as droop on one end but it could just as well be droop in the middle of the bed. What will the above cross-bed angle test show down the stations now? Likely 0.00, 0.00, 0.00 or 0.20, 0.20, 0.20.... So if we ended the above test here we would have false conclusion the bed is 100% planar, but clearly it is not planar. Now you take the same instrument but you need some kind of base to hold the level. A sine bar is good because it has 2 dowels making tangent contact to the bed. Now re-orient the level along the way statins & repeat. Probably you would see somethng like 0.00, 0.02, 0.05, 0.07, 0.09...
Now I'm kind of contradicting myself because first I said the vertical deviation (droop or rise in the Y-axis) factors less than twist. But that was confined to cutting taper on cantilever stock as being the more predominant effect. But since you already have the measurement equipment out, do it for knowledge sake, and also because it can factor in other respects. This is another tangent so I'll just end it here for now. get to this point & then see what the data says.
Refering to the sketch below - the next part almost goes without saying, but shockingly is worth mentioning because many people get it wrong. Probably because of that f*cking 'level' word again. Lets say you started at front plane & worked your way closer in this this picture. A) you measure 0.00, 0.10, 0,20, 0.30, 0.40 deg (a constant twist progression). Is that any different that B) 0.35, 0.45, 0.55, 0.65, 0.75? Answer: No, not from a lathe bed twist perspective. They are identical. Each increment is 0.1-deg apart & the total twist is 0.4 deg over the range. In A, station zero happens to be level to the horizon, plumb to the world. Heck even the neutral axis of twist can be level. WHO CARES! It is not addressing twist. Now if you want the lathe to be plumb with the world for some reason AND no twist, thats fine. Probably best to do some initial coarse jigging of the feet or whatever. But for the initial mapping where you are trying to get a handle on current cutting issue problems, just map it the way it is & see what you are looking at. If you have twist, then temporarily fix it & confirm with same readings down the MT test bar. If you happen to have a very planar bed, its putting even more suspicion to HS rotation as primary cuplrit.
Next scenario. Lets say we have bed droop, no twist as defined above. I'm showing it as droop on one end but it could just as well be droop in the middle of the bed. What will the above cross-bed angle test show down the stations now? Likely 0.00, 0.00, 0.00 or 0.20, 0.20, 0.20.... So if we ended the above test here we would have false conclusion the bed is 100% planar, but clearly it is not planar. Now you take the same instrument but you need some kind of base to hold the level. A sine bar is good because it has 2 dowels making tangent contact to the bed. Now re-orient the level along the way statins & repeat. Probably you would see somethng like 0.00, 0.02, 0.05, 0.07, 0.09...
Now I'm kind of contradicting myself because first I said the vertical deviation (droop or rise in the Y-axis) factors less than twist. But that was confined to cutting taper on cantilever stock as being the more predominant effect. But since you already have the measurement equipment out, do it for knowledge sake, and also because it can factor in other respects. This is another tangent so I'll just end it here for now. get to this point & then see what the data says.
Last edited:
Golem Pens
Michael
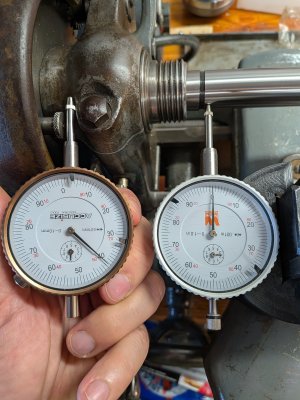
An amusing mean culpa from yesterday. I forgot to swap out my metric dial indicator...