• Scam Alert. Members are reminded to NOT send money to buy anything. Don't buy things remote and have it shipped - go get it yourself, pay in person, and take your equipment with you. Scammers have burned people on this forum. Urgency, secrecy, excuses, selling for friend, newish members, FUD, are RED FLAGS. A video conference call is not adequate assurance. Face to face interactions are required. Please report suspicions to the forum admins. Stay Safe - anyone can get scammed.
  • The 2026 Calgary Area Meetup is set for Saturday May 30th at 10am. The signup thread is here! Robinhood has graciously offered to host the meetup again this year. Please note that you MUST RSVP to the notice linked above if you wish to come.

Working on my South Bend 9C

Sorry, I just mean the length of threads
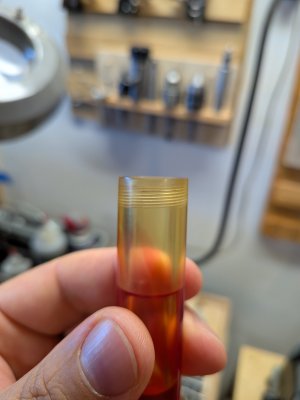
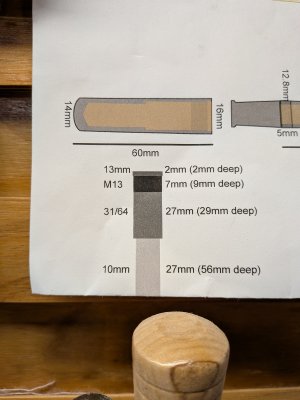
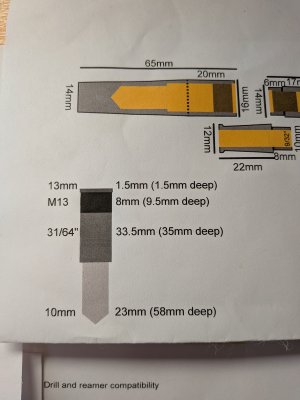
In the cap, 9-10 mm deep, from front edge but with a 1.5-2 mm deep larger lead in. The mating threads on the body tenon are only 5-6mm long, but I needed extra thread depth to account for tap taper, etc.

Number of turns to travel a certain distance, eg treads per inch or mm diameter X pitch. Such as 1/2 X 13 or 12X 1.75
These ones are M13x0.8 triple start. If I single point thread I will probably aim for a double start, not triple. The end goal is for the cap to take a relatively short amount of rotation to uncap - ideally 1 full turn.
 

Attachments

  • PXL_20260613_174048950.jpg
    PXL_20260613_174048950.jpg
    1.1 MB · Views: 3
  • PXL_20260613_174056063.jpg
    PXL_20260613_174056063.jpg
    1.7 MB · Views: 3
  • PXL_20260613_174105158.jpg
    PXL_20260613_174105158.jpg
    1.8 MB · Views: 3
The mating threads on the body tenon are only 5-6mm long, but I needed extra thread depth to account for tap taper, etc.

That goes away with Single point threading.

Advance compound 2x the pitch for double or 3x pitch for single.

That advice implies a plunge cut thread. My gut tells me that he will be better of using the 29.5 degree method when threading plastic. 30 might work too. I'm looking forward to trying some of that material to see for myself.

Btw, good comments on lathe limits. I was gunna bring that up too but I like your explanation better than what would have written.
 
My gut tells me that he will be better of using the 29.5 degree method when threading plastic
Maybe, alhough I have not really had any issue direct infeeding fine pitch threads in the alloys & plastics thus far. But for multi-thread, I think he will have to bite the bullet anyways. This might be approaching the limits of my multi-start threading experience but.... if the compound is not set parallel to the ways to advance 1 pitch length for next thread pass #2 & #3, then how do you rotate the work exactly 360 / 3 = 120 degrees & still properly engage the same thread index on the indicator? I dont think it would be in proper phase with the threading leadscrew if you just rotated the chuck, presuming you could hit the angle anyway would it?
 
if the compound is not set parallel to the ways to advance 1 pitch length for next thread pass #2 & #3, then how do you rotate the work exactly 360 / 3 = 120 degrees & still properly engage the same thread index on the indicator?

Quite clearly, it's easier to plunge as per your description.

But it's also easy if you just accept that you have to do the math. Advance the compound on the 30 degree line the amount required to reach the length you want on the Z axis, and then retract the cross-slide to compensate. Sort of like the way you pickup an existing thread.

I confess that I've only ever done a two start, but I don't see anything fundamentally more difficult about a 3 start other than the shape of the tool driven by the aggressive helix.

For me, the hardest part has always been moving and locking the reference ring on the dials without losing my index. It's something I've always wanted to ask about. Is there an easy preferred way to do that? If so, I'd love to hear it.

Of course, a DRO makes half of this stuff trivial.

Maybe, alhough I have not really had any issue direct infeeding fine pitch threads in the alloys & plastics thus far.

Ya, fine threads have to make all of that a little less of a problem. I guess, my pessimistic mind just likes to worry about invisible issues. One of my old feet is firmly anchored in the comfy days before automation. The other one is broken from running too fast in the modern era. I have ordered a blank of @GolemPens material to play with. We will see.
 
I've never used the back gears, but speeds for the 9" are as shown
Hi Michael,

Since the slowest speed shown on that chart for the back gear is around 40/50 rpm it might pay you to make a Lathe Handle, that will give you two advantages one you can turn the handle as fast or as slow as you like and two you will be able to index the chuck to give you three starts without stopping and starting the lathe.
 
Hi Michael,

Since the slowest speed shown on that chart for the back gear is around 40/50 rpm it might pay you to make a Lathe Handle, that will give you two advantages one you can turn the handle as fast or as slow as you like.....

I would LOVE a lowest speed of 40/50! Mine is 70. I'm in the process of installing a vfd and 3ph motor SPECIFICALLY to get lower speeds.

I don't use a crank. I just thread as usual, stop a wee bit early, and crank the chuck the rest of the way using a modified chuck key. I don't really see the advantage of a crank. But each to his own.

More recently I got one of @MrWhoopee 's auto retracting threading tools. Now that's a tool! I love it!

and two you will be able to index the chuck to give you three starts without stopping and starting the lathe.

I don't see how that works. How does adding a crank handle index the chuck? Can you explain it a bit more for us?
 
Advance the compound on the 30 degree line the amount required to reach the length you want on the Z axis, and then retract the cross-slide to compensate. Sort of like the way you pickup an existing thread.
I confess that I've only ever done a two start, but I don't see anything fundamentally more difficult about a 3 start other than the shape of the tool driven by the aggressive helix.

I think I understand. Check my math.
You advance the compound inward (C) & retract the cross slide outward (Y) to accomplish the same pitch distance along the bed axis. If pitch is (P) and compound preset angle is (A):
C = P / sin(A)
Y = P / tan(A)

example: 25 TPI thread, so Pitch = 1/25 = 0.040" You desire compound to be set at 29.5 deg, slightly less for a 60-deg thread (divided by 2). So for every thread start, reset the dials:
C = 0.040 / sin(29.5) = 0.0812" = infeed compound
Y = 0.040 / tan(29.5) = 0.0707" = outfeed cross slide
Result = tool tip is now 0.040" along the bedway axis toward the chuck

- you have to really pay attention to backlash direction. And probably a good idea to reset the compound & cross slide dials to zero before the 2-step displacement movements.
- I recognize that setting the compound parallel to the bed like I was suggesting can be a setup headache on certain parts if tailstock support is required so angled compound may be necessary anyway
- and in case anyone is wondering, no you cannot just displace the whole carriage over 1 pitch because that will put it out of phase with the threading screw, the adjustement needs to be top side
 
Last edited:
I thought about installing a crank handle on my 14x40 lathe. The hollowed spindle shaft sticks slightly proud of the gear cover. That would mitigate the drama of terminating threads under power. But its a gear drive lathe with Norton lever select quick change tumbler gears . When I turn the chuck by hand it actually takes some effort while engaged in threading, plus factoring extra torque for cutting force. Fine threads wouldnt be to bad but life may get tedious with many passes. Has anyone done this on gearhead lathe like this? I see it employed on Myfords & such from older articles, but not very often (or at all?) on bigger GH lathes with Norton box.
 
Personally, I think for pens the special tap & die solves the issue entirely. Aside from the high cost for the set, it will hopefully last a lifetime in typical materials being used & its got to be much faster than power threadng. Unfortunately if you need a collection of different diameter/pitch tap & die sizes for different pen blank diameters, the outlay increases. Not justifying the price of tool, but this exactly what a manufactuere would have to go through to make the tool. CNC would make it easier but it doesn't end at the threads. Now all the relief angles need to be cut, entry/exit taper profiles, hardened & ground... it all adds up. For common tap & die threads they can bang them out because they sell millions. But for more specialized sizes, its kind of a niche market. Which, I suppose, so are custom pens for that matter.

I could amost visualize a business opportunity for a matched male/female threaded insert set in brass, stainless, whatever. Where you just glue it into the body of your pen, screw them together until cured & they are perfectly mated. Really no different than other mechanical bits that are pressed/bonded into pen blanks. But it would not work for your semi-transparent blanks. Not sure how much the thread kits would cost vs special tap & die. The math might work for a 10 pen guy but not a 100 pen guy.
 
I would LOVE a lowest speed of 40/50! Mine is 70. I'm in the process of installing a vfd and 3ph motor SPECIFICALLY to get lower speeds.

I don't use a crank. I just thread as usual, stop a wee bit early, and crank the chuck the rest of the way using a modified chuck key. I don't really see the advantage of a crank. But each to his own.

More recently I got one of @MrWhoopee 's auto retracting threading tools. Now that's a tool! I love it!


I don't see how that works. How does adding a crank handle index the chuck? Can you explain it a bit more for us?
Well you do have three jaws on your chuck !
 
I thought about installing a crank handle on my 14x40 lathe. The hollowed spindle shaft sticks slightly proud of the gear cover. That would mitigate the drama of terminating threads under power. But its a gear drive lathe with Norton lever select quick change tumbler gears . When I turn the chuck by hand it actually takes some effort while engaged in threading, plus factoring extra torque for cutting force. Fine threads wouldnt be to bad but life may get tedious with many passes. Has anyone done this on gearhead lathe like this? I see it employed on Myfords & such from older articles, but not very often (or at all?) on bigger GH lathes with Norton box.

Mine is a gear head lathe too. It's actually easy to spin the chuck in any speed except 70 which is the lowest speed. Even that isn't impossible - just more difficult. But I don't use a crank - I just stick a chuck key into a convenient square hole on the chuck and rotate it. At most its only a few turns. I have a chuck key I dedicated to this task that has no T bar on it. So it's more like a handle than a crank.

Personally, I think for pens the special tap & die solves the issue entirely.

Not me. Dies don't always cut evenly and they are one size fits all. Single point threads are almost always better threads. It's easy to cut single point threads shallower or deeper or whatever you want. With a die, you get what you bought. Game over if it's not what you want.

Single pointing is easy, versatile, flexible, and fun too.

Well you do have three jaws on your chuck !

Ya, that isn't as good as using a chuck key as I described above to Peter.
 
Not me. Dies don't always cut evenly and they are one size fits all. Single point threads are almost always better threads. It's easy to cut single point threads shallower or deeper or whatever you want. With a die, you get what you bought. Game over if it's not what you want.

Single pointing is easy, versatile, flexible, and fun too.

Ya, that isn't as good as using a chuck key as I described above to Peter.
Well each jaw is at the correct position for a three start thread, and a crank handle means you can stop and start at will.
 
If anyone wants to make a crank handle go to town 😉
 
Mine is a gear head lathe too. It's actually easy to spin the chuck in any speed except 70 which is the lowest speed. Even that isn't impossible - just more difficult. But I don't use a crank - I just stick a chuck key into a convenient square hole on the chuck and rotate it.
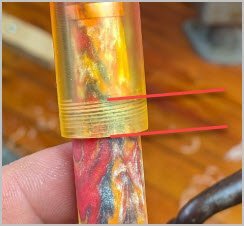
How about in threading mode with clamshell engaged on threading leadscrew? I havent tried it in a while but it seemed to me it required some gronk when I was hand finishing threads. Not a crazy amount, but enough that i didnt think I had a good feel
 
Back
Top