
-
Scam Alert. Members are reminded to NOT send money to buy anything. Don't buy things remote and have it shipped - go get it yourself, pay in person, and take your equipment with you. Scammers have burned people on this forum. Urgency, secrecy, excuses, selling for friend, newish members, FUD, are RED FLAGS. A video conference call is not adequate assurance. Face to face interactions are required. Please report suspicions to the forum admins. Stay Safe - anyone can get scammed.
-
The 2026 Calgary Area Meetup is set for Saturday May 30th at 10am. The signup thread is here! Robinhood has graciously offered to host the meetup again this year. Please note that you MUST RSVP to the notice linked above if you wish to come.
You are using an out of date browser. It may not display this or other websites correctly.
You should upgrade or use an alternative browser.
You should upgrade or use an alternative browser.
Working on my South Bend 9C
- Thread starter Golem Pens
- Start date

Golem Pens
Michael
I mean yes and no. If I ever get my bench cleared off I'll get the grinder going to try single point, yes.
But also many many folks use these same taps and dies with seemingly not this issue, so what's my damn problem hah.
But also many many folks use these same taps and dies with seemingly not this issue, so what's my damn problem hah.
Golem Pens
Michael
I also wonder if I should try shimming the tailstock nose up a little to offset bed wear. No harm in trying.

I also wonder if I should try shimming the tailstock nose up a little to offset bed wear. No harm in trying.
Fundamentally, a die in the tailstock cannot cut as nice a thread as single pointing. The die cannot be customized for the material, and they all have a taper in them to facilitate progressive cutting (worse with multistart). Without the taper, they can't cut progressively which means they have to gouge the material out - really ugly. A single point cutting edge can cut the threads progressively from end to end with whatever depth of cut the operator has optimized - no taper is required.
I know, nag nag nag...... Just sayin..... You really need to bite your fears and get on with learning to single point.
Regarding your question, I really can't say what would happen using a die in a slightly offset tailstock other than to say it would not be ideal. I wouldn't even do it myself. I'd find another way. Using shims would help, but I don't think its ideal either. That said, you could use an MT holder in your toolpost, or you could make an adjustable die holder, or use a boring bar (the same way you would normally cut tapers), etc etc.
Where can I order a small bit of that material you use. I'd like to play with it for the learning experience.
Golem Pens
Michael
Delightfully there's almost no one domestically who sells alumilite blanks. This is probably the cheapest you'll find, or I can send you a rod if you like https://turningnorth.ca/products/halloween-townWhere can I order a small bit of that material you use. I'd like to play with it for the learning experience.
I do less with acrylic, but Lee Valley, KMS both have the square acrylic acetate blanks for cheap.
I do have a threading insert I can try for external threading until I get grinding set up. May be worth it to poke at the process.
This is probably the cheapest you'll find, or I can send you a rod if you like
Is that the rod you use?
Is there a better colour?
I can just order some if it's the right material. It's basically cheap as an experiment, just not if it's material cost in a custom pen.
I do have a threading insert I can try for external threading until I get grinding set up. May be worth it to poke at the process.
I doubt an insert will work well with that stuff. Maybe one for Aluminium.
It's only $20 for material and a few enjoyable hours on my lathe. I'd like to play with the shape of the cutter and the feeds and speeds that work well with your material.
I'm thinking that your triple start thread is also a problem with small diameters. It might need a top grind on an angle.
I've worked with quite a few resins & composite materials. I have an unsubstantaited hunch the threading results are related to the material or setup in conjunction with material. Not to get into details but its very easy to prove. Chuck up a piece of free maching brass, 12L14 or even common 6061 aluminum & cut the threads using the same dimensions & setup. The die cut threads should be acceptably nice & accurate. If not, it points at mechanical/setup issues (assuming the die is new & good gondition).
I've worked with quite a few resins & composite materials. I have an unsubstantaited hunch the threading results are related to the material or setup in conjunction with material. Not to get into details but its very easy to prove. Chuck up a piece of free maching brass, 12L14 or even common 6061 aluminum & cut the threads using the same dimensions & setup. The die cut threads should be acceptably nice & accurate. If not, it points at mechanical/setup issues (assuming the die is new & good gondition).
Fundamentally, I think you are right. In a nut shell, I think that the plastic probably tears more than metal.
I was trying to explain two other factors.
The left/right top relief needs to be at right angles to the cutting path. With a triple start thread on a small diameter, that dictates a fairly hefty top slant. That should be built into the die, but I doubt it is. There are so many other aspects to die geometry that it is likely ignored. I wouldn't ignore it on a single point threading tool.
2. A die handles the need for progressively deeper cuts with an internal taper on the cutting edges. That sacrifices full thread depth at the shoulder. Single pointing accomplishes this with multiple passes terminating with full depth threads all the way to the shoulder. A die finds its way from end to end by centering or floating off course. We have all seen die cut threaded shafts with deeper threads on one side of the shaft than the other.
Golem Pens
Michael
Is that the rod you use?
Is there a better colour?
I believe all of their blanks use the same alumilite resin base, so yes there are other colours: https://turningnorth.ca/collections/resin-blanks
I haven't used one of their materials in a bit, my stock is all from a handful of small makers from the US (and then also a little ebonite and PEEK that I'm saving for a special day). Can send US links if you want, but you know.
Chuck up a piece of free maching brass, 12L14 or even common 6061 aluminum & cut the threads using the same dimensions & setup. The die cut threads should be acceptably nice & accurate. If not, it points at mechanical/setup issues (assuming the die is new & good gondition).
Good idea, I can run it over some brass I have on hand. The die is NOT new, and I uh don't really wanna buy another right now given the price + importing from the US (https://www.turnerswarehouse.com/products/m13?variant=2089065054220). Another big reason for single point being appealing.
A die handles the need for progressively deeper cuts with an internal taper on the cutting edges. That sacrifices full thread depth at the shoulder.
Threading to the shoulder would certainly be an improvement, though not strictly necessary since it can be designed around. I promise I'll try to clear room for the grinder soon 😉
Threading to the shoulder would certainly be an improvement, though not strictly necessary since it can be designed around. I promise I'll try to clear room for the grinder soon 😉
I think maybe I'm not being clear enough. It's not the shoulder that's an issue. The issue is the tapered thread depth that results from running the die to a shoulder.
Golem Pens
Michael
Nah we're talking about the same thing, you're just being more detailed and accurate. I know exactly what you mean.I think maybe I'm not being clear enough. It's not the shoulder that's an issue. The issue is the tapered thread depth that results from running the die to a shoulder.
Golem Pens
Michael
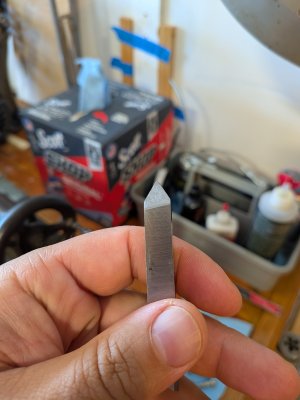
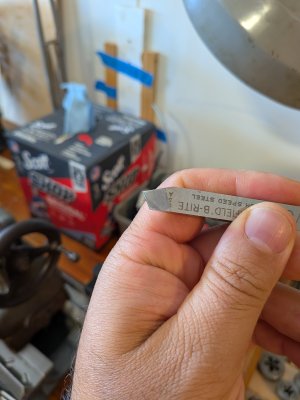
Golem Pens
Michael
AXA, yep!Maybe just a touch up with a stone after some top rake mods, do I remember right, a quick change post?
Should be able to sharpen it without too much drama...
@Bandit is prolly right. It should not be too hard to do. The main difference from a normal threading tool is the helix angle of the thread. Because it is a triple start thread, the helix angle is 3x what a normal thread would be. So the most important thing to do is to make sure that the nose angle of the front edge of the tool matches the helix angle of your thread. See my rinky dink drawing.
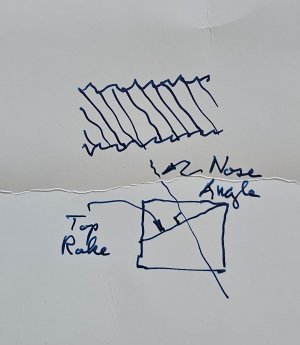
Of secondary importance, the top rake should be perpendicular to that helix angle because that sets the direction of the cut. All easy peasy.
Note that my drawing of the tool is deliberately fundamentally incorrect. It is a view of the tip as seen from the operator looking through the tool as if it were made of transparent glass, not the typical nose on view. If you look at the tool from the front nose on, it will be a mirror image of that. I just thought it was more important to be able to see why those angles are required, than to see the actual result image. Hopefully your mind can easily handle the translation.
Golem Pens
Michael
I'm going to start with a regular single start for learning anyway!

Jswain
Joe
It won't take you long. YouTube. Trial. Ask some questions. Trial and you'll be onto it.
Work far enough away from the chuck crashing is a non issue for the first while.
1 - 3d printed change gear in the lineup might not hurt if you're going to be working in an area with a high potential for mishap(it also significantly reduces the drivetrain noise). When I had my SB I printed one and then just always left it in.
Work far enough away from the chuck crashing is a non issue for the first while.
1 - 3d printed change gear in the lineup might not hurt if you're going to be working in an area with a high potential for mishap(it also significantly reduces the drivetrain noise). When I had my SB I printed one and then just always left it in.
Last edited:
Dont know what your minimum rpm is, but it really helps to go as slow as you can at first. Remember that you can always stop the lathe early and then crank the spindle manually using the chuck key to cut right up to a shoulder or as far as you want.
Golem Pens
Michael
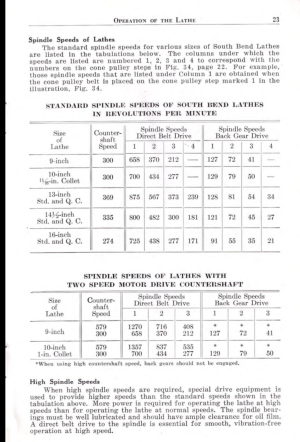
My advice: practice single point threading until you are getting good results. Its a skill that all machinists should have & you will be thrilled by your newly acquired superpowers. By all means use the HSS tool & increase the relief on forward cutting edge, it wont hurt anything for normal threading but you will be set up. When you are pleased with the single thread result meaning: crisp section profile + hitting a pitch diameter dimension + beginning/terminating a thread, thats pretty much it. Welcome to the threading club. Hint: when you are power feeding in yor lathe, you ARE already threading, just not to any target pitch or depth! LOL.
A double start means 1) pre-setting the thread engagement pitch at 2x the single thread pitch. This proportionately increases the thread helix angle. So an M0.5 single pitch would require an M1.0 setting for double or M1.5 setting for triple thread. After completing thread #1 and achieving PD, record that infeed DOC setting. Your compound has already been set at 180-deg = parallel to the ways. Advance compound 2x the pitch for double or 3x pitch for single. This accomplishes the helix offset effect. Cut thread #2 until you reach same target DOC. Rinse & repeat for thread #3. Note - higher pitch setting also increases carriage traverse speed at same lathe RPM, so things happen 2x or 3x quicker etc. Which is why I suggest mastering single threading first.
Note on threading math, you need to know your lathe (limits). If SP thread is 20 TPI, a double start thread would require be 20/2=10 TPI setting. Check. But a triple would be 20/3=6.66 TPI. Hmmm.. I presume you dont have a 6.66 setting on your lathe? So the thread you choose is a function of your lathe capability to cut all 3 with settings you have. This isnt just IMP unique example, same thing can occur on metric but potentially more fuss on a IMP lathe with conversion gear limits. So before you go down this multi-thread path, have a look at your lathe specs. I might be missing some points here that others can chime in. I have only cut a few & it was more to prove that I could than any practical application.
Question for you - how long is the typical thread engagement?
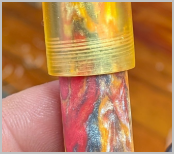
A double start means 1) pre-setting the thread engagement pitch at 2x the single thread pitch. This proportionately increases the thread helix angle. So an M0.5 single pitch would require an M1.0 setting for double or M1.5 setting for triple thread. After completing thread #1 and achieving PD, record that infeed DOC setting. Your compound has already been set at 180-deg = parallel to the ways. Advance compound 2x the pitch for double or 3x pitch for single. This accomplishes the helix offset effect. Cut thread #2 until you reach same target DOC. Rinse & repeat for thread #3. Note - higher pitch setting also increases carriage traverse speed at same lathe RPM, so things happen 2x or 3x quicker etc. Which is why I suggest mastering single threading first.
Note on threading math, you need to know your lathe (limits). If SP thread is 20 TPI, a double start thread would require be 20/2=10 TPI setting. Check. But a triple would be 20/3=6.66 TPI. Hmmm.. I presume you dont have a 6.66 setting on your lathe? So the thread you choose is a function of your lathe capability to cut all 3 with settings you have. This isnt just IMP unique example, same thing can occur on metric but potentially more fuss on a IMP lathe with conversion gear limits. So before you go down this multi-thread path, have a look at your lathe specs. I might be missing some points here that others can chime in. I have only cut a few & it was more to prove that I could than any practical application.
Question for you - how long is the typical thread engagement?