• Scam Alert. Members are reminded to NOT send money to buy anything. Don't buy things remote and have it shipped - go get it yourself, pay in person, and take your equipment with you. Scammers have burned people on this forum. Urgency, secrecy, excuses, selling for friend, newish members, FUD, are RED FLAGS. A video conference call is not adequate assurance. Face to face interactions are required. Please report suspicions to the forum admins. Stay Safe - anyone can get scammed.
  • The 2026 Calgary Area Meetup is set for Saturday May 30th at 10am. The signup thread is here! Robinhood has graciously offered to host the meetup again this year. Please note that you MUST RSVP to the notice linked above if you wish to come.

Working on my South Bend 9C

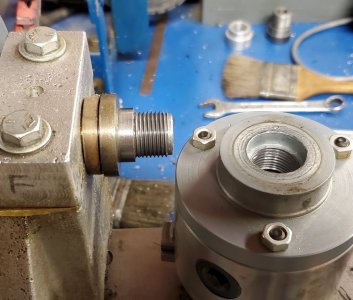
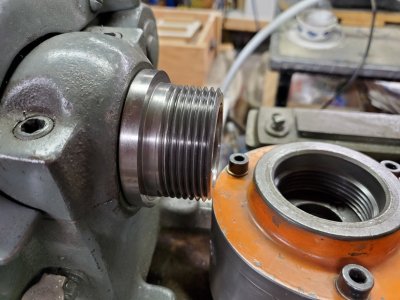
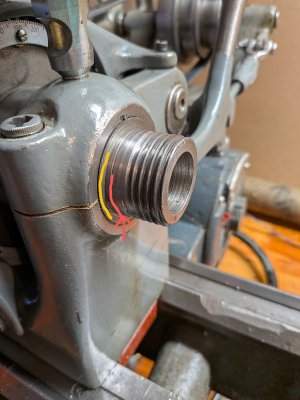
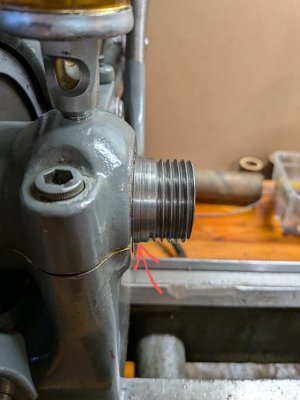
Nope, it needs to fit against the register face (yellow). The threads are hitting that edge so the back of the plate is well off of the register.
I think I see.

PXL_20260110_001237441~2.jpg

The register is yellow.

But the red stops the chuck from reaching the yellow.

This photo was a red herring.....

PXL_20260110_001233357~2.jpg
 
Looks like LMS has backplates and collets, could grab that all at once instead of LMS AND accusize. Would still come out cheaper than the BMP option.
 
I know a lot of those were bought by members, including myself, but IDK if anyone local has one. If someone local did buy one maybe they would be willing to help out if you are interested in getting one.

The company bought a pallet load of each back in the 80's hoping to corner the hobby market and they still have a bunch left. The 3jaw Bison is a screaming deal with the backing plate, even if a guy had to open up the backing plate to for your spindle.
It was my Bison from HR Roberts that didn't fully seat.
 
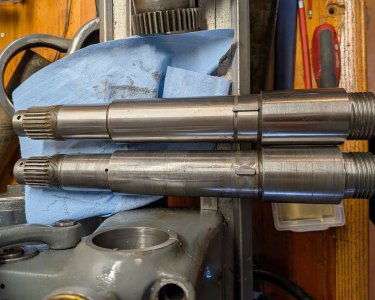
It appears that the register has been machined shorter if compared to the other spindle post # 502 and the #630 post measurements. Possibly to get a stuck chuck off, ( a guess, who knows). This is somewhat indicated by @DavidR8 ’s Bison chuck only going on and stopping some distance from the register.
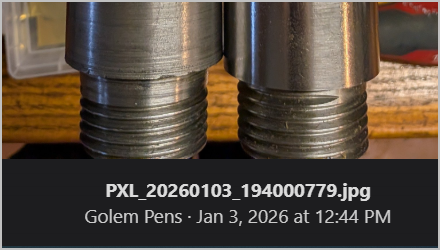
This could be repaired by making a ring to heat shrink on the spindle, high temp locktight would also likely hold, and remachining while in the lathe, a real tight fit would not be needed ( light cuts when machining). This would not fix the spindle bore, (prehaps at another time).
The idea is to restore the shoulder/register to original length and diameter.
Again an idea or 2.
The measurements in post #630 are hard for me to read at this time, a bout of pink eye in both eyes. It is getting better.
 
Hi Guys,

Based on the suggestion by Bandit a thin steel ring pressed on to what remains of the old register would be a good solution.

As far as the collet chuck is concerned the one pointed to earlier is from the same people that i bought mine from, but mine was only about half that price ! I did notice that the price changed from CA$ to UK£.
 
My turn now that I'm back from Puerto Vallarta and can grab some photos. @Bandit beat me to it with the suggestion for a ring heated and pressed onto spindle that spent some time in the freezer. Once cooled it will likely be solid enough but...

From the photos it appears that the badly machined reference section is smaller or would have to be turned smaller than the peak thread height of the spindle So unless the ring can expand enough it's a no go.

However why not build up that surface with welding? TIG or MIG. Then put it back into the lathe and turn the reference shoulder and the back registration surface to meet the original lathe specifications?

The shoulder should be larger than the thread height. Even on my Gingery I did it that way. Three photos here for reference.
The Gingery:
Gingery-Spindle.jpg

The South Bend Heavy 10L:
Notice here the shoulder is pretty close to the thread diameter.
SouthBend_Spindle.jpg

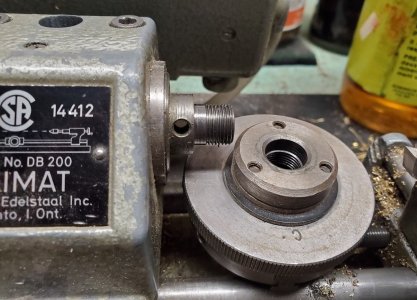
Unimat DB200:
Also pretty close to the same diameter as the Thread OD.
UnimatSpindle.jpg
I will be creating a collet chuck for this puppy so all of this is quite interesting.
 
From the photos it appears that the badly machined reference section is smaller or would have to be turned smaller than the peak thread height of the spindle So unless the ring can expand enough it's a no go.
That's a good question. I can measure that later.

However why not build up that surface with welding?
That (and the ring heating plan) are far outside my resources and would need someone to do that for me.
 
That's a good question. I can measure that later.


That (and the ring heating plan) are far outside my resources and would need someone to do that for me.
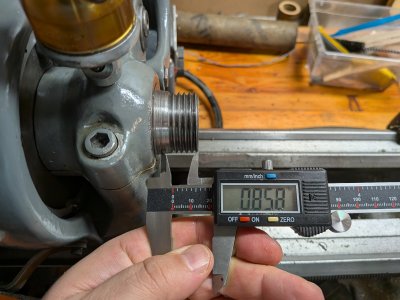
That's not the biggest problem. The issue is whether that surface that should be at least the same diameter or larger than the threads. All the way to the reference surface. The ID isn't very accurate with calipers but it gives an idea.
Thread Shoulder Chuck ID
The Gingery: 0.749" 0.875" 0.997"
Heavy10L 2.245" 2.262" 2.725"
DB200 11.96mm 12.00mm 12.03mm

My guess is the shoulder is lower than the threads because someone tried to turn it down; badly.
 
Probably not spot on, but yeah the low point is measuring a little under 1.5"
So the sketch says 1.5"-8 TPI for the thread dimensions and the thread stops short of the shoulder but that dimension isn't given. Just the nose length of 0.875".

My guess is the design approach is then turn outer diameter to 0.875" up to the shoulder. Then thread 8 TPI until the 3/8" square tool bit with the ground thread bit almost touches the shoulder but not quite. I count 7 threads so I'd guess that non-threaded part is maybe 0.15" wide or so although from the picture it looks wider.

Unfortunately they don't give a width to that should but looking again at the sketch I'd guess 0.2".

Measure yours and measure the diameter of that un-threaded section by the shoulder and where the threads stop. It looks tapered. And short of using some sort of steel epoxy to clue in a round spacer to turn back down to exactly 1.5" +0.000/-0.001 welding may still be your best option. especially if the shoulder width is too thin.

My two cents. (or two pesos as my head is still down south).
 
The numbers don't quite line up, but you're definitely in the right ballpark (and again, who knows how this whole thing has been modified).

If I wanted to pursue welding and reshaping, any ideas where in town would be able to help?
 

Attachments

  • PXL_20260111_033306138.jpg
    PXL_20260111_033306138.jpg
    1.6 MB · Views: 4
  • PXL_20260111_033445479.jpg
    PXL_20260111_033445479.jpg
    1.6 MB · Views: 5
The numbers don't quite line up, but you're definitely in the right ballpark (and again, who knows how this whole thing has been modified).

If I wanted to pursue welding and reshaping, any ideas where in town would be able to help?
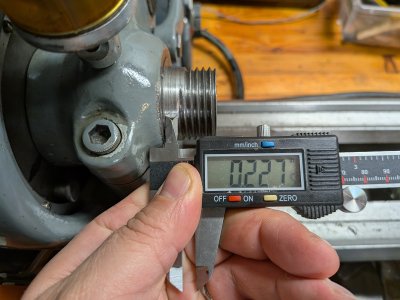
My guess, based on those photos is that the shoulder was turned down to get you that 0.227" wide shoulder. Maybe the hack wanted to have a long larger diameter reference to center a chuck?

Pull the bearing cap and measure how wide the shoulder is. My 10L shoulder is 0.325" wide and is external to the bearing cap. The reference surface (the 2.262" part is about 0.25" wide.

I also noticed my 10L dimensions are a hair larger than the sketch you posted. What should be 2.25" is 2.262". It's only 0.012" larger and correspondingly so is the inside of the SB chuck. But this machine is from 1942. Hard to say how precise they were being then.
 
Oh and on the welding,, I'll bet there are a few of the members here on the island that could do that. But I thought you had a spare spindle for this lathe?
Oh yeah... It's not compatible. I believe it's a more recent style than my lathe needs. The OD is smaller and I believe is intended for use with the generation that uses bronze press-in bearings (mine rides directly in the headstock).
 

Attachments

  • PXL_20260103_194000779.jpg
    PXL_20260103_194000779.jpg
    2 MB · Views: 6
The OD is smaller and I believe is intended for use with the generation that uses bronze press-in bearings (mine rides directly in the headstock).

Hmmmmm.... Maybe someday (not now) that would be a good upgrade for your lathe....... The hardest thing to find is probably the spindle and you have that!
 
Back
Top