

-
Scam Alert. Members are reminded to NOT send money to buy anything. Don't buy things remote and have it shipped - go get it yourself, pay in person, and take your equipment with you. Scammers have burned people on this forum. Urgency, secrecy, excuses, selling for friend, newish members, FUD, are RED FLAGS. A video conference call is not adequate assurance. Face to face interactions are required. Please report suspicions to the forum admins. Stay Safe - anyone can get scammed.
-
The 2026 Calgary Area Meetup is set for Saturday May 30th at 10am. The signup thread is here! Robinhood has graciously offered to host the meetup again this year. Please note that you MUST RSVP to the notice linked above if you wish to come.
You are using an out of date browser. It may not display this or other websites correctly.
You should upgrade or use an alternative browser.
You should upgrade or use an alternative browser.
Working on my South Bend 9C
- Thread starter Golem Pens
- Start date
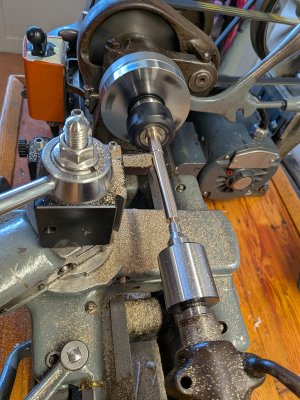
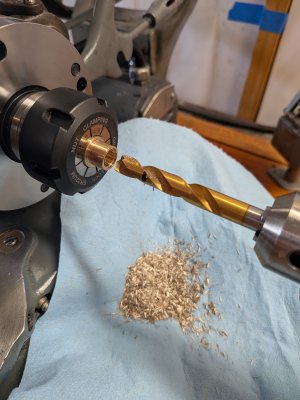
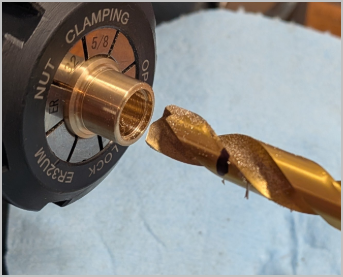
Not quite sure what your operatons are & how it relates to the steel part, but are you counting on the drill for concentricity in the brass part? It will be heavily influecned by center drill pilot (or not) & the drill itself wandering. A better geometric & dimensional surface & would come from roughing the bore with a drill & use a small single point boring bar to hit the ID.
Golem Pens
Michael
I'm currently waiting for the right size insert to arrive so I can bore out the next version in fact (target ID here is 9.2mm).
That one isn't as bad as the other, inner, mandrel.
That one isn't as bad as the other, inner, mandrel.

BaronJ
Ultra Member
Hi Michael,Worked up some new mandrels over the past week but I'm not pleased with the runout on them after trying them today. Ordering some more brass rod to try again...
Have you checked that your collets are clean !
I used to get runout problems until I discovered this... See pictures.
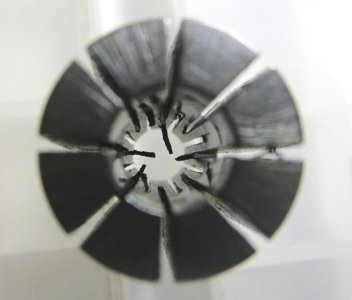
Bear in mind that these collets were brand new Chinese, unused ones, My 0.5" Regiofix is as clean as a whistle and spot on.
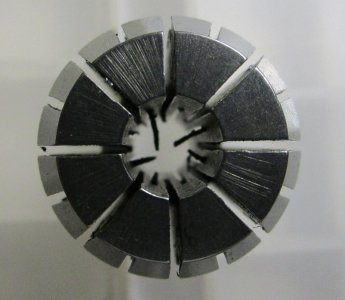
Just look at the swarf from slotting in the cuts.
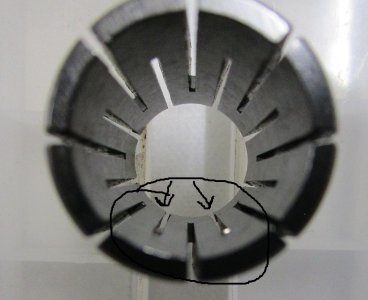
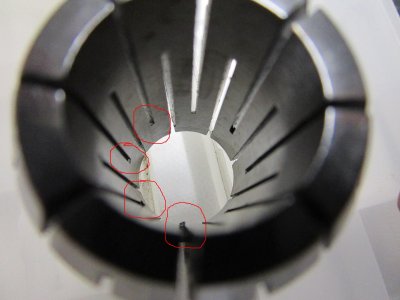
The problem is that the first time that they are used the bits get compressed and are then very difficult to remove. Your work will get pushed to one side when you tighten the collet, causing run out.
If you don't see them and clean them out it will create a long term problem. I use a Stanly knife blade and a ground down hacksaw blade, to remove them.

Just look at the swarf from slotting in the cuts.
I've had this problem too. It's almost a standard feature of Ali Express Collets.
Had a really bad one once. It took a magnifying glass to see and remove the last of the burrs.
BaronJ
Ultra Member
Hi Susquatch, Guys,I've had this problem too. It's almost a standard feature of Ali Express Collets.
Had a really bad one once. It took a magnifying glass to see and remove the last of the burrs.
Its the small ones that are difficult to clean up. I have used 3 mm HSS rod to scrape off the burrs, if you are careful you won't damage the collet. The alternative is small abrasive sticks the smallest that I have got is 4 mm, they are hard but will snap easily.
The technique is to clean the slots with a Stanly knife blade using the back edge as a scraper. I clamp the blade in a block of hardwood to prevent cutting myself with the sharp edge. Then stone the inside edge of the slot, using oil helps.
Golem Pens
Michael
I do generally keep a good eye on keeping those cleaned out, but it's a good reminder to go check.
I do suspect it's a problem in my process somewhere, but I'll give that a check just in case.
I do suspect it's a problem in my process somewhere, but I'll give that a check just in case.
Golem Pens
Michael
Well, may as well toss it here for input before I go again. My attempted production of the long (internal) and short mandrels. I don't have the dimensions on me, but they fit a 5/8" collet, for a sense of scale. All work held in said collet.
Long internal mandrel
1. Short amount of rod extended, the length of the "base".
2. Face the work, center drill for a live center.
2. Using the live center, turn work down to 0.625".
3. Flip the work so that it's held by the base, as it will be used.
4. Face and center drill.
5. Using the live center, turn down the steps as seen (including the long thin portion).
6. Trim and face the thin end as needed.
7. Cut the threads (yes, I'm still using tap and die).
Short mandrel
1. Short amount of rod extended, the length of the "base".
2. Face the work, center drill for a live center.
2. Using the live center, turn work down to 0.625".
3. Flip the work so that it's held by the base, as it will be used.
4. Face and spot drill.
5. Drill relief and to depth. (Next time I'll try boring).
6. Tap.
Long internal mandrel
1. Short amount of rod extended, the length of the "base".
2. Face the work, center drill for a live center.
2. Using the live center, turn work down to 0.625".
3. Flip the work so that it's held by the base, as it will be used.
4. Face and center drill.
5. Using the live center, turn down the steps as seen (including the long thin portion).
6. Trim and face the thin end as needed.
7. Cut the threads (yes, I'm still using tap and die).
Short mandrel
1. Short amount of rod extended, the length of the "base".
2. Face the work, center drill for a live center.
2. Using the live center, turn work down to 0.625".
3. Flip the work so that it's held by the base, as it will be used.
4. Face and spot drill.
5. Drill relief and to depth. (Next time I'll try boring).
6. Tap.
Attachments
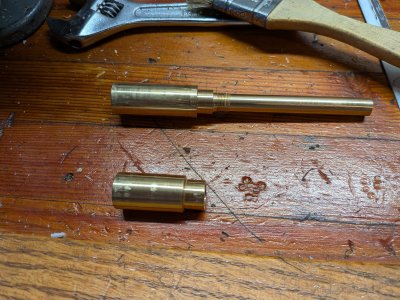
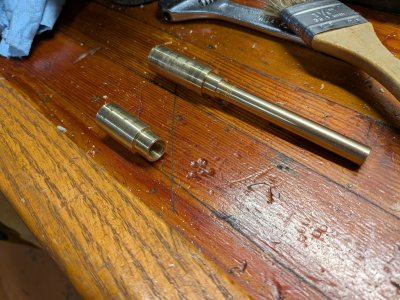
Well, may as well toss it here for input before I go again.
The one and only thing that jumps out at me is those threads. E everything else "looks" amazing. Well done!
The thread leads (both start and finish) are not great though. I believe that's probably the result of using a tap and die and all the limitations of that. Taps and dies are probably good enough for production parts, but I'm thinking they are not good enough for your mandrels.
Basically, I think of your mandrels as masters. That's not the same as production parts. To make good production parts, your mandrels need to be better than production.
My advice...... Time to learn to Single Point.
Golem Pens
Michael
Yeah, it's still on The List...
Well at least the method seems sound. Hopefully take 2 won't be all wobbly like these ones...
Well at least the method seems sound. Hopefully take 2 won't be all wobbly like these ones...
Golem Pens
Michael
I'd need transposing gears to run metric for that too. And some tiny internal thread cutters.
IIRC Sus told you months ago, you need to learn how to grind HSS tooling. Jeesh, you really must listen to Sus ! 😛I'd need transposing gears to run metric for that too. And some tiny internal thread cutters.
Golem Pens
Michael
I still classify that as tiny internal cutters! I didn't specify buy/make 😉
Ah, yes indeed, I stand corrected.I still classify that as tiny internal cutters! I didn't specify buy/make 😉
However my point still stands 😉
Give the kids a quarter, send them to the corner store and by the time they get home you'll be typing a thank you note to Sus.
Golem Pens
Michael
Honestly it's something that I think having someone show me in person would go super quick to pick up.
Yeah, it's still on The List...
Well at least the method seems sound. Hopefully take 2 won't be all wobbly like these ones...
One of MANY advantages to Single Point threading is that you can make threads as tight or as loose as you want them. They don't need to be generic. In fact, you can even cut them to perfectly match a given tap or a given die.
That said, another error that most of us make is thinking that a tight fit is good. It's the cones of each thread bearing against each other that make for a solid fit. The threads distort and deform intentionally as they are torqued up. This isn't intuitive.
Golem Pens
Michael
Well looks like 34 TPI is close to my target 0.75mm pitch (for this specific part). Guess I can try cutting that to see if I can learn it.
Honestly it's something that I think having someone show me in person would go super quick to pick up.
Yes, it is faster that way. You probably have lots of mentors around you who could help you. Even better if you have several because there are variations in the process that are preferred by some but not all. I think it's good to have all the possibilities available to you in your toolbox.
I'd suggest something bigger to start. 1/2"-13 maybe. A 12" bar, thread an inch, rinse and repeat.Well looks like 34 TPI is close to my target 0.75mm pitch (for this specific part). Guess I can try cutting that to see if I can learn it.
Also if your lathe is imperial, go that way if you don't have to match some commercial part.
I wanted a coarser thread for my SB TS so I didn't have to index the wrench all the time. 5/8 NC is 11 tpi. Single pointed a new (1/2" ?) bolt and ground an old 5/8" tap down for the internal threads on a new matching nut. Works a treat. Maybe a useful practice project for you. Channel your inner David and be done by lunch.

140mower
Don
Atta boy..... you learned how to walk and ride a bike and those were pretty daunting at the time, this will be no different, unless you tell yourself that you can't....... but you will, 'cause we all know that you can. 😉Well looks like 34 TPI is close to my target 0.75mm pitch (for this specific part). Guess I can try cutting that to see if I can learn it.