• Scam Alert. Members are reminded to NOT send money to buy anything. Don't buy things remote and have it shipped - go get it yourself, pay in person, and take your equipment with you. Scammers have burned people on this forum. Urgency, secrecy, excuses, selling for friend, newish members, FUD, are RED FLAGS. A video conference call is not adequate assurance. Face to face interactions are required. Please report suspicions to the forum admins. Stay Safe - anyone can get scammed.
  • The 2026 Calgary Area Meetup is set for Saturday May 30th at 10am. The signup thread is here! Robinhood has graciously offered to host the meetup again this year. Please note that you MUST RSVP to the notice linked above if you wish to come.

Working on my South Bend 9C

If the wear was consistent or present where the tailstock is most of the time I could see that. But in this case, the tailstock is way further aft than normal operations when the reamer is mounted. Alignment is fine when it's brought into "normal" drilling range. So shortening the reamer is probably the way to go for now...
 
Michael,

If you recall, I had suggested a "D" bit to ream that hole. You would have to make one of course but you could make it as long or as short as you like. And since its only reaming plastic drill rod would work well and then you could harden it if you wished.
 
Hi Michael,

I would argue that its a simple turning job, the only hard part would be filing a flat accurately on the rod end and a little back rake on the front. You do need to ensure sharp edges on the front, but the sides should automatically become sharp as you file it down. As a last step stone it !

Someone posted a copy of the instruction manual for a "D" bit grinder. There are details in that.

PDF attached.
 

Attachments

So if I did want to fuss with trying to shim the tailstock to account for bed wear... (Knowing that it will only help things within a certain range of the bed, but I tend to be working in a small range so it may be fine)

1) I imagine it's better to shim between the two pieces of the tailstock rather than against the ways.

2) Should I shim just the front so it tips slightly to account for the angle of the bed wear, or shim it all the way around so the whole thing is slightly raised?
 
Should I shim just the front so it tips slightly to account for the angle of the bed wear, or shim it all the way around so the whole thing is slightly raised?

If you haven't realized it yet, I'm an unorthodox Redneck Hill-Billy. If it was mine I'd put release agent on the upper half, and devcon plastic steel on the bottom half. Slide the tailstock to where it will be used, let the epoxy setup just enough so it doesn't flow anymore, and then press the top half into the epoxy till it aligns when the quill is extended and also when retracted. A different fellow would shim it with small shims till it was perfect, and then use the epoxy.

The trouble with shims is that the top and bottom halves have to be able to move relative to each other. That's why there is a joint there. With epoxy, you can clean it up so it can still move.

Of course, there are also a lot of guys who would do it properly....... LOL!
 
If you haven't realized it yet, I'm an unorthodox Redneck Hill-Billy. If it was mine I'd put release agent on the upper half, and devcon plastic steel on the bottom half. Slide the tailstock to where it will be used, let the epoxy setup just enough so it doesn't flow anymore, and then press the top half into the epoxy till it aligns when the quill is extended and also when retracted. A different fellow would shim it with small shims till it was perfect, and then use the epoxy.

The trouble with shims is that the top and bottom halves have to be able to move relative to each other. That's why there is a joint there. With epoxy, you can clean it up so it can still move.

Of course, there are also a lot of guys who would do it properly....... LOL!
The problem with bed wear isn't handled with that though. Now if the tailstock will always sit in the same place for production then that's a good solution. But if the tail stock will be used for other projects I'm not so sure.
My two cents.
 
The problem with bed wear isn't handled with that though. Now if the tailstock will always sit in the same place for production then that's a good solution. But if the tail stock will be used for other projects I'm not so sure.
My two cents.

He did say:

Knowing that it will only help things within a certain range of the bed, but I tend to be working in a small range so it may be fine

If he had not said that, I would not have suggested it.

The trouble is that you cannot fix a tailstock to be correct end-to-end with a worn bed. Only for a small range.
 
@Golem Pens look up a “floating reamer holder”, we use them for reaming chambers in rifles.

Those will get rid of slight tailstock misalignment if used properly, when reaming.

Drilling should not be used as a “precision” operation anyway so I wouldn’t worry about that.

Turning with a tailstock slightly high or low doesn’t really effect much, and misalignment to one side or the other can be taken out by aligning the tailstock.

How low are you?

Are you getting oversized holes when reaming?
 
@BaitMaster those are interesting!

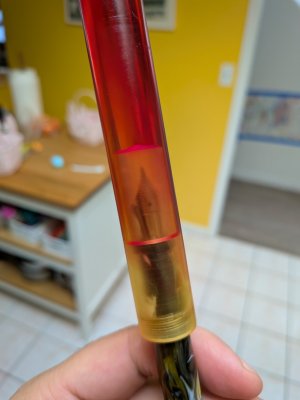
Good point re: drill imprecision. Currently I make all my internals with machine/screw length drill bits, clean with a reamer, tap, and on clear pieces, sand and polish. It's the clear materials where I really want this to work. Here you can see the quality of the interior finish after being reamed (and run through the ultrasonic to clear off cutting fluid), the exterior has been taken to a reasonably high polish, so all that spiraling and texture is on the inside:
PXL_20260409_194201858.MACRO_FOCUS.jpg

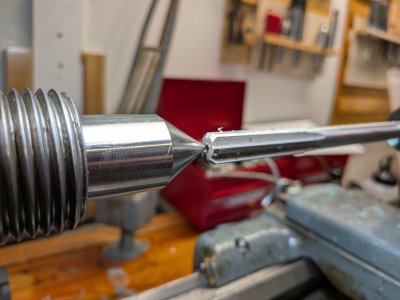
The issue isn't oversized holes, more that the reamer was visibly low compared to the drilled hole, and really had to "rise" quite a bit when I advanced it into the hole with the tailstock quill. In fact, I think I see a similar lift with most of the drill bits as they start to bite the material. How low? I can try to measure tomorrow, but this image may give an idea:
PXL_20260412_013516526.NIGHT.jpg

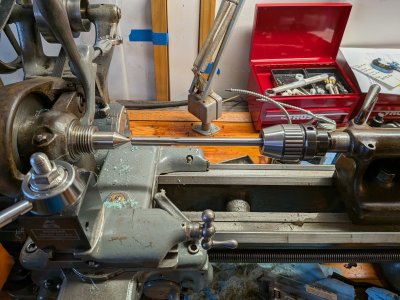
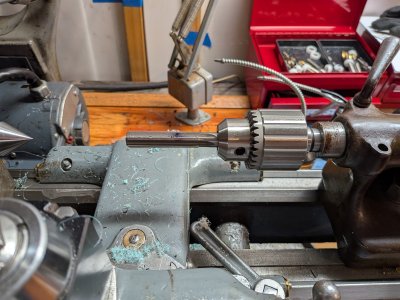
Now, I did cut down my most problematic reamer shank yesterday so TBD if that helps. For reference, before and after:
PXL_20260412_155349374.jpgPXL_20260415_041503537.jpg
 
@BaitMaster those are interesting!

Good point re: drill imprecision. Currently I make all my internals with machine/screw length drill bits, clean with a reamer, tap, and on clear pieces, sand and polish. It's the clear materials where I really want this to work. Here you can see the quality of the interior finish after being reamed (and run through the ultrasonic to clear off cutting fluid), the exterior has been taken to a reasonably high polish, so all that spiraling and texture is on the inside:
View attachment 81116

The issue isn't oversized holes, more that the reamer was visibly low compared to the drilled hole, and really had to "rise" quite a bit when I advanced it into the hole with the tailstock quill. In fact, I think I see a similar lift with most of the drill bits as they start to bite the material. How low? I can try to measure tomorrow, but this image may give an idea:
View attachment 81117

Now, I did cut down my most problematic reamer shank yesterday so TBD if that helps. For reference, before and after:
View attachment 81118View attachment 81119

If the hole is that critical best to bore it. Or the idea of a floating reamer. I have a similar issue coming up but I think in my case the shaft of the motor is 8mm and the reamer is 8mm but I find it has a loose fit. Haven't thought about off centre tail stock so thanks for that heads up.
 
The issue isn't oversized holes, more that the reamer was visibly low compared to the drilled hole, and really had to "rise" quite a bit when I advanced it into the hole with the tailstock quill. In fact, I think I see a similar lift with most of the drill bits as they start to bite the material.

Haven't thought about off centre tail stock so thanks for that heads up.

There is a fairly extensive discussion about floating reamer holders in the members only section of the forum. If you plan to use one and care about precision, it's worth a read. I'd link it here, but I'm not certain about link security. Just search on floating.

Maybe start at post 57 in First Lathe Questions. Like most threads on here, the discussion jumps around a fair bit. But the floating reamer discussion gets right down into the weeds and should help you a lot. Heck, it might even help you with your order of operations thinking.
 
Not sure I would even go to the trouble of trying a floating reamer for the Plastic that Golem uses...plastic wont support the droop of the reamer, floaters require a good solid piloted entry point.

That might be true. I'm not sure. Even plastic has significantly higher strength than gravity.

But your point is totally appropriate. @Golem Pens would probably be well advised to borrow one to try (or making one) than buying one. If it works, then decide if it's worth buying one.

What does a bald eagle or a decent clone of one cost these days anyway?
 
If the hole is that critical best to bore it. Or the idea of a floating reamer. I have a similar issue coming up but I think in my case the shaft of the motor is 8mm and the reamer is 8mm but I find it has a loose fit. Haven't thought about off centre tail stock so thanks for that heads up.
When I was asking about boring earlier, folks flagged that the dimensions I'm working at probably would be a problem. That's where recommendations for D bits came in.

Perhaps my shortened reamer will help as it stands. I'll be polishing anyway, a better finish just saves time.

But I'll find that floating reamer discussion too.
 
When I was asking about boring earlier, folks flagged that the dimensions I'm working at probably would be a problem. That's where recommendations for D bits came in.

I'd be studying how reaming and boring is done in precision rifle work. It's at least an order of magnitude greater precision than you need. If it works for them, it will probably work for you too.
 
Back
Top