-
Scam Alert. Members are reminded to NOT send money to buy anything. Don't buy things remote and have it shipped - go get it yourself, pay in person, and take your equipment with you. Scammers have burned people on this forum. Urgency, secrecy, excuses, selling for friend, newish members, FUD, are RED FLAGS. A video conference call is not adequate assurance. Face to face interactions are required. Please report suspicions to the forum admins. Stay Safe - anyone can get scammed.
-
Several Regions have held meetups already, but others are being planned or are evaluating the interest. The Calgary Area Meetup is set for Saturday July 12th at 10am. The signup thread is here! Arbutus has also explored interest in a Fraser Valley meetup but it seems members either missed his thread or had other plans. Let him know if you are interested in a meetup later in the year by posting here! Slowpoke is trying to pull together an Ottawa area meetup later this summer. No date has been selected yet, so let him know if you are interested here! We are not aware of any other meetups being planned this year. If you are interested in doing something in your area, let everyone know and make it happen! Meetups are a great way to make new machining friends and get hands on help in your area. Don’t be shy, sign up and come, or plan your own meetup!
You are using an out of date browser. It may not display this or other websites correctly.
You should upgrade or use an alternative browser.
You should upgrade or use an alternative browser.
Tips/Techniques Which printer to buy advice needed
- Thread starter GummyMonster
- Start date
Tips/Techniques
Dan Dubeau
Ultra Member
I think we're in good company here Darren.Dan, I think we are pretty similar in that regard.

It looks great. The contrast is good. The mm markings are really good. I was trying to print a small gear with my old machine. I think I'm going to try again on the X1C just to see what it does. I printed some desiccant boxes out. Take a look at the small grid in these.....

If it can print that grid, I might be able to make my gear.

 canadianhobbymetalworkers.com
If it can print that grid, I might be able to make my gear.
Anyone have a 3D resin printer?
From what I understand you can print a much smaller item on a resin machine. I'm looking to make (or have someone make) a small plastic gear. Approx 3.5 mm diameter. I tried on my PLA machine with a 0.4mm nozzle. No joy. I though maybe I could make a negative of the gear and then fill...

My boy likes Capsela. Its a building toy with gears and stuff. I played with it when i was a kid too. Anyways, all this stuff is old. The capsule couplers are all cracked. So tonight i went on thingiverse, and sure enough, there's what i need. Started printing a few at different scaling to check fit, canceled it when they were built enough to test, and now that its dialed in, its printing off a lifetime supply. 

Last edited:
Doggggboy
Ultra Member
Jesus! How many more kids are you planning on?My boy likes Capsela. Its a building toy with gears and stuff. I played with it when i was a kid too. Anyways, all this stuff is old. The capsule couplers are all cracked. So tonight i went on thingiverse, and sure enough, there's what i need. Started printing a few at different scaling to check fit, canceled it when they were built enough to test, and now that its dialed in, its printing off a lifetime supply. View attachment 44656View attachment 44657
Darren, your calibration lines look different than mine. Next print can you get a photo of the lines and post it?
I like to keep a set of calipers around for fast measuring of 'stuff'
Those do look handy. They appear to have a Vernier Scale too, but when I zoom in, it just looks like a regular scale. What the heck is thy all about?
In my case, I have just a regular 6" and 12 " steel ruler, and a tape measure. I don't have any plain calipers. I think plain calipers would be very useful to have handy on my mill and my lathe.
Doggggboy
Ultra Member
Aarknoid
Super User
Along with software suggestion I will put in a vote for solidworks if you are doing more technical stuff. I've only done 4 of the lessons for it, and 6 months of practicing on my own stuff. ( got a copy of their training book from a co worker ) and I've just completed my most complex part yet, the splined shaft for my quick change gear box on the colchester. Dont get me started about crash course on gear cutting and design. But the thinner splines are 15t DP16 at a 20 deg contact angle, which solidworks has a tool for. (Edit: after my test print they are 14.5 degree it seems)
Attachments
Last edited:
Calgary Library has free online courses. Lynda- Solidworks is worth checking out. Short follow along videos that get straight to the point.Along with software suggestion I will put in a vote for solidworks if you are doing more technical stuff. I've only done 4 of the lessons for it, and 6 months of practicing on my own stuff. ( got a copy of their training book from a co worker ) and I've just completed my most complex part yet, the splined shaft for my quick change gear box on the colchester. Dont get me started about crash course on gear cutting and design. But the thinner splines are 15t DP16 at a 20 deg contact angle, which solidworks has a tool for. (Edit: after my test print they are 14.5 degree it seems)View attachment 44712
@Doggggboy No Ludicrous speed for me ...yet. lol. So far time is on my side. I'm happy not having to keep an eye on. If it can print and just do it's job...I'm willing to wait. I got lots of other things to do. Have you tried it yet? The speed on this unit is Ludicrous compared to my old machine.
@Darren I printed one of the Twist lock gift boxes for a friend's birthday. I used the Bambu Petg-CF. You can not see a line on this print. There is no way to make this print any better.
So far following the Bambu recommendations has paid off with no issue prints.
So first black hole learning curve.
The Bambu PETG-CF printed with no issues using the default settings. Just started a riser project for the AMS and decided to use the Bambu PETG in black . (not sure if color matters, but I read black, red and yellow seem to be more temperamental)
The default settings from Bambu do not work for the Bambu PETG (at least not for me). There is a lot of info on the web about the Bambu PETG stating that many people have had issues trying to print it. Many other brands work fine with the Generic PETG settings.
So just like my old printer, there is a lot of messing around to get it to a point where you are happy. 2 days of messing around. Lots to read, lots to try.
As I'm sitting here my print is 1.5 hours into a 9 hour print. Things appear to be going along much better then it was two days ago.
I've learned a lot about this machine, but this is what I was hoping to avoid. I want this machine to be a tool, not a hobby. My old printer was more of a hobby.
Still not a push print and sit back machine.....yet.
Woke up to a successful print this morning. So far so good. Just finished setting up part two of this print. Another 9 hour over night print.
It would appear that you could fall into having to fine tune filaments even if they are the Bambu brand. Even the same filament from the same supplier may need to be tuned to get a superior print. (Not all rolls are the same.) The process is not too difficult, but there is a learning curve the first time.
I'm hoping this was a one of thing, but from my reading some of the filaments may need a little more work then others. TPU is one I would like to print and it falls into this group.
Have a great night gents. 🙂
Ok a few photos to make this less dry. Woke up to another PETG print success. Assembled and installed this evening.
One item I do not like about the Bambu X1C is the AMS sits on the top glass. You need to take that glass off for some materials. With the glass off there is no place for the AMS to sit. I did not design this riser. I downloaded from link below. It lifts the AMS up off the glass. The top glass can be removed and slid into a slot to allow for venting. There are many designs out there. This one was simple and clean.
Riser link
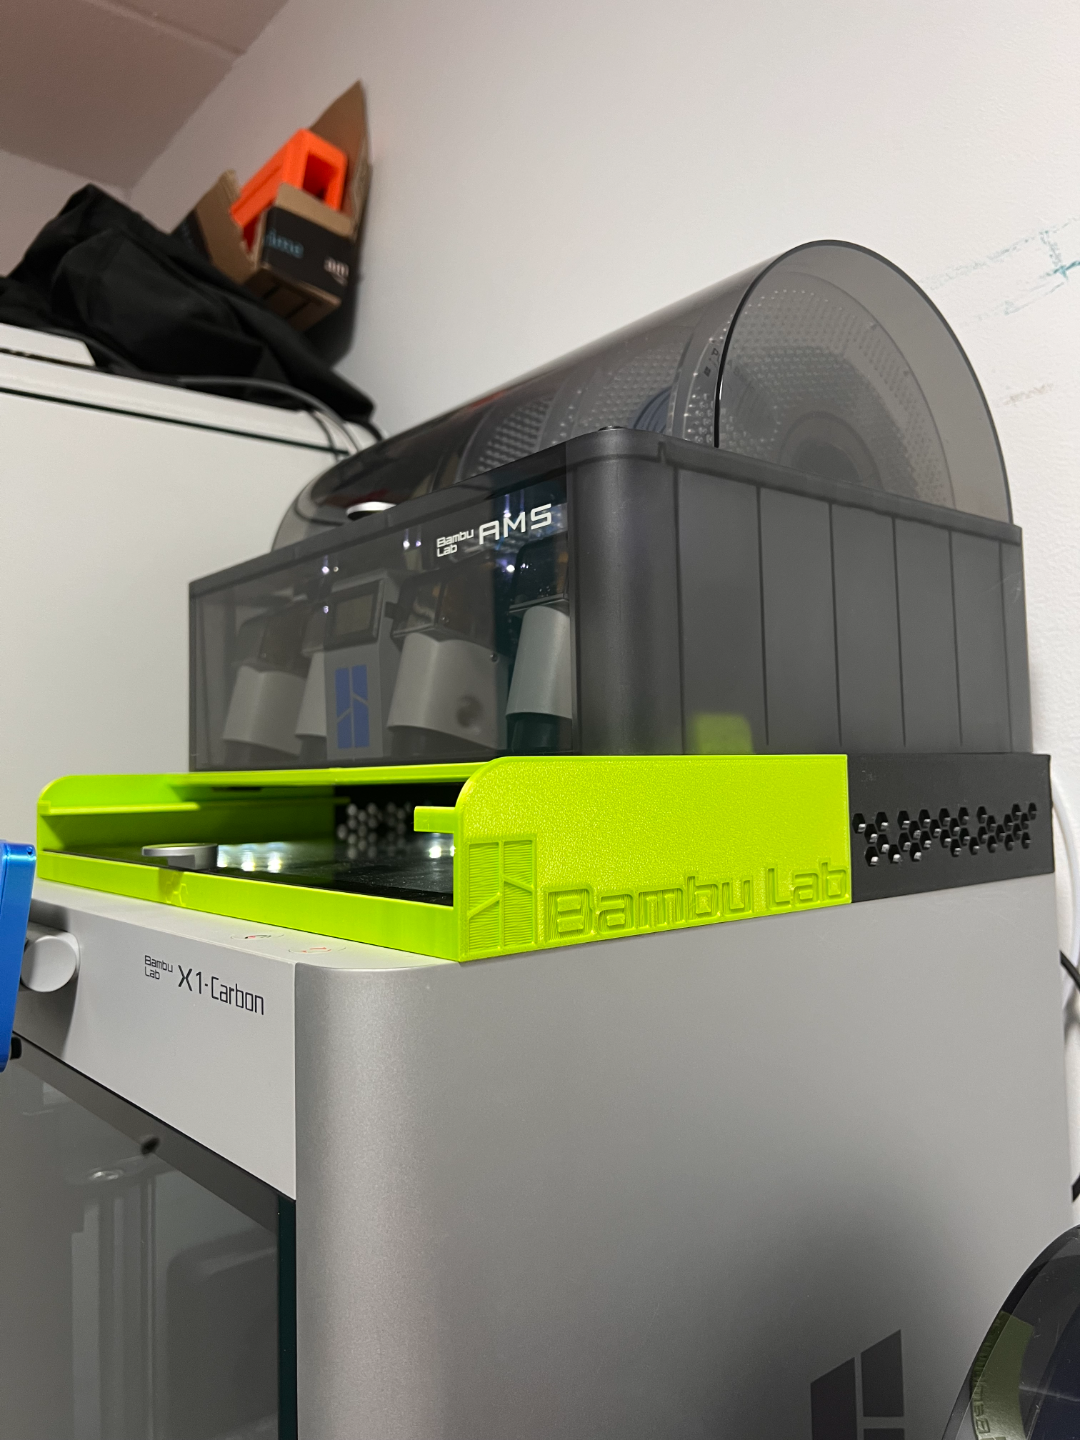
 makerworld.com


One item I do not like about the Bambu X1C is the AMS sits on the top glass. You need to take that glass off for some materials. With the glass off there is no place for the AMS to sit. I did not design this riser. I downloaded from link below. It lifts the AMS up off the glass. The top glass can be removed and slid into a slot to allow for venting. There are many designs out there. This one was simple and clean.
Riser link
X3D AMS Riser Lite 58mm high by DutchWorkX3D
Check my FB group if you need more info after reading below. Again a riser but this time one which is in line with the outer lines of the machine.I have tested it with the X1C and the P1S and glass fits perfect.You will need 4 top connectors and 4 bottom connectors to fuse the 4 sides...
Engmaxx
(Michael)
Capsela!! I loved that toy when I was a kid and completely forgot about it. Right, all the couplings had cracked so nothing held together well. And aren't they water sealed as well?...again cracked couplings made that a problem.My boy likes Capsela.