-
Scam Alert. Members are reminded to NOT send money to buy anything. Don't buy things remote and have it shipped - go get it yourself, pay in person, and take your equipment with you. Scammers have burned people on this forum. Urgency, secrecy, excuses, selling for friend, newish members, FUD, are RED FLAGS. A video conference call is not adequate assurance. Face to face interactions are required. Please report suspicions to the forum admins. Stay Safe - anyone can get scammed.
-
Several Regions have held meetups already, but others are being planned or are evaluating the interest. The Calgary Area Meetup is set for Saturday July 12th at 10am. The signup thread is here! Arbutus has also explored interest in a Fraser Valley meetup but it seems members either missed his thread or had other plans. Let him know if you are interested in a meetup later in the year by posting here! Slowpoke is trying to pull together an Ottawa area meetup later this summer. No date has been selected yet, so let him know if you are interested here! We are not aware of any other meetups being planned this year. If you are interested in doing something in your area, let everyone know and make it happen! Meetups are a great way to make new machining friends and get hands on help in your area. Don’t be shy, sign up and come, or plan your own meetup!
You are using an out of date browser. It may not display this or other websites correctly.
You should upgrade or use an alternative browser.
You should upgrade or use an alternative browser.
Shop What's Happening in Chazz's Shop?
- Thread starter ChazzC
- Start date
Shop
ChazzC
Ultra Member
I think I was in 11th grade when one of the instructors got a Leroy Lettering Set (for his use only). Sometime after that I saw an add for a “mini typewriter” gizmo that directly typed onto a drawing.My dad, a draftsman used to have handwriting like a typewriter. I was an abject disappointment in that regard.
ChazzC
Ultra Member
In the late 70’s we moved to Pennsylvania from Florida; when we went to AAA to register our cars, they told us that since we had lived in PA fir less than 6 months and purchased our cars elsewhere we had to pay Sales Tax. We left and went back 6 months later and they didn’t say anything about taxes. [What’s this have to do about handwriting? Just be patient] We signed the paperwork, but while I was writing a check (remember those?) I was told “You can’t sign your name like that, no one can read it: they’ll send it back!” I signed the check, handed it over and said, “They’ll take the check, so they’ll take the application - send it in.” Don’t you love people who have a little power?I should have been a doctor. I have the handwriting for it! 😛
I dropped out of med school after I aced the handwriting class.I should have been a doctor. I have the handwriting for it! 😛
ChazzC
Ultra Member
Mini-Lathe Chuck Storage
As everyone should know by now, I like things neat & tidy (tickety-boo?). Chuck storage has always been an issue for me – they need to be close at hand, but out of the way, while not taking up space that could better be utilized. At the same, the chucks need to be protected from dust, dirt & swarf. Over the weekend, I came up with a solution that looks like it will work, and here's what I did.
First, I spent some time removing the labels from some plastic "jars" that were wrapped around Kirkland™ Chocolate Covered Almonds (sprayed the labels with Goo-Gone® and let them sit overnight until the labels could be easily peeled off, wiped the jars with 90% Isopropyl Alcohol and gave them a good wash & dry. Then over to the bandsaw:
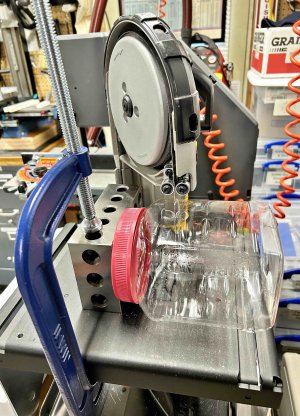
Not the first time I've used a 2-4-6 block as a guide. The sawing went surprising smoothly, and shortly I was left with two pieces:
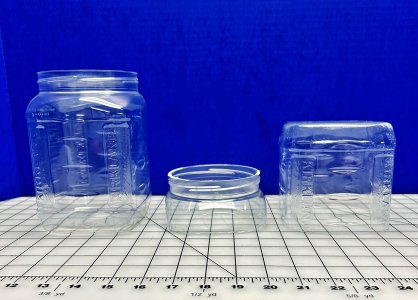
The guide did it's job, and the cut was square (and the two ends of the cut met).
After deburring the cut edges by rubbing them against a green Scotch-Brite™ pad on the bench and some detail work with a small strip of 220 grit emery cloth, my covers were done:
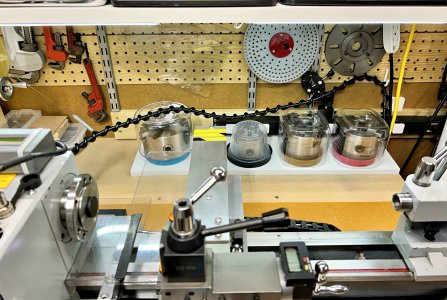
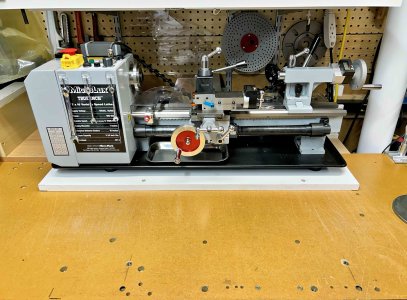
As you can see, I didn't waste the lids: the 4" 3-Jaw & 4-Jaw chucks sit back-down in a lid, and the bottom of the jar is a perfect cover. There is also a 3" 3-Jaw chuck back-down in a lid, but with a 16oz Deli-Cup as a cover. Also seen at the far left of the row is my 5" 3-Jaw, sitting in a larger cap with a clear food storage container used as a lid. The chucks are out of the way, but close at hand, and protected against the elements. When I need bench space, I remove two bolts that secure the lathe baseplate to the bench and push it back against the 1x8 that the chucks are sitting on:
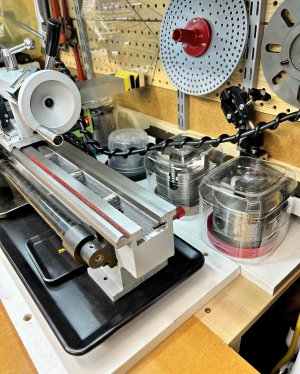
leaving clear bench space (with numerous mounting holes for various portable tools):
As everyone should know by now, I like things neat & tidy (tickety-boo?). Chuck storage has always been an issue for me – they need to be close at hand, but out of the way, while not taking up space that could better be utilized. At the same, the chucks need to be protected from dust, dirt & swarf. Over the weekend, I came up with a solution that looks like it will work, and here's what I did.
First, I spent some time removing the labels from some plastic "jars" that were wrapped around Kirkland™ Chocolate Covered Almonds (sprayed the labels with Goo-Gone® and let them sit overnight until the labels could be easily peeled off, wiped the jars with 90% Isopropyl Alcohol and gave them a good wash & dry. Then over to the bandsaw:

Not the first time I've used a 2-4-6 block as a guide. The sawing went surprising smoothly, and shortly I was left with two pieces:

The guide did it's job, and the cut was square (and the two ends of the cut met).
After deburring the cut edges by rubbing them against a green Scotch-Brite™ pad on the bench and some detail work with a small strip of 220 grit emery cloth, my covers were done:

As you can see, I didn't waste the lids: the 4" 3-Jaw & 4-Jaw chucks sit back-down in a lid, and the bottom of the jar is a perfect cover. There is also a 3" 3-Jaw chuck back-down in a lid, but with a 16oz Deli-Cup as a cover. Also seen at the far left of the row is my 5" 3-Jaw, sitting in a larger cap with a clear food storage container used as a lid. The chucks are out of the way, but close at hand, and protected against the elements. When I need bench space, I remove two bolts that secure the lathe baseplate to the bench and push it back against the 1x8 that the chucks are sitting on:

leaving clear bench space (with numerous mounting holes for various portable tools):

Last edited:
Brilliant idea!Mini-Lathe Chuck Storage
As everyone should know by now, I like things neat & tidy (tickety-boo?). Chuck storage has always been an issue for me – they need to be close at hand, but out of the way, while not taking up space that could better be utilized. At the same, the chucks need to be protected from dust, dirt & swarf. Over the weekend, I came up with a solution that looks like it will work, and here's what I did.
First, I spent some time removing the labels from some plastic "jars" that were wrapped around Kirkland™ Chocolate Covered Almonds (sprayed the labels with Goo-Gone® and let them sit overnight until the labels could be easily peeled off, wiped the jars with 90% Isopropyl Alcohol and gave them a good wash & dry. Then over to the bandsaw:
View attachment 48134
Not the first time I've used a 2-4-6 block as a guide. The sawing went surprising smoothly, and shortly I was left with two pieces:
View attachment 48135
The guide did it's job, and the cut was square (and the two ends of the cut met).
After deburring the cut edges by rubbing them against a green Scotch-Brite™ pad on the bench and some detail work with a small strip of 220 grit emery cloth, my covers were done:
View attachment 48136
As you can see, I didn't waste the lids: the 4" 3-Jaw & 4-Jaw chucks sit back-down in a lid, and the bottom of the jar is a perfect cover. There is also a 3" 3-Jaw chuck back-down in a lid, but with a 16oz Deli-Cup as a cover. Also seen at the far left of the row is my 5" 3-Jaw, sitting in a larger cap with a clear food storage container used as a lid. The chucks are out of the way, but close at hand, and protected against the elements. When I need bench space, I remove two bolts that secure the lathe baseplate to the bench and push it back against the 1x8 that the chucks are sitting on:
View attachment 48137
leaving clear bench space (with numerous mounting holes for various portable tools):
View attachment 48138
First, I spent some time removing the labels from some plastic "jars" that were wrapped around Kirkland™ Chocolate Covered Almonds (sprayed the labels with Goo-Gone® and let them sit overnight until the labels could be easily peeled off, wiped the jars with 90% Isopropyl Alcohol and gave them a good wash & dry.
You are a very sick puppy. You need to come visit me one of these days to see how superior organized chaos is.
All that work on those covers and then you put them where they will get covered in swarf and cutting oil! Sheesh!
If I were you I'd be totally embarrassed to let anyone see my beautiful covers made with blood sweat and tears, all covered in oil, dust, and swarf.
FWIW, I stack my chucks on top of each other, mounting taper down, on the workbench opposite my lathe (behind the operator). They don't take up much room that way, they are far from the fling zone, and I don't have to lift dirty covers to see which one is hiding under which cover...... 🙄
Labels = excuse to buy four different engraving machines........ been thinking about labels for my shop as well and I think I have come up with the appropriate one..... "Caution this shop poses severe risk of stroke in persons with OCD".... Won't help me find anything, but should cover my ass just in case.
Tom O
Ultra Member
Labels = excuse to buy four different engraving machines
Log into Facebook
Log into Facebook to start sharing and connecting with your friends, family, and people you know.
 www.facebook.com
ChazzC
Ultra Member
I tend to work very clean, with minimal application of cutting fluid and capturing swarf before it causes any problems. The covers are intended to keep errant bits from sneaking into the innards of the chucks. I’ll take before & after photos during my next cleaning after using the lathe.You are a very sick puppy. You need to come visit me one of these days to see how superior organized chaos is.
All that work on those covers and then you put them where they will get covered in swarf and cutting oil! Sheesh!
If I were you I'd be totally embarrassed to let anyone see my beautiful covers made with blood sweat and tears, all covered in oil, dust, and swarf.
View attachment 48139
FWIW, I stack my chucks on top of each other, mounting taper down, on the workbench opposite my lathe (behind the operator). They don't take up much room that way, they are far from the fling zone, and I don't have to lift dirty covers to see which one is hiding under which cover...... 🙄
I don’t think I’ve posted the floor plan of my shop on this forum (I’ll fix that in the next few days) or you wouldn’t suggest storing something on the other side of the shop.
This triggered my OCD : Occasional Cutter DepravationLog into Facebook
Log into Facebook to start sharing and connecting with your friends, family, and people you know.www.facebook.com
View attachment 48143
I love it, 3, 4 and 5 inch chucks, imagine all the chocolate covered almonds if I do covers for my 15 inch chucks.Mini-Lathe Chuck Storage
As everyone should know by now, I like things neat & tidy (tickety-boo?). Chuck storage has always been an issue for me – they need to be close at hand, but out of the way, while not taking up space that could better be utilized. At the same, the chucks need to be protected from dust, dirt & swarf. Over the weekend, I came up with a solution that looks like it will work, and here's what I did.
First, I spent some time removing the labels from some plastic "jars" that were wrapped around Kirkland™ Chocolate Covered Almonds (sprayed the labels with Goo-Gone® and let them sit overnight until the labels could be easily peeled off, wiped the jars with 90% Isopropyl Alcohol and gave them a good wash & dry. Then over to the bandsaw:
View attachment 48134
Not the first time I've used a 2-4-6 block as a guide. The sawing went surprising smoothly, and shortly I was left with two pieces:
View attachment 48135
The guide did it's job, and the cut was square (and the two ends of the cut met).
After deburring the cut edges by rubbing them against a green Scotch-Brite™ pad on the bench and some detail work with a small strip of 220 grit emery cloth, my covers were done:
View attachment 48136
As you can see, I didn't waste the lids: the 4" 3-Jaw & 4-Jaw chucks sit back-down in a lid, and the bottom of the jar is a perfect cover. There is also a 3" 3-Jaw chuck back-down in a lid, but with a 16oz Deli-Cup as a cover. Also seen at the far left of the row is my 5" 3-Jaw, sitting in a larger cap with a clear food storage container used as a lid. The chucks are out of the way, but close at hand, and protected against the elements. When I need bench space, I remove two bolts that secure the lathe baseplate to the bench and push it back against the 1x8 that the chucks are sitting on:
View attachment 48137
leaving clear bench space (with numerous mounting holes for various portable tools):
View attachment 48138
Ironman
Ultra Member
That's sickening. You could eat off that worktable, it's so clean😱You are a very sick puppy. You need to come visit me one of these days to see how superior organized chaos is.
All that work on those covers and then you put them where they will get covered in swarf and cutting oil! Sheesh!
My shop is a pig wallow compared to Chazz😛
That's sickening. You could eat off that worktable, it's so clean😱
My shop is a pig wallow compared to Chazz😛
Mine is a pig wallow too. But I like it! And just to be really clear...... I'd eat off my floor, the driveway, and just about any surface anyplace. It doesn't have to be clean to eat off it in my books. I draw the line at toilet seats.
Keep in mind your bathtub and your shower stall floor will have far more fecal coliforms than even the toilet bowl. Fact.I draw the line at toilet seats.
Keep in mind your bathtub and your shower stall floor will have far more fecal coliforms than even the toilet bowl. Fact.
I said Lid, not bowl.
And speaking of bowls, showers and tubs are more suitable for having soup and I don't generally have soup out of anything but pots, bowls, cups, or the bowl of my hands. So no risk there!
But thanks for thinking about my well being @Dabbler!
ChazzC
Ultra Member
Updated My Tapping Fixture (Poor Man's Universal Pillar Tool)
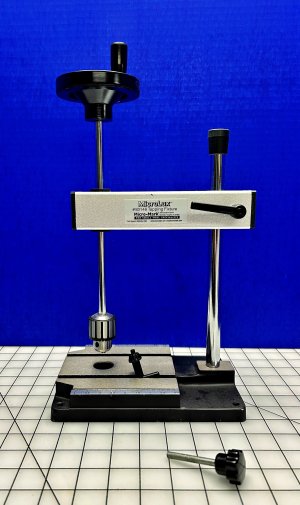
Referred to in this post; I replaced the difficult to turn hand knob (in the foreground) with an adjustable lever handle:
Referred to in this post; I replaced the difficult to turn hand knob (in the foreground) with an adjustable lever handle:

Last edited:

