• Scam Alert. Members are reminded to NOT send money to buy anything. Don't buy things remote and have it shipped - go get it yourself, pay in person, and take your equipment with you. Scammers have burned people on this forum. Urgency, secrecy, excuses, selling for friend, newish members, FUD, are RED FLAGS. A video conference call is not adequate assurance. Face to face interactions are required. Please report suspicions to the forum admins. Stay Safe - anyone can get scammed.
  • The 2026 Calgary Area Meetup is set for Saturday May 30th at 10am. The signup thread is here! Robinhood has graciously offered to host the meetup again this year. Please note that you MUST RSVP to the notice linked above if you wish to come.

Tips/Techniques What are you printing today?

Tips/Techniques
I printed a straight up 1" cube flat on the bed and it is flawless.

I didn't want to do that on the adapter remover because the threads would be too weak. I should try 45 degree with a fancy support
I'm not sure if the Creality slicer allows it but if you can use adaptive layer height it may help smooth the transition from layer to layer when printing on an angle. It works well on printing a sphere where the change in circumference makes for a large change in where the edge of the layer starts. Just spitballing.
 
I'm not sure if the Creality slicer allows it but if you can use adaptive layer height it may help smooth the transition from layer to layer when printing on an angle. It works well on printing a sphere where the change in circumference makes for a large change in where the edge of the layer starts. Just spitballing.
It does works the same as others. I don’t think there is much difference between slicers these days. For threads you can print at angles also increase wall lines.
 
Anybody printing with a dual head with 0.4mm for threads/details and 0.6 or 0.8mm for coarse features? Some of you have the Bambu dual head model?
 
Anybody printing with a dual head with 0.4mm for threads/details and 0.6 or 0.8mm for coarse features? Some of you have the Bambu dual head model?
That's a really good question I would not have thought about it that way. I have printed up to 0.8 and standard size on my belt printer was 0.6. Fell like I might have to look in to getting a dual head or multi head printer one of these days. Awesome watching guys print without purging an entire bin with each color swap.
 
Not available on the Bambu multi head printers. My H2D can't and none of the other Bambus can either.
They say it is a massively complicated software problem.
But Prusa and Snapmaker I think have figured it out.
There are ways to spoof the Bambu multihead printers by changing the nozzle size partway through the print or mislabeleing the size so the printer thinks it is a .4 when it's really a .6 or ,8..
Seems like a lot of futzing around, honestly.
 
Last edited:
That's a really good question I would not have thought about it that way. I have printed up to 0.8 and standard size on my beltprinter was 0.6. Fell like I might have to look in to getting a dual head or multi head printer one of these days. Awesome watching guys print without purging an entire bin with each color swap.
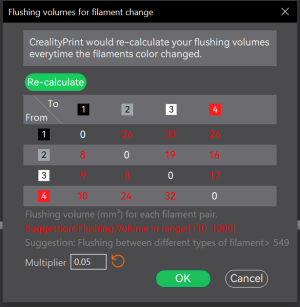
Where do you set your flushing volumes? I turned mine down as far as I could, the system complains but I have never seen any ill effects from it in fact most times I wouldn't care if it feed the next color without any flushing.
1792102240666.png
 
Where do you set your flushing volumes? I turned mine down as far as I could, the system complains but I have never seen any ill effects from it in fact most times I wouldn't care if it feed the next color without any flushing.
View attachment 88145
I have mine set at the default volume. I have used the guide from creality. It is not the best. Seems to purge a lot for my taste
 
Anybody printing with a dual head with 0.4mm for threads/details and 0.6 or 0.8mm for coarse features? Some of you have the Bambu dual head model?

I received some emails about this one, love the efficiency of filament use but not sure of the quality and durability.

 
Looks like a bambu A1 and no waste seems to be relying on purging to infill - I think some slicers already do this. I've meaning to try that - anyone try purging colour change to infill?
 
I don't have a 3D printer, but was impressed to see that the new Canadian Armed Forces (CAF) C25 rifle is equipped with a suppressor / muzzle brake that is 3D printed in Inconel.
 
Anybody printing with a dual head with 0.4mm for threads/details and 0.6 or 0.8mm for coarse features? Some of you have the Bambu dual head model?
I have the H2C, my preferred engineering filament is PET-GF - not PETG-GF. Reinforced PET is a very tough and durable material, well suited for light duty parts.

Large threaded objects print quite accurately with the 0.4mm nozzle.
The smallest I have tried is an M22x1.5. While it printed neatly, it was about 15 thou oversize so I needed to run it through a die.
For other small threaded parts, the threaded portion is not printed as a thread, but a circular section slightly larger than the major diameter of the thread, then use the die or lathe to finish.

Larger threads such as 1-1/2x8 will require support for the overhang. But again some thread chasing is needed. Print orientation affects the fit and strength too.
IMG_7862.JPG
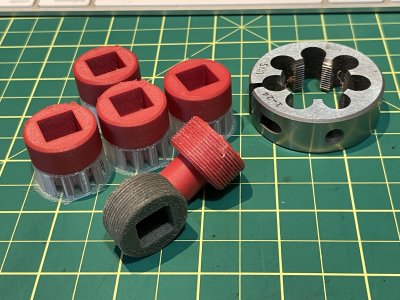
PETG-HF vs. PET-GF. The PETG is far too soft to carry any real load, and the PET-GF doesn't deform nearly as much.
IMG_7864.png

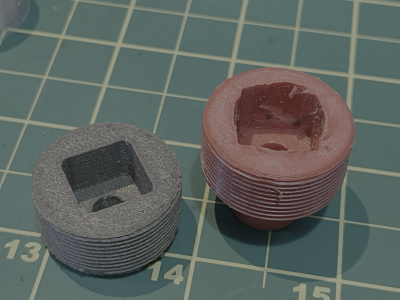
These soft plastics always produce an oversize thread after passing through the die, because the material deforms under the cutting pressure, then relaxes. The resulting threaadform is slightly oversize and is likely to be a tight fit. The harder filaments do not deform (as much) and the resulting thread is a reasonable fit.

When printing exotic filaments, pay attention to the support material and the bed adhesive which must be compatible with all of the main object materials. Not only for molecular compatability, but bed temperature, and chamber temperature. Many useful filaments do not seem to have a corresponding support material within my budget, so some experimenting is necessary. PET-GF is horrible stuff to support properly due to the high print and chamber temperature which limits the support material to nylons and polycarbonate. Other support materials are soft at these elevated temperatures and the usual bed adhesives degrade above 60C.

The H2C does a very good job of reducing purge filament waste - instead of squirting expensive filament down the poop chute, it creates a large prime tower which catches all the dribbles so that the print nozzle is clear, charged and ready to print. Each filament has its own nozzle, primed and ready to go without further purging.


🙂

 
I have the H2C, my preferred engineering filament is PET-GF - not PETG-GF. Reinforced PET is a very tough and durable material, well suited for light duty parts.

Large threaded objects print quite accurately with the 0.4mm nozzle.
The smallest I have tried is an M22x1.5. While it printed neatly, it was about 15 thou oversize so I needed to run it through a die.
For other small threaded parts, the threaded portion is not printed as a thread, but a circular section slightly larger than the major diameter of the thread, then use the die or lathe to finish.

Larger threads such as 1-1/2x8 will require support for the overhang. But again some thread chasing is needed. Print orientation affects the fit and strength too.
View attachment 88170
PETG-HF vs. PET-GF. The PETG is far too soft to carry any real load, and the PET-GF doesn't deform nearly as much.
View attachment 88172

These soft plastics always produce an oversize thread after passing through the die, because the material deforms under the cutting pressure, then relaxes. The resulting threaadform is slightly oversize and is likely to be a tight fit. The harder filaments do not deform (as much) and the resulting thread is a reasonable fit.

When printing exotic filaments, pay attention to the support material and the bed adhesive which must be compatible with all of the main object materials. Not only for molecular compatability, but bed temperature, and chamber temperature. Many useful filaments do not seem to have a corresponding support material within my budget, so some experimenting is necessary. PET-GF is horrible stuff to support properly due to the high print and chamber temperature which limits the support material to nylons and polycarbonate. Other support materials are soft at these elevated temperatures and the usual bed adhesives degrade above 60C.

The H2C does a very good job of reducing purge filament waste - instead of squirting expensive filament down the poop chute, it creates a large prime tower which catches all the dribbles so that the print nozzle is clear, charged and ready to print. Each filament has its own nozzle, primed and ready to go without further purging.


🙂
Interesting results Arbutus. Can you categorize how much more resistant to breakage this stuff is? Even just subjectively?

I see the PET-CF is $58 for 500g - so roughly twice the price for half as much! 4x more expensive. At the Bambu store. Is there a better source? Where do you get the GF variant?

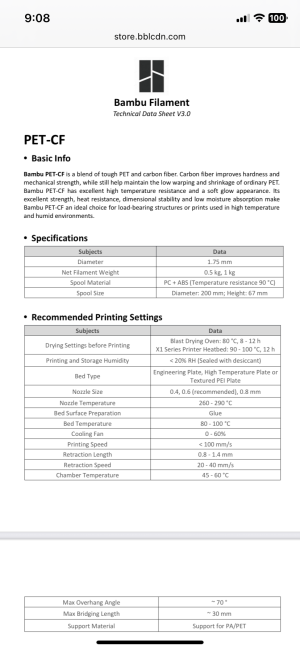
Here are the print settings for PET-CF A very hot bed, elevated chamber temp, and hot nozzle.
 

Attachments

  • IMG_9042.png
    IMG_9042.png
    220.2 KB · Views: 3
Interesting results Arbutus. Can you categorize how much more resistant to breakage this stuff is? Even just subjectively?

I see the PET-CF is $58 for 500g - so roughly twice the price for half as much! 4x more expensive. At the Bambu store. Is there a better source? Where do you get the GF variant?

Here are the print settings for PET-CF A very hot bed, elevated chamber temp, and hot nozzle.
The Bambu product is overpriced IMHO.

There are several other options including Fiberon PET-GF
To use it, the support should be a PA or PC material. For the bed adhesive the only reliable product I have found is Vision Miner NanoPolymer adhesive. This adhesive will handle the high temperatures and LSE plastics and it is compatible with PC sand PA support materials. B U T It can seriously damage some build plates if it is not used properly!

As far a s stiffness goes - subjectively it is noticably stiffer and harder than PETG materials, approaching PA for surface hardness. PET will survive on your car dasboard in the summer without warping and even at elevated temperatures (50C) it remains rigid. It begins to soften around 120C.

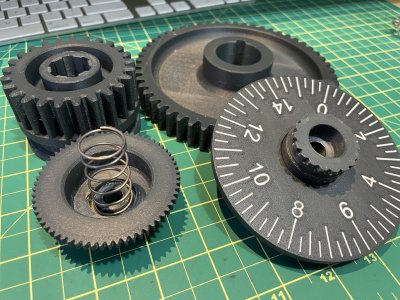
I use it for durable machine components that need good surface wear characteristics:

PET-GF M2.5 gears and a 2 colour dial replacing steel parts in a hot tapping drill.
IMG_7865 2.JPG

🙂
 
Back
Top