• Scam Alert. Members are reminded to NOT send money to buy anything. Don't buy things remote and have it shipped - go get it yourself, pay in person, and take your equipment with you. Scammers have burned people on this forum. Urgency, secrecy, excuses, selling for friend, newish members, FUD, are RED FLAGS. A video conference call is not adequate assurance. Face to face interactions are required. Please report suspicions to the forum admins. Stay Safe - anyone can get scammed.
  • Several Regions have held meetups already, but others are being planned or are evaluating the interest. The Ontario GTA West area meetup is planned for Saturday April 26th at Greasemonkeys shop in Aylmer Ontario. If you are interested and haven’t signed up yet, click here! Arbutus has also explored interest in a Fraser Valley meetup but it seems members either missed his thread or had other plans. Let him know if you are interested in a meetup later in the year by posting here! Slowpoke is trying to pull together an Ottawa area meetup later this summer. No date has been selected yet, so let him know if you are interested here! We are not aware of any other meetups being planned this year. If you are interested in doing something in your area, let everyone know and make it happen! Meetups are a great way to make new machining friends and get hands on help in your area. Don’t be shy, sign up and come, or plan your own meetup!

Welcome to Westwood Metalworks, What is he building in there?

Yes, just pouring around the pattern in about 2" lifts, and vibrating as I go to settle/pack it. I tried a jig saw, recip saw, but found the best results from the thera gun just run around the bucket exterior. I really like Kelly Coffield's vibrating air turbine bucket stand and would like to make something like that moving forward. His entire process is something I'm trying to emulate actually, as he's got it pretty dialed in.
 
A friend on Saltspring pushes air from the bottom with his shop vac. This creates sand into which the pattern can easily be pushed down until the sprue is level. He then turns off the shop vac and the sand settles around everything perfectly.
He used foam cut with hot wire on his CNC JGRO router. Don't remember if he covered his patterns with a coating.
I'll ask. He doesn't do much of that anymore or I'd pop over and film it.
 
Hmmm, a fluid bed might work pretty good. I made a small one a few years ago for dipping powder paints for fishing lures. Works great, nice even coverage. Now I just need to scale it up 10x....
 
Today was a cleanup day and I wanted to get my new box in the shop and on the casters that showed up yesterday.

I flipped the box over to measure it for a cradle and low and behold it was already punched for casters....could....it...be...this...easy? 20250426_103617.jpg

Job done, bolt em on and move on.....no sooner had i gathered hardware and zipped the first one on did the sky's open up and it started downpouring....chased me back in the garage, where I looked in disgust at my welding table full of junk and clutter so I started cleaning it off, putting stuff away. That done, rain still falling i thought about making the cradle again anyway. Wanting to do a quick and easy fab job and practice some more tig, i said screw it, grabbed some angle from the rack and started cutting. Saw wasn't even through the first cut when I looked out the front door and the sun was shining again.....oh well, I stayed the course and carried on.
20250426_113344.jpg
20250426_115137.jpg

Then is was time to pull all the drawers, clean and relube the slides.

20250426_115926.jpg

Probably 30+ years of barn dust and dirt on original grease. Top one clean.
20250426_151816.jpg
20250426_152209.jpg

Cleaned and relubed with moly grease they slide much better now. Was going to use white lithium and searched forever for that can I knew I had somewhere before I remembered I knocked it off the bench a few years ago and poked a hole in the side spewing it's contents all over everything.....probably suppressed that memory for a reason....

It's basically the same as the side portion of my big bottom box.20250426_160437.jpg

And heres where it'll mainly live
20250426_160752.jpg

Ill have to pull it out for now when I'm milling, but it's small and nimble enough with 4 swivel casters to move it somewhere else. Will be handy to have milling accessories right there and not 8' away in my other box.....8' doesn't sound like a lot, but it can get jammed up with crap (unfinished projects) pretty quick. And gets annoying really fast making multiple trips.....
 

Attachments

  • 20250426_160343.jpg
    20250426_160343.jpg
    2.8 MB · Views: 6
I also remade my wheel pattern yesterday using only the hotwire, and some wax for fillers. Currently drying from the coating, but came out pretty good. 20250426_081843.jpg
20250426_081840.jpg

In a way, I'm glad the last one failed, as I would have been pretty bummed to discover that it wouldn't have worked anyway.......I modeled it from memory of what it was before i lost the 3d design of the grinder, and we'll, my memory isn't that great apparently.....boring for the taperlock would have left me with very little meat holding it all together, so I re measured everything and made some cardboard templates to guide the wire. And built it up in layers
20250425_160341.jpg
20250425_155006.jpg
20250425_174037.jpg20250425_173854.jpg
20250425_175221.jpg
20250425_204049.jpg

Of course I had to make my own fillet tools too....just tigged some bearing balls onto some rod.
20250425_171139.jpg
20250425_171956.jpg
20250425_172540.jpg

Not pretty but they worked great.

Baked off another bag of sand, so if all goes according to plan and the coating drys by tomorrow I'll pour it.
 
Last edited:
Bondo works great for wood and other material patterns, but not good for foam....I found that out the hard way years ago after gluing up and shaping a fiberglass buck to make a fiberglass seat cowl for my motorcycle. After getting it really close, I thought I'd skim a coat of bondo on there for the final smooth before paint and polish, and watched in horror as it practically ate my foam and it was distorted all to hell lol. Lesson learned.....

I used roughly a mix of toilet ring, and paraffin and it worked pretty good. From the last casting It all burned out just fine, so I'm hoping it'll be fine this time too. I'm going to extrude some rounds to make it easier for next time. it was a bit tedious brushing it on in layers, then coming after it with the ball, but it was a very enjoyable process.

Just got a call for work while typing that, so I may or may not get to cast tomorrow, depends on what broke and how long it'll take to fix.
 
I took my first hand/manual drafting class today as part of my 433a trade school curriculum. When I started high school back in 1996, Our small high school had just gutted the well equipped shop class the year before and with it, the drafting portion. They replaced it with a "high tech" computer lab called Lab 2000, yet in my entire time there, they never had anybody qualified to actually teach any thing in there, and it never got used for anything more than typing/word processing, or an overflow classroom.....What a waste.....Big rant clipped out here......When I started College for Mech Eng tech in 2000, they'd just quit teaching manual drafting and switched completely to Autocad drafting starting with my year. When I got my first job out of college as a designer, they'd just got rid of a few boards, and all the other related stuff to make room for a couple new cad stations/cubicles.....Sense a pattern here? I just missed it.

I actually did a lot of "drafting" in my career, but never learned the old fashioned way and always wanted to, but with no real need, I never really bothered with it. Too many other things to learn. I find it funny now that at 42 going back to basic level 1 trade school as a millwright for a 2nd career, that I'm only now getting to learn drafting by hand. Being much older than everybody else in my class, they were all bummed that we weren't learning CAD lol.

Anyway, Today was a lot of fun. Basically an introduction on how to develop Orthographic views from an Iso. Using the same textbook I still have from college, but just a little out of date....

Maybe I'll grab one of those free drafting tables off marketplace for myself now....
 
Had a couple free hours today so I attempted pour #2.

Trying the pattern vertical this time to eliminate overhang. Vibrated with a thera gun in 1-2" lifts.
20250504_112118.jpg20250504_113242.jpg

All setup before lighting the forge this time......
20250504_113758.jpg
20250504_120100.jpg

And the pour went off without issue. What i could see from the outside anyway. It's still cooling while I melt some more scrap for ingots.
20250504_120610.jpg

Ill crack it open in about 30-40 minutes and see what I've got.....hopefully a useable casting to machine. If not I will try plan c moving forward....
 
Pouring the bucket out my initial impressions were great......20250504_121851.jpg
20250504_121859.jpg

Then i started looking closer.....
20250504_122524.jpg
20250504_122533.jpg
20250504_122535.jpg

Bummer. Not sure why that happened. Will have do do some reading, and playing back in my head. There was a moment in the pour where the basin fill up and seemed to stall, then emptied quickly again, so perhaps that had something to do with that.

There were some wins though. I'm pretty impressed at the surface finish and how all the wax fillets came out.
20250504_122541.jpg
20250504_122559.jpg
20250504_122603.jpg
20250504_122612.jpg

I also finished off melting the rest of the small scrap I had kicking around the shop into 15 ingots that will fit in my bench top foundry.
20250504_122222.jpg

Not sure where to go with this now. More reading and research for sure, but I don't really want to give up yet. But on the other hand, plan c, a weldment, has always been a quick afternoon project, and I'm getting pretty tired of this grinder project dragging on.......
 

Attachments

  • 20250504_122528.jpg
    20250504_122528.jpg
    1.4 MB · Views: 3
If I look at the pattern it appears as if you haven't got the equivalent of risers or vent holes to let the gases escape. The dry sand isn't good enough if the foam melts and forms a plug in an area where you want to vent the melted foam gas.

If you build a wooden pattern and used green sand you could would be adding risers and poking lots of holes for letting out steam. And a failure could be tried again as soon as you shake out the casting for inspection. Then determine where additional vents or risers are needed and try again right away. Odd shaped patterns can be very difficult.

With foam you have to start all over again and that looks like even in wood it would be a multi-part pattern so I see the attractiveness of lost foam. Maybe coat it in sand/slurry first and try burning out the foam first?
 
This was first try although I fully expected to perhaps add a riser on the opposite side of the feed it turned out not to need it. A 3D printed pattern, Lepages wood filler and rattle can primer filler and paint. The hole is tapered and once cleaned up sits on the tapered spindle drive.

With lost foam I'd have created several round tubes of foam glued to the top so the gases could escape through the tubes even as the foam melted.

1746377789091.png
 
Yep, that's the big downside to lost foam, is having to remake the patterns again after a failure. The upside, it that for ones offs, like this was supposed to be......it's great, and fast. And you don't wind up with boxes of patterns you don't want to throw out, but will probably never cast again. I currently don't have enough green sand to mould this part, and this was purposly done in lost foam to learn the process. I've done the 3d printed pattern in green sand many times, and it's a great path to victory. Hindsight would say at this point I would have been better off to go that route, but that was not the objective hear. I wanted to try/learn the lost foam process, and sometimes it's more about the journey and learning stuff.

Venting with lost foam is "supposed" to be just that easy. One big riser, no addition venting everywhere. Coated with a slurry to meter the venting through the sand. The foam vaporizes and bubbles up through the vent. No pre burnout of the foam. Some guys use plastic straws in places venting to the surface, and I may entertain that idea if I do another. I would guess that my Sprue was a touch on the smaller side for the volume of foam that had to burn out.

I was pretty confident I poured this on the hotter side too, but could be wrong, as I have no pyrometer to actually quantify the metal temp. Just an eyeball, and this look VERY fluid compared to previous pours.

I'd like to give it one last kick at lost foam, and have some ideas. I might add some runners from the bottom lip to the top, and make the sprue bigger to help gasses escape. My crucible size should allow me to add some more volume in those two areas without running out of metal to pour. I can remake this pattern in about 2-3 hours, and find it pretty enjoyable process doing the filleting and finishing so wont mind remaking it again. It's all in the pursuit of knowledge at this point. I was happy with how the sand packed this time, especially in the undercut lip area at the top.

If I had a big tig welder, I'd just gouge it out, and tig it back up, but my sw175 would not even make a puddle on that thick of a casting without a ton of preheat. I'll talk to my welding teacher tomorrow morning to see what they have at the college, and if I can "borrow" it for a bit. The only one I've seen so far is also the same as mine, so that wont work. I might try it though.....Would be nice to see how homemade "clean" castings weld.
 
Last edited:
@Dan Dubeau, I am wondering if the glue seams are where some/all of the problem maybe. That black appears to be on the glue seams, and the poor infill seem to be at seams. Maybe the glue you are using is the problem, it may not be burning out. Also I am not sure what waxes do at higher temps. eg. molten alum. temps.
As to the venting, all the venting has to take place out the sprue as the foam is covered with dry wall mud, not allowing any other venting.
A few thoughts.
 
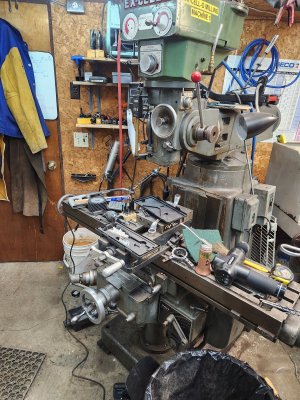
I'm using mostly white PVA "tacky glue". A small bit of hot glue also, but not much on this one. Both very recommended in the foam casting communities, and are supposed to burn out very similar to the foam with no issues. The wax should as well, as long as it's a lower melting temp wax. My fillets were a mix of parrafin and toilet ring gasket, so I doubt that was an issue. Judging by the fillets and surface finishes I'm guessing they burned out fine.
20250425_204049.jpg
20250425_204044.jpg
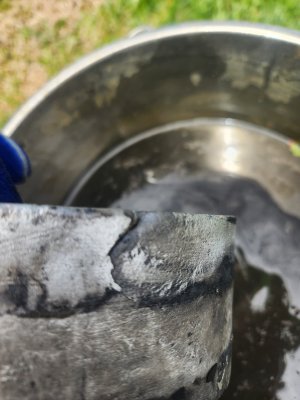
Those photos show the pattern a bit better. Those cold shuts are perpendicular to any glue seams that are there. The more I thought about it this afternoon, the more I think it happened when the basin filled up and stalled, there was probably some metal that already dropped down and filled the lower portion, then when the basin dropped it pilled in on top of it causing those cold shuts. Perhaps the straight vertical Sprue might be a contributing cause that prevented venting, as it choked off? Their placement would support that theory. I went back to vertical on this one to cure the overhang fill I had with the last one, but if I do another I'll tilt it again like everyone recommends. If I get some miss fill on the sand I can always machine it out.

As much as I just want this grinder done at this point, I want to figure this foam casting out too, so I'm going to give it at least another shot. Using this project to give lost foam a try was the whole reason I went with a casting in the first place. I think if I tilt it like the first time it'll actually fill and vent properly, and now that I have enough sand to cover it completely it "should" cast just fine. The first casting didn't have any fill problems, just that blowout from lack of sand coverage at the top.

I also don't think I'll go bigger on the sprue. Kelly Coffield, who has arguably the best results and most dialed in process to acheive them on the web for foam casting does some much bigger castings with similar, and even smaller sprues, so I don't think that was the issues. I honestly think it was the vertical routing that choked it off temporarily. Tilting it on the side would allow the molten aluminum to follow the bottom and fill the cavity melting the foam, and the gases to escape above it on the way back out. In theory anyway....

Just thought of a better way to vent it while typing the above....will have to wait till sometime this week, but I think it'll work just fine. I'll make the pattern very similar, but just tilt the sprue off at a tangent point on an angle so it will fill on an angle running down to the bottom, allowing a bottom up fill, while venting out the top more easily. Won't have any over hang problems packing the sand if I leave it in this orientation. Kinda mad I didn't think of that before....learning opportunity I guess....I've always had to do things the hard way....

1746403810511.png


Could maybe also make a vertical vent, but drill it out so that it's open from the beginning, not needing a burn out.....Drill out most of the sprue too might help as well. Shirley wouldn't hurt......I just picked up this big 5/8" twist drill and need to find some use for it....I have a 3/8" one that long too.
1746404260285.png
20250501_183539.jpg
 
Back
Top