Just one other thing; the method I learned means no shifting of the compound so threading can be incorporated any where in a sequence of machining operations.
-
Scam Alert. Members are reminded to NOT send money to buy anything. Don't buy things remote and have it shipped - go get it yourself, pay in person, and take your equipment with you. Scammers have burned people on this forum. Urgency, secrecy, excuses, selling for friend, newish members, FUD, are RED FLAGS. A video conference call is not adequate assurance. Face to face interactions are required. Please report suspicions to the forum admins. Stay Safe - anyone can get scammed.
-
Several Regions have held meetups already, but others are being planned or are evaluating the interest. The Calgary Area Meetup is set for Saturday July 12th at 10am. The signup thread is here! Arbutus has also explored interest in a Fraser Valley meetup but it seems members either missed his thread or had other plans. Let him know if you are interested in a meetup later in the year by posting here! Slowpoke is trying to pull together an Ottawa area meetup later this summer. No date has been selected yet, so let him know if you are interested here! We are not aware of any other meetups being planned this year. If you are interested in doing something in your area, let everyone know and make it happen! Meetups are a great way to make new machining friends and get hands on help in your area. Don’t be shy, sign up and come, or plan your own meetup!
You are using an out of date browser. It may not display this or other websites correctly.
You should upgrade or use an alternative browser.
You should upgrade or use an alternative browser.
Threading - 29.5/30 vs 90
- Thread starter Susquatch
- Start date
Just one other thing; the method I learned means no shifting of the compound so threading can be incorporated any where in a sequence of machining operations.
Yes, I can see that's a clear advantage. Probably outweighs the cross-slide zero reference 2 to 1! Yup, another great tool for my tool box!
Just ran across this while looking at Sandvik threading tools. It is a comparison of the different threading methods from perspectives I have not considered previously. While focussed on CNC threading methods, the discussion still applies. Scroll down a bit to see the methods comparison, but the whole thing is quite interesting.
 www.sandvik.coromant.com
I'd be interested in the thoughts of those who take the time to read it. For my part, I'm thinking 29 degree threading might actually be here to stay for a while.....
Sandvik Coromant
I'd be interested in the thoughts of those who take the time to read it. For my part, I'm thinking 29 degree threading might actually be here to stay for a while.....
First off, there are a multitude of ways to cut your threads. They'll all work. And if you're happy, then all is good! But just because the new threaded bolt that you made fits into it's nut, doesn't make it to "spec". As you can see in the attached photo, there are all manner of dimensions that make for a "proper" thread profile.
My biggest issue with the 29° (or whatever angle) you want to feed into your work, is that unless you are using a full profile topping insert, (or hss cutter which you have appropriately shaped the tip), is that you cannot properly form the root of the thread.
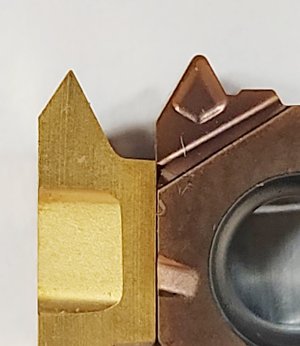
If you look at the the inserts on the attached photo, the insert on the left is a non-topping insert capable of cutting threads as fine as 44tpi and as course as 14tpi. While the insert on the right is a full form topping insert specifically for 12tpi. The non-topping insert allows us to cut many different thread pitchs, and therefore reduces our inventory of inserts, (and when you have to buy packs of 10, buying full-form topping inserts for each thread pitch will be expensive.
Look at the tips...on the left, the width is 0.006", while the insert on the right it is 0.020".
According to the Sandvik catalogue it tells us that if we want to cut a 12tpi thread, we need to make a 0.054" radial depth of cut, (or move 0.058" @ 29° with the compound.) If we use the topping insert and cut to that depth, our thread profile is correct, the root width is correct, the crest width is correct, and our pitch diameter is correct. This new bolt is to spec, and will fit.
If we were to use the non-topping insert and go in the same distance, the pitch diameter is too large and the nut won't fit. So what, you say, just keep going deeper until the pitch diameter is correct, and the nut fits! Ok, so we do that, our nut fits and pich diameter is correct, but now our root and crest is not to spec. In fact we've created a razor edge at the crest. Too sharp you say, ok, file off the tops. Now, the OD is not to spec. It's not loose because we hit the proper pitch diameter, it's just not correct.
So, how do we remedy the procedure using non-topping inserts?
1. Set your compound slide so advancing it will move the cutter in the z-axis (perpendicular to your cross-slide).
2. Cut your thread, advancing the cutter radially until we get to a depth of 0.054".
3. Take more cuts but only advancing the compound 0.001-0.002" at a time, while still having the cross-slide at a depth of 0.054". So, mathematically we would need to advance the compound the differece between the non-topping tip and 1/4Pitch. In this case: 0.020" - 0.006"= 0.014".
There are ways you can play with this method too. You can do the incremental infeed method they show. Move your cutter radially x amount, the next cut x + z, the next cut x -z, etc, until youve reached full depth, and the proper root width. (For me, that's way too finicky). But, what I do do, is when I've reached the full depth of cut radially, and start using the compound, I'll take a couple thou' from the trailing thread flank to clean it up, before advancing on the leading flank.
My biggest issue with the 29° (or whatever angle) you want to feed into your work, is that unless you are using a full profile topping insert, (or hss cutter which you have appropriately shaped the tip), is that you cannot properly form the root of the thread.
If you look at the the inserts on the attached photo, the insert on the left is a non-topping insert capable of cutting threads as fine as 44tpi and as course as 14tpi. While the insert on the right is a full form topping insert specifically for 12tpi. The non-topping insert allows us to cut many different thread pitchs, and therefore reduces our inventory of inserts, (and when you have to buy packs of 10, buying full-form topping inserts for each thread pitch will be expensive.
Look at the tips...on the left, the width is 0.006", while the insert on the right it is 0.020".
According to the Sandvik catalogue it tells us that if we want to cut a 12tpi thread, we need to make a 0.054" radial depth of cut, (or move 0.058" @ 29° with the compound.) If we use the topping insert and cut to that depth, our thread profile is correct, the root width is correct, the crest width is correct, and our pitch diameter is correct. This new bolt is to spec, and will fit.
If we were to use the non-topping insert and go in the same distance, the pitch diameter is too large and the nut won't fit. So what, you say, just keep going deeper until the pitch diameter is correct, and the nut fits! Ok, so we do that, our nut fits and pich diameter is correct, but now our root and crest is not to spec. In fact we've created a razor edge at the crest. Too sharp you say, ok, file off the tops. Now, the OD is not to spec. It's not loose because we hit the proper pitch diameter, it's just not correct.
So, how do we remedy the procedure using non-topping inserts?
1. Set your compound slide so advancing it will move the cutter in the z-axis (perpendicular to your cross-slide).
2. Cut your thread, advancing the cutter radially until we get to a depth of 0.054".
3. Take more cuts but only advancing the compound 0.001-0.002" at a time, while still having the cross-slide at a depth of 0.054". So, mathematically we would need to advance the compound the differece between the non-topping tip and 1/4Pitch. In this case: 0.020" - 0.006"= 0.014".
There are ways you can play with this method too. You can do the incremental infeed method they show. Move your cutter radially x amount, the next cut x + z, the next cut x -z, etc, until youve reached full depth, and the proper root width. (For me, that's way too finicky). But, what I do do, is when I've reached the full depth of cut radially, and start using the compound, I'll take a couple thou' from the trailing thread flank to clean it up, before advancing on the leading flank.
Attachments
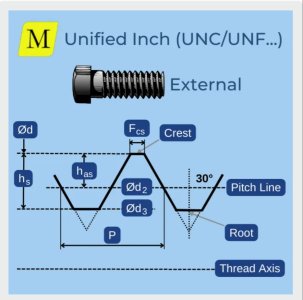
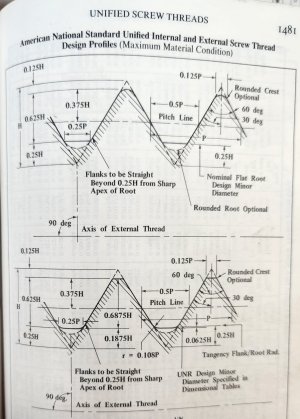
First off, there are a multitude of ways to cut your threads. They'll all work. And if you're happy, then all is good! But just because the new threaded bolt that you made fits into it's nut, doesn't make it to "spec". As you can see in the attached photo, there are all manner of dimensions that make for a "proper" thread profile.
Want a good laugh? I do what you do but with a 29.5 degree advance..... I take my last cut or two (or three for bigger threads) advancing the compound but backing off the cross-slide to account for the compound advance. That gives me a nice clean root, good thread fit, and a nice finish when it really matters.
I wouldn't pretend that I do this on all the threads that I cut. Just those where I decide that I want to. But it does require tight underwear and a clear comfy relationship with the math. I wouldn't bother suggesting it for 90% of the threads others do.
What caught my eye most about this article was the discussion about the chip load on a plunge cut thread. It nicely explains what happens and why.
I also loved the discussion about alternating 30 degree cuts with non graduated pass depth. I want to think more about how to do that manually. It's very intriguing...... But lots of opportunity to have the thread go to hell in a handbasket yesterday.
This particular discussion aside, I still want to get a good carbide threading tool and forming inserts to try too. I'll txt you about that shortly.
Chipper5783
Super User
Being a little contrarian, I’m for 27 degrees on the compound (cut advance on the compound, in/out retract on the cross slide). The rationale of 29 or 29.5 degrees is still relevant (puts the chip on the one side, curls off nice and leaves a good surface finish) - I believe the exact value doesn’t matter because the thread shape is formed by the tool shape (I’m mostly using full form, lay down inserts) of course the tool must be lined up to the work. I don’t sweat the final depth much, because I simply cut until I‘ve hit the published pitch diameter (a thread micrometer is a very handy tool) - I start checking when I’ve about 0.005” to go.
The reason for 27 degrees is I have a 40P tool holder, every position is 9 degrees - so I can flip the holder to 0, 45, 90, 180 etc and don’t need to reposition the tool post.
Susqu’s Sandvik document is great, I’m getting into the CNC side of lathe work and there are lots of parameters which configure the threading details. It is straightforward to adjust the axial start position slightly on each pass to put the chip on one side of the insert (described in the Sandvik document), effectively doing a similar thing to using the compound for the infeed, swung around a little steeper than 30 degrees. This is on an old industrial CNC - if good enough for Cincinnati Milacron, then good enough for me.