• Scam Alert. Members are reminded to NOT send money to buy anything. Don't buy things remote and have it shipped - go get it yourself, pay in person, and take your equipment with you. Scammers have burned people on this forum. Urgency, secrecy, excuses, selling for friend, newish members, FUD, are RED FLAGS. A video conference call is not adequate assurance. Face to face interactions are required. Please report suspicions to the forum admins. Stay Safe - anyone can get scammed.

Tool Surface plate height gauge recommendations

Tool
I'm just trying to wrap my head around how you guys go from a manual milled squared up block , lets say for argument sake.. out of squareness by .0015 over 6" per side... to scraping the block to size within a tenth over 6".

I see. Me? I would expect my milled block to be a bit better than that. Under a thou anyway. Then it would go to the surface grinder to get it to a tenth.

@McGiver would prolly do the same. But not everything can be put onto a surface grinder and that's when his skills (not mine) become way more valuable.

I don't think the block you refer to was some kind of unique metal. I think what you were looking at was the scraping marks. Just my opinion though.
 
I'm not saying I doubt Mcgyvers technique when using a scraper. I have several Starrett scrapers for deburring actually. I just never considered buying 1 for squaring blocks to within a tenth.
Perhaps our CMM experience differs, That's ok. Our CMM checks some very small parts as well, both internally and externally, also measuring from tooling balls.
I will back out of this thread now.
I hope I didn't ruffle anyone's feathers here, I just haven't heard of scraping blocks to within a tenth in all my years of machining.

I don't think anybody's feathers are ruffled. Your questions are good ones. Maybe with more time on here you will come to know what expertise others have. We are all different. That's one of the things I like about our forum.

That said, I am always impressed when @Mcgyver pulls out his scrapers. There are a few others on here who can do that too. I'm not one of them.

Ya, I've seen others use CMMs on small stuff but I always end up asking why. Even if the darn dancing octopus actually can do it, I'd rather use regular metrology equipment that I can trust without calibrating it every time I turn it on.

Maybe it's just me and my experiences. I spent a huge chunk of my career designing digital control systems. I am WAAAY too familiar with how they work. And fundamentally I don't trust them. That doesn't mean I think everyone should be leery of them. It's really just me. It's that old saying - familiarity breeds contempt.
 
I'm just trying to wrap my head around ...
Actually it isn't all that hard - in the right context...

Scraping is best on soft-er-er materials such as cast iron and annealed steel. I wouldn't attempt to scrape flat and perpendicular a block of 4140PH, for instance. I don't have the arms or the patience for that.

The process I was taught was to set up a squareness comparator, and scrape the vertical on the contact band until the comparator reads correctly. Once that band is acceptable, you scrape the whole surface flat to that indicated band.

For a difference in squareness of about a thou on a 4X4 plate in cast iron, it takes hours and hours... I had to straighten a 4X4 angle plate in the 80s under supervision, and nowadays Id just use the surface grinder to get close and scrape the last few tenths...
 
first thing, I rarely rarely try to hit a dimension when scraping. Scraping for flat, parallel, square, mating parts, happens all the time...but its just never required to hit a dimension. The closest would get the headstock and tailstcok aligned...THAT is the big sweat, alignment in two planes and the same height to a tenth. So when I say scraping something to a tenth its not 4.000, its square (over 6"), parallel etc to a tenth.

Why? Scraping main use us machine tool reconditioning and tool making. They just require relationships and fits between geometry not particular dimensions.

The late Harry Beckley, one of the more knowledgeable machine too reconditioning guys on Practical Machinist, scraped his flamed hardened 10ee bed. I don't know he did it, I tried, bloody awful.....and that isn't tool steel! For hardened stuff, I grind, really no other way.

The main thing that gets scraped is machine tools. Except for hardened beds (which you send out to someone with a slideway grinder) its all soft cast iron. I think its a useful skill for all sorts of things other machine tool reconditioning (which I do and have done a fair bit of) but if its hardened, scraping is not going to work.

So....your block off the mill (hopefully CI, steel is not that fun to scrape) say you don't have a grinder and want a very accurate block. Scrape one side, call it A. Fairly simple to see how you can get that as flat as the plate (like I say, small DOC and many iterations). Now, pick two sides adjoining A and that are opposite each other, B & C. Scrape B. Start to scrape C. Put B on the plate, indicate the top of C. Scrape C BOTH into flatness and perfectly parallelism to B so an indicator reads zero over the surface (surface of C, while B is the plate. Now....put A on the plate and do the above indicator tests. Rework A until its both flat and square to C & B. continue around the block. Incidentally I've satisfied myself as the accuracy of the surface gauge ball technique by clamping a certified Mit bevel section square (bought new and calibrated and only taken out of the box for such inspections) to the work and indicating it. results are with a tenth over 6"

Lastly, you mention "over that distance", do you mean the 6"? Everything varies including grade A plates. My 18x24 Starrett (bought under calibration and lighted used since) is supposed to be i think flat for 1.5 tenths over the 30" diagonal. What are variations along they way and do material affect what I'm seeing? Don't know for sure, except I get the same readings I measure in different spots on the plate, and when scraping it doesn't change the patter if can take a print from a different spot on the plate (suggesting any variance is around tenth or less)
 
I just haven't heard of scraping blocks to within a tenth in all my years of machining.

No reason why you would, there would be next no commercial call for it. otoh, certainly anyone knowledgeable about machine tool reconditioning would understand it, not be surprised by it, and could do it.

It does have home shop merit as it lets someone with out a grinder work to a grinding level of accuracy,

I have a grinder so could have gone that route. That particular block was really done just to demonstrate scraping for parallism and squareness as part of series I wrote.
 
when scraping it doesn't change the patter if can take a print from a different spot on the plate (suggesting any variance is around tenth or less)
For those not following the above description, on a surface plate 'local variance' is always very small - so for any arbitrary and small section, say a 3" X 3" part, you can expect an A grade plate to be less than 1/2 tenth, for instance, even if the corner-to-corner accuracy is only 1.5 or 2 tenths

All this assumes that the plate is in a controlled environment at the temperature and humidity that it was calibrated for. If not, all bets are off.

There are a lot more factors, but let's just say that actually measuring to less than a tenth and machining ore even grinding to less than a half-thou is a 'very advanced' subject... And checking your piece is another gnarly ball of wormy subjects.

-- and we haven't even started talking lapping and optical flats, yet!
 
I have a grinder so could have gone that route. That particular block was really done just to demonstrate scraping for parallism and squareness as part of series I wrote.

Thank you for that. Although I admire your talent, every time I looked at that block I was increasingly starting to think maybe you were crazy...... :D
 
Squareness is one of the most difficult processes to achieve. To the extent that old steam locomotives drive axles got done in one location in England for the longest time. A touch out of square on the drive you stress fractured your axles in use because of the torque applied by the steam pistons.

Now flatness with a surface grinder while smooth is not flat or parallel. It is why surface plates are lapped and metal surfaces scraped until recently with CNC compensation. Tolerance with new modern equipment (if you can afford it) is insane. For our purposes these CNC centers would exceed anything we could do, CNC grinders OMG.

That said I have seen cylinder grinding over 10ft done within 3/10's over the entire length (deflection compensation was what stopped it from getting tighter), how by hearing the tone of the cut and adjusting the cut in progress on old equipment.
 
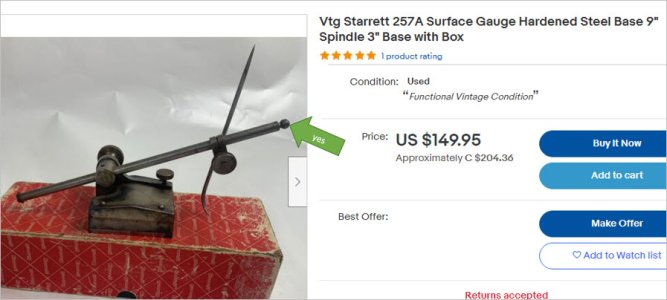
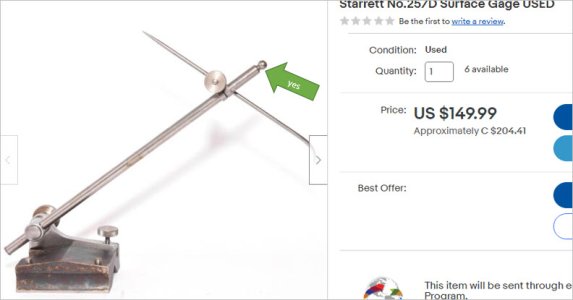
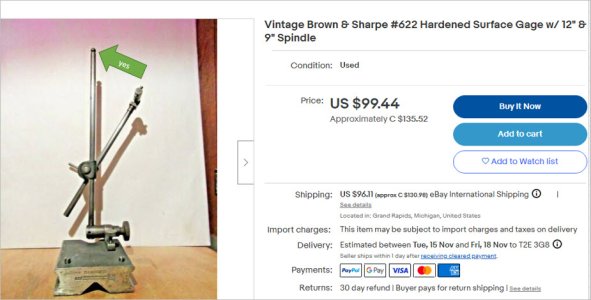
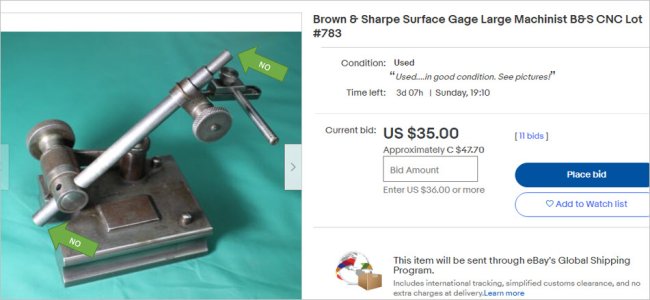
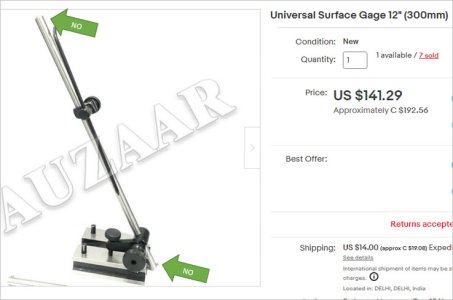
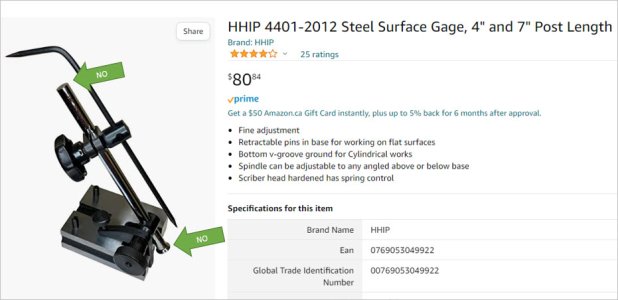
Just to add some more data to the Balled versus Non-Balled square base surface height gages (hey that distinction could work for politicians too & I dont mean gender.. but I digress).

Just did an Ebay/Amazon quick evaluation so catch both old & new. Seems like some have it & some don't & others arguably look more like cosmetic round-overs vs 'ball'. So worth considering if you also want to use the device for squareness checking. Although here I'm a bit confused, some SHG's look to be dedicated to a scriber insert only, others look more universal & could accommodate a DTI or indicator. Now I have to go check mine. Maybe grafting a bearing ball to the end might be easier & more functional than altering the base.
 

Attachments

  • SNAG-11-3-2022 002.jpg
    SNAG-11-3-2022 002.jpg
    49.6 KB · Views: 3
  • SNAG-11-3-2022 003.jpg
    SNAG-11-3-2022 003.jpg
    30.1 KB · Views: 3
  • SNAG-11-3-2022 004.jpg
    SNAG-11-3-2022 004.jpg
    59.8 KB · Views: 3
  • SNAG-11-3-2022 005.jpg
    SNAG-11-3-2022 005.jpg
    54.5 KB · Views: 3
  • SNAG-11-3-2022 006.jpg
    SNAG-11-3-2022 006.jpg
    34.8 KB · Views: 3
  • SNAG-11-3-2022 007.jpg
    SNAG-11-3-2022 007.jpg
    49.7 KB · Views: 5
I have seen cylinder grinding over 10ft done within 3/10's over the entire length (deflection compensation was what stopped it from getting tighter), how by hearing the tone of the cut and adjusting the cut in progress on old equipment.

Do you mean like a 10 foot long rod within 0.0003" on it's OD? (via cylindrical grinding?)
Or do mean like 10 foot long 'cylinder' OD or ID within 0.0003"? (which seems crazy but if so what kind of application)
 
Do you mean like a 10 foot long rod within 0.0003" on it's OD? (via cylindrical grinding?)
Or do mean like 10 foot long 'cylinder' OD or ID within 0.0003"? (which seems crazy but if so what kind of application)
The latter, as to application don't know was about 20+ years ago.
 
Back
Top