• Scam Alert. Members are reminded to NOT send money to buy anything. Don't buy things remote and have it shipped - go get it yourself, pay in person, and take your equipment with you. Scammers have burned people on this forum. Urgency, secrecy, excuses, selling for friend, newish members, FUD, are RED FLAGS. A video conference call is not adequate assurance. Face to face interactions are required. Please report suspicions to the forum admins. Stay Safe - anyone can get scammed.

Tool Surface plate height gauge recommendations

Tool
Stunning how expensive these have become, I think the imported green dial double were a $150 last time I looked. Since then I've accumulated a few mitutoyos, one of which is digital, but that import was surprising good quality...just saying in case one turns up.

I don't have one...... Yet. I've been looking for ages. No way in hell I'm buying a bargain one. If a bargain one is good enough then I don't really need a surface plate.

My advice is to buy a good one. Don't buy an inexpensive height gauge. If you can't afford a good one new, then resign yourself to waiting for a good used one or a good deal on a new one.

I don't want digital either. I want dial or vernier - preferably vernier. A little bird told me that one is headed my way some day soon. I can wait as long as that might take.

My opinion is that surface plates and height gauges are used to make precision measurements, do measurement comparisons, and calibrate measurement tools and measurement standards - not simple part measurements. They require a level of precision that isn't generally available with inexpensive tools.

The above is a personal opinion. Others are free to disagree.

Edit - I know that a very common use for a height gauge and surface plate is to scribe lines on a part for subsequent machining or layout. I'm not knocking that practice. But to be fair, neither a surface plate or a height gauge is needed to do that. You can even use your mill table, or a piece of flat plate, or even a counter top for that. I don't personally think that a scribed line can be described as a precision measurement. It's a perfectly fine way to measure and make most parts though.

I've had to near give away various vernier ones over the years. Your eyes must be good; even with drug store magnifiers, I don't have the patience for verniers.... a dial or digits is so much nicer.

As you point out there is a wide range of levels of accuracy they can be use for, from as good as it gets with an indicator and gauge blocks to scribed lines. We all have our workflows that we like, but imo, generally, the right is way, i.e. the best way, is the quickest method that is good enough for the accuracy required. Sometimes the outside dimensions of a part doesn't much matter and milling/sawing/filing to a scribed line can be quick.

Having said that, I confess my height gauges mostly hold the shelf down, whereas surface gauges get used constantly. similar to what you are saying I think...that surface plate/gauge work tends to shine most brightly with precision stuff.

Where scribed lines can be quite accurate is for hole layout, to with in a couple of thou. You find the intersection with a prick punch or what I do, use an optical centre punch.

Anyway, standard toolaholic rules apply, if you don't have one you badly want/need one :)
 
Last edited:
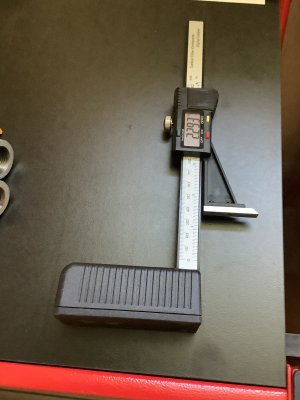
I got this height gauge from AMAZON 2 weeks ago.
Large digital display, inch & mm, solid tool for scribing work.
$18.00 delivered in 3 weeks.
It is a Chinese make, but,
. . . a $180 Starrett is still just marking a line.
 

Attachments

  • D4F8C1F1-600D-4EC3-84F8-752D1610EA76.jpeg
    D4F8C1F1-600D-4EC3-84F8-752D1610EA76.jpeg
    507.2 KB · Views: 5
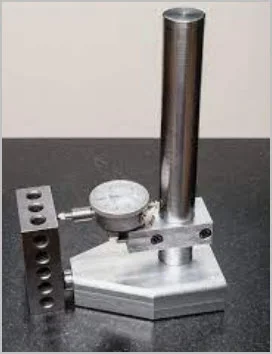
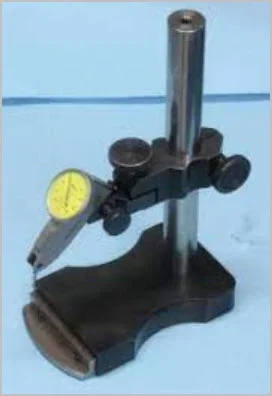
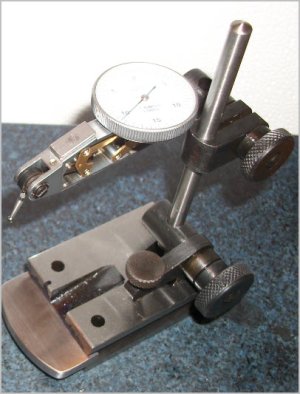
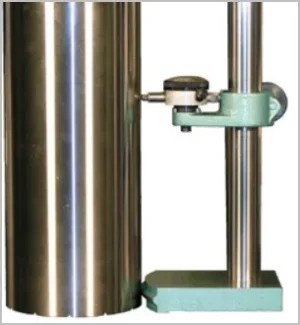
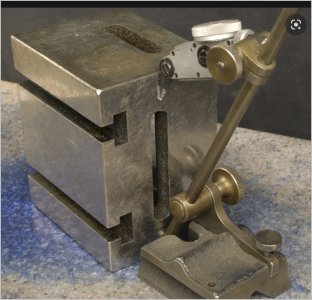
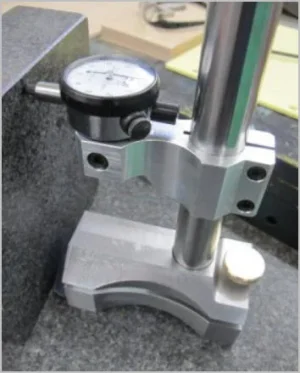
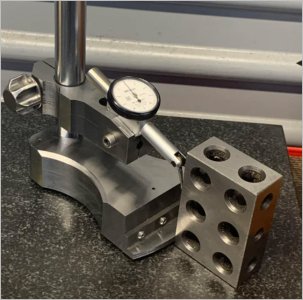
Any thoughts or preferences on squareness checking indicator stands? Example pics:
- curve profile integrated in the base itself
- spherical ended reference rod in base (removable accessory or permanent/integrated?)
- maybe a bolt-on curved plate accessory?
 

Attachments

  • SNAG-2022-10-29 11.43.52 AM.webp
    SNAG-2022-10-29 11.43.52 AM.webp
    9.4 KB · Views: 9
  • SNAG-2022-10-29 11.50.16 AM.webp
    SNAG-2022-10-29 11.50.16 AM.webp
    7.4 KB · Views: 9
  • SNAG-2022-10-29 11.42.24 AM.jpg
    SNAG-2022-10-29 11.42.24 AM.jpg
    38.7 KB · Views: 9
If you introduce a curved base you are adding in more chance of variance.
Height gauges are meant to work on flat reference surfaces.
As long as your vertical beam is secure and square to the flat base then it comes down to how accurately you can determine the position of the scribed line.
Keep it practical, scribing work gives you guidelines - only.
 
@LenVW I know post title is height gauge, but I'm specifically talking about squareness measurement. It appears to me some height gages serve double duty if their base accommodates this with a curve profile in some form or another to act as the base tangent & which then compares to the indicator ball. So its not about scribing or vertical height comparison.
 

Attachments

  • SNAG-2022-10-29 1.47.38 PM.webp
    SNAG-2022-10-29 1.47.38 PM.webp
    8.3 KB · Views: 10
  • SNAG-2022-10-29 1.47.25 PM.jpg
    SNAG-2022-10-29 1.47.25 PM.jpg
    64.5 KB · Views: 12
  • SNAG-2022-10-29 1.47.06 PM.jpg
    SNAG-2022-10-29 1.47.06 PM.jpg
    72.2 KB · Views: 13
  • SNAG-2022-10-29 1.47.54 PM.webp
    SNAG-2022-10-29 1.47.54 PM.webp
    19 KB · Views: 13
The only application that is similar is a ‘V’ profile cut into the base of the height gauge. It would maintain positioning relative to the workpiece. Qualifying your height gauge would require comparing it to a certified inspection tool (ie. Ground Angle Block or other high precision reference.)
I have seen Jig Boring Centres used to compare inspection tools on occasion because they were requalified on a regular schedule.
 
Any thoughts or preferences on squareness checking indicator stands?

@PeterT The most common mod to do this is by using a slitting saw on a scratch gauge and inserting a rounded boss in the kerf. Oxtool (tom Lipton) has a video about this, but I don't remember the title...

Usually people don't mess with their height gauge. That being said, I re-calibrate mine ever time I use it, by zeroing against the surface plate and checking a 3" gauge block.
 
Last edited:
I do the same each time I use it, zero on the surface plate, gauge block test to confirm.
@PeterT The most common mod to do this is by using a slitting saw on a scratch gauge and inserting a rounded boss in the kerf. Oxtool (tom Lipton) has a video about this, but I don't remember the title...

Usually people don't mess with their height gauge. That being said, I re-calibrate mine ever time I use it, by zeroing against the surface plate and checking a 3" gauge block.
 
I know post title is height gauge, but I'm specifically talking about squareness measurement.

I think what you are looking for is called a cylinder square. A good one will allow you to check vertical squareness to a tenth or so across its length assuming everything is temp stabilized near 70 F.

I got one at a recent Kijiji sale. It was easily worth the entire purchase price of what I all got all on its own. It's in pristine condition. Didn't even know it was in there till I opened the box. Then I sucked in my breath...... I already had one I made many many years ago, but it is neither as big nor nearly as perfect as this one.


20221029_165219.jpg
 
This is not for you Peter cuz I know you already know this.

As I mentioned before, I really don't think surface plates are for scribing lines. Yes, you can use them for that, and they work well for that too. But their purpose is for more precision than normally used to scribe lines. For example gauge block comparisons, etc. I would prefer to say that I would use a surface plate to calibrate the equipment that I might then later use to scribe a line.

Anybody who doubts that should try measuring the line they just scribed. I'd bet they would be lucky to be within 3 thou over 5 trys. Hardly within the precision of a good surface plate.

In my opinion, metrology equipment should normally be an order of magnitude better than what ever precision you are trying to achieve in your work. Otherwise you are just chasing numbers.

To be clear, I would use my surface plate to calibrate my height gauge vs known gauge blocks at room temp. I might also scribe a line while I was at it, but I could also do that on my mill table. It's plenty flat enough to scribe lines with.

I dunno if I'm making this discussion worse or better - hopefully better.
 
The guy that started me on home machining used to use his Mitutoyo surface plate for scribing lines all the time... Even the most expensive B&S height gauge is only accurate to .002 at any decent height. It is also why all height gauges come with a scriber...

I agree that where a surface plate shines and is most accurate is using a half-tenths indicator and comparing a part against a stack of gauge blocks...

... and in *my* shop I have a very low cost surface plate for scrbing layout lines... saves wear and tear on the good surface plate.
 
After over 25 years of wanting one, I finally bought a cylinder square... Now I need to make a squareness comparator!
 
After over 25 years of wanting one, I finally bought a cylinder square... Now I need to make a squareness comparator!

Thanks for not doing one of those "you suck" s even though I totally deserve it.
 
This is not for you Peter cuz I know you already know this.

As I mentioned before, I really don't think surface plates are for scribing lines. Yes, you can use them for that, and they work well for that too. But their purpose is for more precision than normally used to scribe lines. For example gauge block comparisons, etc. I would prefer to say that I would use a surface plate to calibrate the equipment that I might then later use to scribe a line.

Anybody who doubts that should try measuring the line they just scribed. I'd bet they would be lucky to be within 3 thou over 5 trys. Hardly within the precision of a good surface plate.

To be clear, I would use my surface plate to calibrate my height gauge vs known gauge blocks at room temp. I might also scribe a line while I was at it, but I could also do that on my mill table. It's plenty flat enough to scribe lines with.

I dunno if I'm making this discussion worse or better - hopefully better

I agree to a point.

I never put anything on the surface plate that has not been ground.

IMO, scribing lines is simply for layout. I'm not looking for tight tolerance lines. That needs to be taken care of at the machine when picking up the block, then readout positioning will get me to where I need to be. Precision comes in with measuring tools at that point.

I'm a fan of gauge blocks, pin gauges and angle plates when checking squareness, angles, dimensions etc on the surface plate for final inspection.

If its just fly cut, then yeah, I scribe lines on the mill table all the time... with my caliper. That's just me thou, I'm not looking for precision at that point.
 
Last edited:
I think our conversations are ships passing in the night. My understanding:
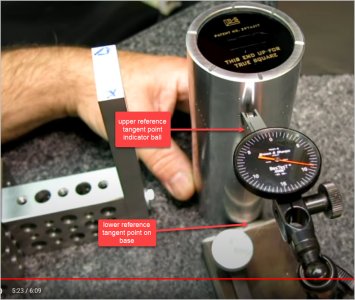
- you need a specific type of stand, lets call it a squareness comparator (any of the pics in my post #25). But they look remarkably similar to a surface height stand with an added curve feature on the base
- you need an accurate reference block, could be a cylinder square like @Susquatch shows, could be a purpose gage block, anyway has known/graded perpendicular surfaces
- calibrate the squareness comparator to the reference block by zeroing the DTI or whatever instrument. The 2 tangent contact points are exactly like the prior calibration step: the rounded surface on the stand base & the ball of the indicator
- now bring this calibrated comparator up to the object we want to check squareness. Dial now indicates extent of squareness deviation. For example picture, he may be checking his 123 block but object could be anything

If I'm off base let me know. That's why I'm asking
 

Attachments

  • SNAG-2022-10-29 1.47.25 PM.jpg
    SNAG-2022-10-29 1.47.25 PM.jpg
    64.5 KB · Views: 3
calibration (or in his case, validating prior setup using parallel & block)
 

Attachments

  • 2022-10-29_17-15-32.jpg
    2022-10-29_17-15-32.jpg
    86.2 KB · Views: 8
I think what you are looking for is called a cylinder square. A good one will allow you to check vertical squareness to a tenth or so across its length assuming everything is temp stabilized near 70 F.

I got one at a recent Kijiji sale. It was easily worth the entire purchase price of what I all got all on its own. It's in pristine condition. Didn't even know it was in there till I opened the box. Then I sucked in my breath...... I already had one I made many many years ago, but it is neither as big nor nearly as perfect as this one.


View attachment 27505
You suck ;) (I'm really jealous) Nice find!
 
@PeterT .

I think your ships at sea is prolly smack on. I often have trouble figuring out what it is you want to know. Your questions seem simple at first blush but after a few passes at sea, I always end up realizing you were after something much deeper.

Let me try again....... LOL!

In most cases where I use a cylinder square (either my old one or the new one) I don't use an indicator or a height gauge. I simply hold whatever it is I want to evaluate up against the cylinder square. It's either square or its not. If the light coming through the contact point is blue, I know I'm close to a tenth.

It gets a bit harder when you want to measure how square something is. In this case, you need to take a measurement. In these cases, I use an indicator like you showed to do a comparison between the cylinder square and whatever I'm measuring. Usually, I use the straight edge of a gauge block to slide the two objects along to get the high spots. Often, the indicator will be mounted on the gauge block. The difference between the cylinder square and the object I'm measuring gives the off-square value to use in subsequent calculations. The reason for the straight edge of the gauge block is to eliminate off-center errors.

I don't know what you mean by a curved base in your description. Do you have a photo of that? What is that for?

Can you describe what it is that you want to know or what it is that you are trying to do? Or is this one of your learning exercises that goes way beyond the obvious?
 
- you need a specific type of stand, lets call it a squareness comparator (any of the pics in my post #25). But they look remarkably similar to a surface height stand with an added curve feature on the base

The first photo is mine. There is no curved base, you use ball at the bottom the mast - that's what it is for. I've never understood people set about modifying height gauges when most probably everyone as a surface gauge with this feature already built in. With a good swiss tenths indicator and plate, its how you work to tenth in the home shop.

btw, this a technique that can create squares from nothing, either via grinding or scraping. The key is the two opposing sides have to be parallel (not hard to do by grinding or scraping). Indicate each and you can figure out how out of square they are to the bottom surface.

here's a shot that shows it better....and the finished block, everything parallel to a tenth via scraping and square to a tenth over 6". All done via comparison, i.e. you don't need anything square to create this


DSC_0378-1300x870.JPG


DSC_0555-1300x870.JPG
 
Back
Top