Spindle square

DPittman

Ultra Member
Premium Member
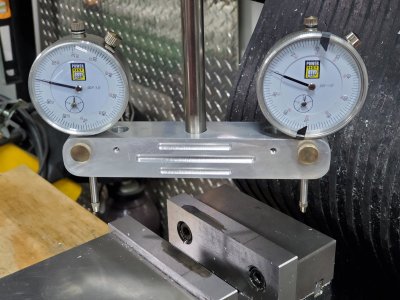
Still practicing with milling machine (trial and error) I made myself a spindle square out of salvaged material. I loosely used Dale Derrys video series, "Metal tips and tricks" as an inspiration.

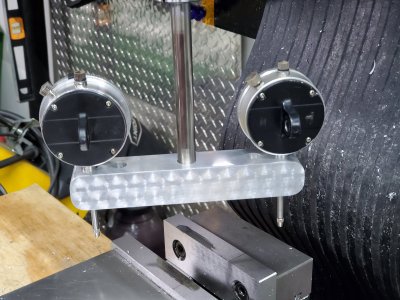
The aluminum was cut from an 8" round log of extruded aluminum (soft, gooey stuff), the brass screws 20211114_080216.jpg 20211114_080202.jpg were made from salvaged water valve stem, and the shank was rod salvaged from an old printer.

I did some "jeweling" on the back side with a small chunk of scotch Brite pad glued to a piece of wood doweling. If I would have changed out the scotch Brite pad several times I would have had a better more defined job.

It was a first attempt with a ball end mill and I'm not happy with the finish it gave but I think at least part of that is the material I was working with.

I have two different mounting distances for the indicators as I have only a 4" vise on my mill but wanted to get maximum distance for table squaring so I made 3.5" and 5" spaces.
 

gmihovics

Garrett
Looks like you did a good job to me. I've seen these on a bunch of people using these on YouTube channels lately but never a homemade one. what kind of accuracy do you think you will get from this?

Also, I'm amazed at the level of scavenged materials around here. I always keep parts for building printers or machines but never thought to keep it for turning or milling until I joined the forum.
 

Susquatch

Ultra Member
Administrator
Moderator
Premium Member
Looks like you did a good job to me. I've seen these on a bunch of people using these on YouTube channels lately but never a homemade one. what kind of accuracy do you think you will get from this?

Also, I'm amazed at the level of scavenged materials around here. I always keep parts for building printers or machines but never thought to keep it for turning or milling until I joined the forum.
I only buy new stock when I absolutely have to.

Almost all my stock is salvaged or scrounged or traded.

For the lathe, you will find old bolts are a terrific supply source. Look at equipment company dumpsters, farm machinery shops, highway construction sites, old street-light post anchors. etc. You can get regular Bolts, grade 5 Bolts, grade 8, and of course Stainless. They are usually pretty good steel. Just turn the threads off and or galvanized coating off and use as appropriate. Brass and aluminiun is harder to find that way.
 
Last edited:

Susquatch

Ultra Member
Administrator
Moderator
Premium Member
what kind of accuracy do you think you will get from this?

I don't have one and have not considered making one either.

For my purposes, I have found that an indicator mounted to the outside of the spindle or in a collet or even a drill chuck is plenty good enough. I cannot get my milling machine trammed in any better than a 1 thou indicator anyway. Any runout in the collets or drill chuck or spindle OD is totally cancelled out if you only use one indicator and turn the spindle by hand using a 3/4" socket and wrench on the Drawbar.
 

DPittman

Ultra Member
Premium Member
I don't have one and have not considered making one either.

For my purposes, I have found that an indicator mounted to the outside of the spindle or in a collet or even a drill chuck is plenty good enough. I cannot get my milling machine trammed in any better than a 1 thou indicator anyway. Any runout in the collets or drill chuck or spindle OD is totally cancelled out if you only use one indicator and turn the spindle by hand using a 3/4" socket and wrench on the Drawbar.
Well I could be wrong, but when you calibrate the two indicators to read the same thing in the same spot that accomplishes the same thing as you are doing with using just one indicator. The spindle square is no better than using just one indicator just more convenient.
 

Susquatch

Ultra Member
Administrator
Moderator
Premium Member
Well I could be wrong, but when you calibrate the two indicators to read the same thing in the same spot that accomplishes the same thing as you are doing with using just one indicator. The spindle square is no better than using just one indicator just more convenient.

I think you are absolutely correct on all counts except the convenience part. You might be right on that too, but I think by the time you finish calibrating the two gauges to read the same thing, you could be finished tramming your head.

Then again, I am so used to dialing in a part on my lathe that I found tramming my mill to be a total cake walk.
 

gmihovics

Garrett
i was just wondering about the the accuracy of the shaft into the main body. if the shaft hole isn't completely perpendicular to the body, wouldnt that introduce some inaccuracy?
 

Susquatch

Ultra Member
Administrator
Moderator
Premium Member
but it has no nod adjustment so I guess that would have to be done with shims.

Ya, at first I had trouble with adjusting nod. But as soon as I realized that both front and back measurements move the same way except in magnitude, it got fairly easy too. You just can't use the rule of halves in the normal way.
 

Susquatch

Ultra Member
Administrator
Moderator
Premium Member
i was just wondering about the the accuracy of the shaft into the main body. if the shaft hole isn't completely perpendicular to the body, wouldnt that introduce some inaccuracy?

The body concentricity doesn't matter as long as you don't try to use it. You just use the spindle axis. If that doesn't run true, it's time for a new machine or a major rebuild!
 

Brent H

Ultra Member
The biggest reason to use this type set up on, say a Bridgeport or clone, is that tramming the mill in the Y-axis is a bit more of a PITA. This is because of the way the head is off set and any error on the y-axis gets worse very quickly. It is very quick to get the 2 indicators reading the same. By using the two indicators I can set up from a head tilt operation in a few minutes.
 

DPittman

Ultra Member
Premium Member
i was just wondering about the the accuracy of the shaft into the main body. if the shaft hole isn't completely perpendicular to the body, wouldnt that introduce some inaccuracy?
Nope that's what the calibrating the indicators to read the same in the exact same spot accomplishes. Remember this isn't a always turning thing, it just turns 90 degrees to read the two planes concerned with tramming a mill.
 

Susquatch

Ultra Member
Administrator
Moderator
Premium Member
Basically, any part that is solidly attached to the spindle will run as true as the spindle does.
 

Susquatch

Ultra Member
Administrator
Moderator
Premium Member
The biggest reason to use this type set up on, say a Bridgeport or clone, is that tramming the mill in the Y-axis is a bit more of a PITA. This is because of the way the head is off set and any error on the y-axis gets worse very quickly. It is very quick to get the 2 indicators reading the same. By using the two indicators I can set up from a head tilt operation in a few minutes.

I confess I'm a bit surprised at you Brent! I would have figured you could do that kind of math in your head without even thinking about it! Mere mortals like me have to do the trigonometry. It's just the two different angles from the front and rear of the table to the head's pivot point! I do an adjustment, look at how much they both moved and then ratio that to get to where they are the same. Two or three adjustments later and you are there. I confess I had to think about that a bit the first time I did it though....

I have also thought you might be able to use either of the midpoints with a half rule to get you there too but I never tried it. Then again, maybe not..... I guess I should actually try that last one before I shoot my mouth off.......LOL!
 

Brent H

Ultra Member
HA HA! @Susquatch : yes - doing some math and calculation is all good but in the couple minutes it takes with the spindle square......... plus, having ten dial indicators is one thing, but if over half of them have a dedicated purpose - that is another :p and when the boss comes out and dials are adjusting and things are spinning about and the work place is happy.....way better than a bunch of sailor language (which I have proper training in ;)) after over shooting the adjustment a few times. LOL

Plus it was neat to make ..... one of the joys of shop :)
 

PeterT

Ultra Member
Premium Member
I would expect the accuracy all depends on the indicator repeatability and resolution.
...and also the arm distance from the spindle post to indicator stem. You could elongate the bar segment for even more accuracy, but most people keep it compact like yours to match the table width in Y direction. Unless you happen to have a nice, long, accurate parallel bar to lay over the table. I use my Noga arm with DTI & mag base stuck to underside of spindle (no tool in). It's quick but still 1-dial rotate operation. The 2 dials would be convenient in nod adjustment mode, just bump-bump till they agree. You can also use this method to check you vise ways relative to table.

Another useful test with your tenths DTI held in quill is run it up & down the fixed jaw of mill vise using quill or knee. Better yet clamp a good 123 block with soft filler on the moveable jaw side. The extra block length will exaggerate the jaw discrepancy beyond its vertical width. The idea here is to see how the fixed jaw aligns to quill axis. If it's out (could be jaw, could be vise bed...) this works against you when it comes to milling square stock despite the roll/rotate the machined part recipe sequence. If the jaw is out, it will be parallelogram-ish at best.
 

Dusty

(Bill)
Premium Member
I also designed my hybrid spindle square from Dale Derrys video series, "Metal tips and tricks".

Checks it out here:


gmihovics

Garrett
The body concentricity doesn't matter as long as you don't try to use it. You just use the spindle axis. If that doesn't run true, it's time for a new machine or a major rebuild!

Nope that's what the calibrating the indicators to read the same in the exact same spot accomplishes. Remember this isn't a always turning thing, it just turns 90 degrees to read the two planes concerned with tramming a mill.

ok yup, that makes total sense, I didn't think about calibrating both dials on the same spot first. that solves the issue.
 
Top