• Scam Alert. Members are reminded to NOT send money to buy anything. Don't buy things remote and have it shipped - go get it yourself, pay in person, and take your equipment with you. Scammers have burned people on this forum. Urgency, secrecy, excuses, selling for friend, newish members, FUD, are RED FLAGS. A video conference call is not adequate assurance. Face to face interactions are required. Please report suspicions to the forum admins. Stay Safe - anyone can get scammed.

Show us your shops!

Curious. What was the recommended base depth and install for the interlock for a vehicle?

15 years ago when I did mine I had 8-10 inches of base installed in 2 layers with tamping between the first and second. Heavy vehicle traffic is low since I only bring vehicles into the garage for repairs. I do park on the brick. It has held up very well.

My area is hard clay after 8-10 inches so it's just fill from there upwards. A distant neighbour tried to dig some post holes for a driveway gate could not get through the clay with those powered auger rentals from homedepot, and he's a pretty large dude. He did the two holes manually by repeatedly soaking the clay in water before chiselling/digging out bit by bit, rinse and repeat many times.

I park a car at the front but the side gets no heavy traffic, just the motorcycles in the future once the workshop is up.
 
Anyone use concrete sealers? Thoughts?
Protecrete Densifier & Repeller:


This (and equivalent) product penetrates the concrete making the surface less susceptible to dusting, water (and oil) proofs and is breathable. Disney World used it everywhere and there is/was an egg processing facility that used it to eliminate odors from years of raw eggs that had soaked into the bare concrete.

It can be applied to newly placed concrete to act as a curing compound, or to a properly prepared old surface.

The projects I was involved with were 10 years ago, and at that time it needed to be applied by an approved/trained contractor.
 
1784161445922.png

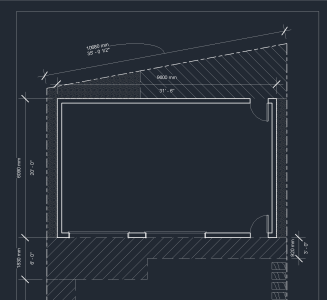
Building out a front pad (concrete or interlock tbd) in front of the first overhead door as suggested. I might just do some loose pavers in pat of the back over gravel. Gravel rest of sides.

I initially had the 6ft pad all the way across the front, but my partner gave me a bad stare as it would reduce the available garden, so I notched it back to 3ft. She's still not too happy about this new front pad suggestion and feels blind sided 😳
 
I know a little about partners being nonplussed by shops. She claims I built bigger than planned…

Not sure I understand the logic of two garage doors when one is effectively blocked by house. I probably wouldn’t have the man door in the back either- too much temptation for crooks to do stuff unseen.
 
View attachment 84381

Building out a front pad (concrete or interlock tbd) in front of the first overhead door as suggested. I might just do some loose pavers in pat of the back over gravel. Gravel rest of sides.

I initially had the 6ft pad all the way across the front, but my partner gave me a bad stare as it would reduce the available garden, so I notched it back to 3ft. She's still not too happy about this new front pad suggestion and feels blind sided 😳
3’ wide concrete around the building will help keep various critters from invading the dhop and will make it easier to control weeds, etc.
 
I am thinking of this space as bays as suggested and so the middle bay would allow me to access the exterior without having to wheel things to the first bay unless absolutely necessary for the 6ft pad. The first bay in front of the pad will be wrenching motorcycles. The second overhead would also be nice to have open on a fair weather day, or if my partner needs visuals on me to make sure I haven't dropped dead? Kinda thinking a nice patio to bbq from too? Let me know if that doesn't make any sense!

The back is fence and mirrored property of their backyard and house. Will have a camera for the back as well but I don't have much worry for that sort of robbery here. I do want to access this back area as posible overflow since space is a premium.
 
Codes most likely require two exits rollup doors don’t count. I would put the people doors on opposite corners.
Hadn’t thought of that for an outbuilding. In Manitoba only one door needed unless it’s a residence, in which case, at least two.
 
I am thinking of this space as bays as suggested and so the middle bay would allow me to access the exterior without having to wheel things to the first bay unless absolutely necessary for the 6ft pad. The first bay in front of the pad will be wrenching motorcycles. The second overhead would also be nice to have open on a fair weather day, or if my partner needs visuals on me to make sure I haven't dropped dead? Kinda thinking a nice patio to bbq from too? Let me know if that doesn't make any sense!

The back is fence and mirrored property of their backyard and house. Will have a camera for the back as well but I don't have much worry for that sort of robbery here. I do want to access this back area as posible overflow since space is a premium.
Yeah, logical for your intended use. I was just thinking, extra roll up door limits placements for workbenches, tall cabinets, shelving, etc. And is less energy efficient.
 
Yeah, logical for your intended use. I was just thinking, extra roll up door limits placements for workbenches, tall cabinets, shelving, etc. And is less energy efficient.

+1 on the energy efficiency. I am still on the fence about it and my initial layout was a slider instead. That's why I'm posting to get some thoughts to push me one way or another. I think it's the designer in me trying to come up with more multipurpose uses instead of a box, especially to justify (to both me and family) this huge investment!

I'm gonna line the other 3 sides completely with shelves/workbench/cabinets. Thinking of some island workbenches and storages as well so hopefully that wil be enough.

No double egress requirements for storage/shed wink wink. But single family residential here also only needs the one front door egress. There's actualy a fight here in Ontario to elimnate double stair egress for mid-size buildings since many west coast jurisdictions do not require it.
 
Anyone use concrete sealers? Thoughts?
I used a tinted hardener that is worked in after the initial placement and leveling (when power troweling). The floor looks like it is painted (except it isn’t, so nothing to flake off) and for small scratches they don’t really show as it scratches to the same colour. The surface is very smooth (I really like it) - the guy doing the slab claimed he was supposed to use a brush finish so it wouldn’t be as slippery when wet. He absolutely understood that there was no way that I’d agree to a brush finish, as long as it was on the work order for a smooth finish at customer request - then he was satisfied and made it nice and smooth. I also bumped up the cement ratio a bit and had fibreglass chop added to the mix (the concrete is stronger than the bare minimum and less tendency to crack). In the 15 years since building the shop, there are a couple small cracks - overall I have been very satisfied.

I think a sealer may also have been applied (a couple weeks after the pour). That step is fuzzy in my memory.

There are quite a few things you can do with a slab, during construction - not so much afterwards. Continue doing your research for what is available and suitable in your area. I went with 2” of underslab insulation that had the formed tubing grooves, and put in hydronic loops, then rebar above that. The target thickness was 6”, but strictly speaking it ended up at 5” (which has turned out to be fine) - even though I have machines wherein the manual says to have much thicker concrete (have 3 machines at 8000 lbs). I also put in some in slab conduit for wiring. The machine plan and wiring requirements have changed a lot since I built the shop, but having a few in slab wiring options has been really handy.

I found that the various extras cost very little to add during construction (and basically impossible later). A couple of the contractors I had working on the shop commented that people building million+$ homes will go as cheap as possible (except for bling in the finish details).

 
I used a tinted hardener that is worked in after the initial placement and leveling (when power troweling). The floor looks like it is painted (except it isn’t, so nothing to flake off) and for small scratches they don’t really show as it scratches to the same colour. The surface is very smooth (I really like it) - the guy doing the slab claimed he was supposed to use a brush finish so it wouldn’t be as slippery when wet. He absolutely understood that there was no way that I’d agree to a brush finish, as long as it was on the work order for a smooth finish at customer request - then he was satisfied and made it nice and smooth. I also bumped up the cement ratio a bit and had fibreglass chop added to the mix (the concrete is stronger than the bare minimum and less tendency to crack). In the 15 years since building the shop, there are a couple small cracks - overall I have been very satisfied.

I think a sealer may also have been applied (a couple weeks after the pour). That step is fuzzy in my memory.

There are quite a few things you can do with a slab, during construction - not so much afterwards. Continue doing your research for what is available and suitable in your area. I went with 2” of underslab insulation that had the formed tubing grooves, and put in hydronic loops, then rebar above that. The target thickness was 6”, but strictly speaking it ended up at 5” (which has turned out to be fine) - even though I have machines wherein the manual says to have much thicker concrete (have 3 machines at 8000 lbs). I also put in some in slab conduit for wiring. The machine plan and wiring requirements have changed a lot since I built the shop, but having a few in slab wiring options has been really handy.

I found that the various extras cost very little to add during construction (and basically impossible later). A couple of the contractors I had working on the shop commented that people building million+$ homes will go as cheap as possible (except for bling in the finish details).

Thanks super helpful. Despite the hefty cost, I am now seriously considering radiant slab now that you and many others are vouching it.
 
I put 2 garage doors in, both insulated, but as I have R22 insulation in the walls and ceiling, there is only R8? in the doors, and really less as the doors have metal joining the panels at joints from inside to out. A very good conductor of heat.
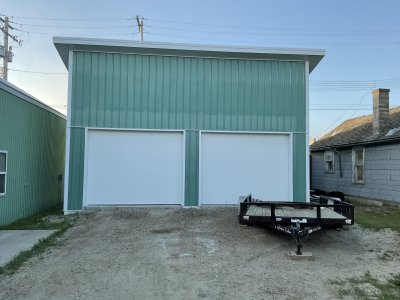
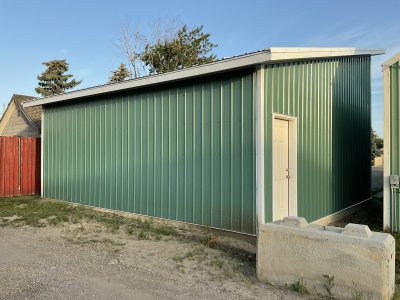
10 wide by 8 high garage doors, 36inch man door. Shed roof. 26X26 outside diamention. No heat at moment, but will be electric, this will be heated only if out working in.
Used foam blocks that have concrete in them, so some perimeter insulation of floor, no insulation of floor otherwise. We will see.
Notice the dew line above the garage doors, this is about ceiling height inside.
While I would have done some things different, money was playing into it, and this is not my main work area, just a garage. LOL, SO FAR, only a garage.
Pictures of inside when finished insulating and lining.
Note, using 7/16 OSB for lining as is cheaper than drywall by nearly half at this time, and will hold a nail or screw.
 

Attachments

  • IMG_0055.jpeg
    IMG_0055.jpeg
    1.8 MB · Views: 7
  • IMG_0056.jpeg
    IMG_0056.jpeg
    2 MB · Views: 7
Last edited:
Add to above, there will be concrete slab in front of the garage doors, at least 10 ft., wife wants 26 ft., what the ? Gravel around rest, stairs and some concrete at man door.
Electrical service from my building on the left (looking at picture of garage doors), put single phase 220volt, 60amp, under ground. Not finished inside yet, a couple of outlets, 110., a few lites and electric door opener,(only one at this time). A 60amp welding plug to go in, and numerous other 110 outlets and lites, once inside walls and ceiling lined.
 
Last edited:
I’m sure you know this, but radiant floor heating is a turn on in fall turn off in spring kinda thing. It won’t work as instant heat if you’re only in the shop on weekends and want to heat only when working in there.

In my heating zone it’s fantastic!
I have in-floor heating in my basement and ya it's a 3 day heat-up in fall and a 4 day cool out in the spring but worth every penny of the construction. the radiant heat rising from the basement 24/7 into the upstairs keeps the main furnace from running much until outside ambient temps get into the mid-minus teens. You dont need a multi $ooo dollar setup that a heating company will "absolutely" recomend you will need....you dont... The "boss" and I installed all our piping & headers ourselves before the floor was poured and after floor was poured we hooked an old hot water tank to the header and fired it up...total cost was under $500. that was 20 yrs ago so piping will be a bit more now but the "do it yourself" work will still be the same.
We colored our concrete floor by just adding concrete dye to the mix before pouring and color is still perfect after 20 yrs of traffic on it no scuffing or fading at all.
 
Yeah, I think the in floor heating is a good thing, some the installers don’t know dick and it’s easy to screw up when there are pumps and multi zones, solenoids etc. in the system
Years ago a guy had a system put in that was also using ground heat. The electishion I worked with looked at it, said it was costing over $600.00 a month to run. Told him that was not working right, but everything looked O.K. to him, turned out the ground circuit was pumping heated water down into the ground all the time instead of pumping warm fluid out of the ground and heating it as needed for house heat, plus some of the pumps were running all the time in areas not calling for heat.
 
There are quite a few things you can do with a slab, during construction - not so much afterwards. Continue doing your research for what is available and suitable in your area. I went with 2” of underslab insulation that had the formed tubing grooves, and put in hydronic loops, then rebar above that. The target thickness was 6”, but strictly speaking it ended up at 5” (which has turned out to be fine) - even though I have machines wherein the manual says to have much thicker concrete (have 3 machines at 8000 lbs). I also put in some in slab conduit for wiring. The machine plan and wiring requirements have changed a lot since I built the shop, but having a few in slab wiring options has been really handy.

I found that the various extras cost very little to add during construction (and basically impossible later). A couple of the contractors I had working on the shop commented that people building million+$ homes will go as cheap as possible (except for bling in the finish details).
Did you lay down copper or tubing? Gas boiler? How did you decide?
 
Back
Top