• Scam Alert. Members are reminded to NOT send money to buy anything. Don't buy things remote and have it shipped - go get it yourself, pay in person, and take your equipment with you. Scammers have burned people on this forum. Urgency, secrecy, excuses, selling for friend, newish members, FUD, are RED FLAGS. A video conference call is not adequate assurance. Face to face interactions are required. Please report suspicions to the forum admins. Stay Safe - anyone can get scammed.

QCTP Tool holder

ShawnR

Ultra Member
Premium Member
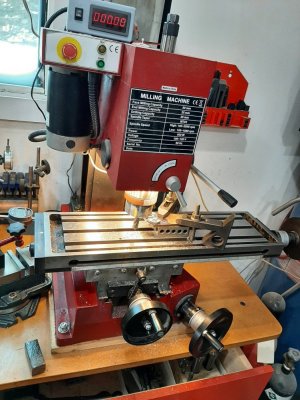
1" square stock to start..... Tool holders to finish. This project lead to questions in another thread about depth of cut with milling cutters of different types in small mills. This project was started a few days ago, but deferred because of questions, problems, and other projects like the bench lamp part.

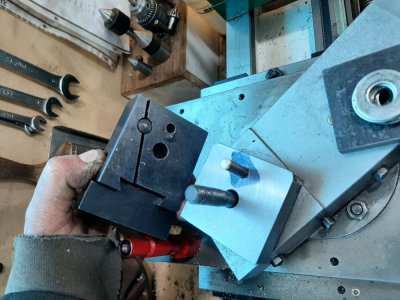
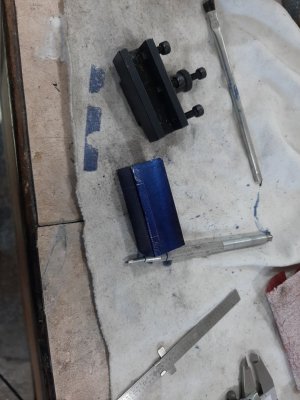
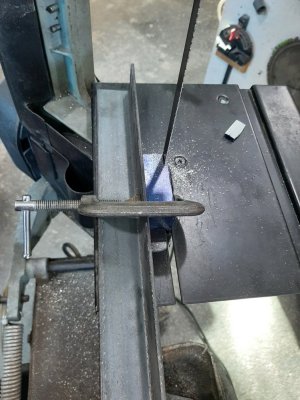
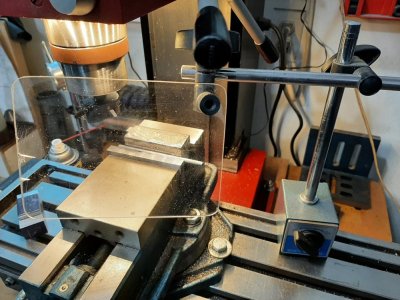
Back to this project..... After reading other threads, I have decided that it is probably better to remove as much stock as possible via means other than the small mill I have access to so will bandsaw out the bulk that I can, and then get to the actual more precise cuts. Every day, learning something new.

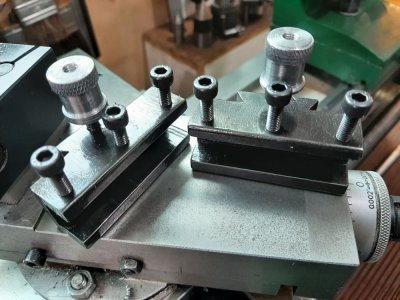
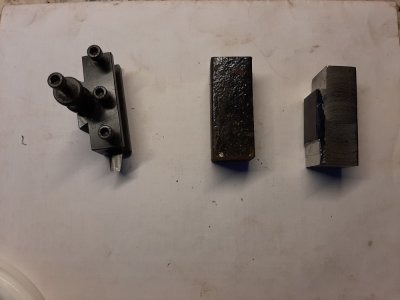
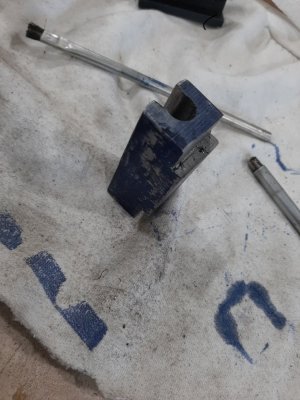
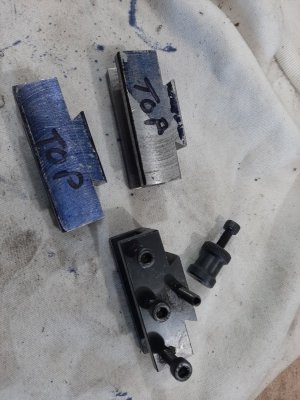
Pic got twisted I think. Middle one is the rusty old but painted stock to start. Will grind that crud off. First attempt on the right (ongoing) and factory original at left. Just a China cheapy tool that I have had for years and not used because it needed some adaption for my lathe but after revisiting it, I have decided it will be good, if I had more holders. So, here we go. :D
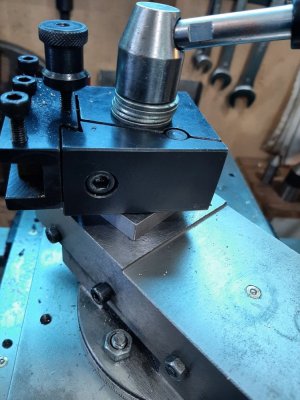
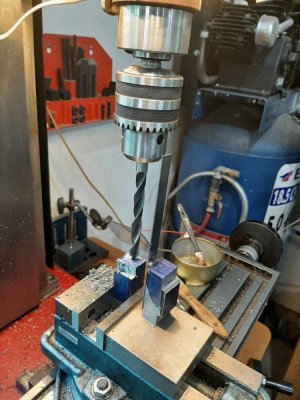
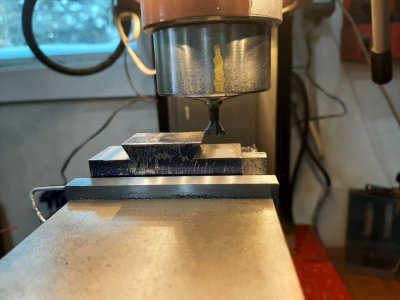
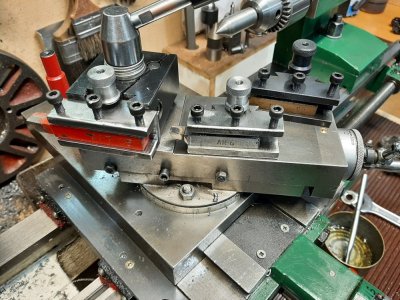
I have some dovetail cutters but not used them. I probably bought them for this project years ago. I think questions might follow when I get to that point. I am assuming to get everything cut close with straight cutters, then start milling with the dovetail cutters....?
 

Attachments

  • 20210208_083028.jpg
    20210208_083028.jpg
    74.8 KB · Views: 42
Last edited:

ShawnR

Ultra Member
Premium Member
Oh Oh...followers..!! That puts the pressure on to me finish it ....and with documentation and photos! ...:cool:

Disclaimer, I am a relative beginner too so one, don't necessarily do what I do, and two, if you have suggestions for me, by all means, let me know. I won't be hurt.... After starting milling the first one last week, I decided that it is more milling that I want to do. In fairness, part of my problem last week might have been dull tools and inexperience. Amazon was kind enough to get some new cutters to me, and after trying them on brass, I think they might make a big difference for this project!

The progress today....

The first part of the day was experimenting with the fly cutter and tool sharpening, looking for the best finish and learning mill speeds.... still looking for the magic combination to square the material. I used a grinder to get rid of the paint and rust before getting to the mill this time.

Then onto the layout, (not overly critical I don't think so I did it quickly, but will cut the dovetail carefully) and then the bandsaw (I used the angle iron and clamp to keep my fingers away from the blade because the part is only 1" square by 2 1/2" long). The makeshift work holder worked great! I did not get too close to the lines to leave a good margin for milling, but I think it will be a good start versus starting the milling with just a square block.

Then I drilled out where the tool bit goes. It is a half inch recess but I used a 7/16 to leave room for error in drilling. I think this material being removed will be a great start.

Then I just cut out the remaining with bandsaw and a zip disc. For the next one, I will use the zip disc.

Bonus today was finally putting the chip shield together. I don't like my face shield, nor getting spit on with hot metal chips. Been thinking of doing this for a long time and finally did it. I had the plexiglass in stock. It works great! !!

And only 2 band aids today....:eek: ;)

Cheers,
Shawn
 

Attachments

  • Layout 1.jpg
    Layout 1.jpg
    132 KB · Views: 23
  • Bandsaw action.jpg
    Bandsaw action.jpg
    147.7 KB · Views: 24
  • Drilling out bit area.jpg
    Drilling out bit area.jpg
    152.2 KB · Views: 24
  • Next step is the mill.jpg
    Next step is the mill.jpg
    150.8 KB · Views: 25
  • Chip shield.jpg
    Chip shield.jpg
    164.6 KB · Views: 25
Last edited:

ShawnR

Ultra Member
Premium Member
I first finished cleaning up and finalizing the area adjacent to the dovetails, then cut the dovetails. Having never used a dovetail cutter, I went really slow. It looks like a "dainty" little tool but cut really well. I then flipped the holders over and milled out the tool slots. I learned a bit here.... I had a 1/2" roughing end mill and the slot is a 1/2" wide (.5030") so I thought it would be ideal, especially considering that most of the material had already been removed but I found it did not do so well. I think maybe too aggressive for my machine, in that application. Maybe cutting both climb and conventional at the same time since I was cutting on both edges only? I tried different cut depths, speeds and feed rates but eventually, swapped out to a HSS 3/8" mill. This worked much better and I think the whole tool slot on the second holder was done much quicker than on the first thanks to the smaller mill. I worked one side first, then did the other side vs alternating. This is probably a personal preference. With a DRO, it might be easier but with back lash in the Y movement, playing with the dials was a PITA so I just did one side at a time. The only reason that "Top" is marked on them is that the originals had a slightly thicker bottom than a top for the tool slot. I tried to replicate that a bit, but it was so slight that it was a not a huge concern for me. I don't think mine are too different. My initial milling size, after cleaning off the old paint and rust, did not allow for much flexibility here. Other than that, they can go either way up or down right now.

I, hopefully, can find some M5 x 0.8 screws tomorrow and I can finish this up. I can at least tap the holes for the screws and clean them up tomorrow and turn the adjustment nuts. I might try a bluing for the finish. Never tried that before either but I have the stuff so see what happens.

I also found that my mill vice tends to lift the near side of the material, regardless of tapping it down or a piece of round material on the moving jaw. There is a bit of play in there so I think I will try to fix that sometime in the near future. Once again, one job leads to another...:rolleyes:
 

Attachments

  • Dovetail cuts.jpg
    Dovetail cuts.jpg
    104.4 KB · Views: 23
  • Milling tool slot.jpg
    Milling tool slot.jpg
    238.4 KB · Views: 23
  • Pre tap.jpg
    Pre tap.jpg
    192.2 KB · Views: 23
Last edited:

ShawnR

Ultra Member
Premium Member
And...that's a wrap. I think. Not sure if I will try bluing on them, or paint them, or leave them but for now, done. That was a fun project. The finish is not what I think of when I look at machinist's projects but I am ok with that. The project served its purpose.....work on some skill development (basics) using stock (old rusty metal ) that resulted in a usable product.
 

Attachments

  • Finished holders.jpg
    Finished holders.jpg
    201.1 KB · Views: 40
  • Finished holder1.jpg
    Finished holder1.jpg
    179.2 KB · Views: 40
Last edited:

YYCHM

(Craig)
Premium Member
I've never seen a center set up in a tail stock chuck like that before. That's different?

Did you turn and knurl those adjustment nuts?
 

ShawnR

Ultra Member
Premium Member
I've never seen a center set up in a tail stock chuck like that before. That's different?

Did you turn and knurl those adjustment nuts?

lol...not what it looks like.. or maybe it is. I was tapping the holes for the adjustment nut just after drilling the hole. It was just to assist me in keeping the tap aligned. The center is not a taper, but rather, just a straight shaft. It was handy. I guess I could have removed the chuck and put the live center in or mounted the tap in the chuck. Honestly, did not even think of it. That center has a reduced shaft size of 3/8 to use in a drill chuck, for use in the drill press for tapping the holes in the holders.

I seem to fumble around with aligning taps and dies. I just did free hand for years and they were seldom straight. Lately, I have been trying to take the time to figure out what works for me. There are lots of good ideas on the web. I like the spring set up in this one for keeping the pressure on the tap instead of trying to keep up with the center advance.....and it looks like a good project for me.

Yes to the adjustment nuts. I like knurling. Like everything, I have not done much of it but it is one of those things that is really easy to do and makes such a nice practical feature to turned parts. I did not go too crazy on exactly duplicating the originals. Took some measurements but just mostly eyeballed the part in the lathe. They are slightly different .:oops:
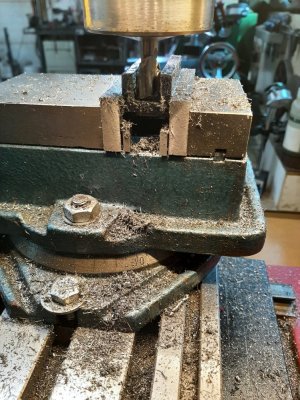
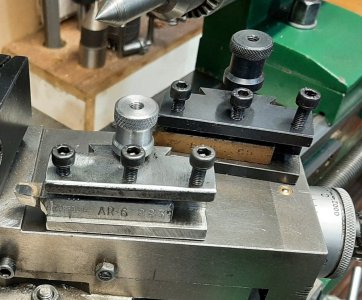
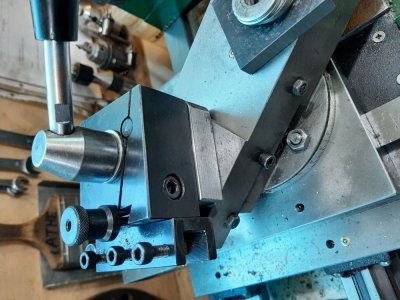
....cause, honestly, I was paying more attention on the first one than the second...and the stock piece was getting small for the second one so I modified on the run to compensate......

 
Last edited:

Dabbler

ersatz engineer
Ages ago when I started using an AXA toolpost, I bought some 4140 rectangular stock to make some tool holders - AXA holders were very expensive for decent ones. (I think they were 40$+ CDN at the time)...

Time went on, and I didn't need a lot more so I bought 2 more eventually, a lower prices as the price came down.

Now I use BXA exclusively (the most common available size) and I bought a ton of them for 9$ CDN each, so I won't be making any.

I still think your project is cool and think that making your own tools is one of the best things ever!
 

ShawnR

Ultra Member
Premium Member
Thanks for the comments guys! It adds a little fun to projects knowing others might have an interest in them. I have certainly followed several over the years on forums like this.

So, this project lead to another of course...2 actually....but one is regarding the milling vice and it might make an interesting thread for some so I will start it.

As for this saga, I first got that tool holder many years ago and it was never used much. It did not seem to fit right on the lathe...too low mostly but there are two different size holders that it uses. The larger one seems to be for a parting off tool and also works with a threading tool I got last week. Since I have been in this mode this week, I decided to do something about the redneck setup I have been using. The bottom spacer often rotated into the way of the sliding dovetail, limiting down travel. It just needed a bit of a turn but still....a pita if I did not notice and was trying to lower the bit. The other thing I did not like was the stack of washers which just allowed me to tighten the holder down. I could have shortened the bolt but it fits my turret holder and you have to remove the compound slide to remove it. So today I made a riser block to clean that nonsense up. It eliminates the stack of washers and replaces the bottom spacer. It has a locating pin so that when I turn the post, it tracks, mostly.... :rolleyes: The pin is press fit into the riser and slips into the alignment hole on the bottom of the tool holder. Turned out to be an interesting project as I spent some time with the fly cutter and a new roughing mill, which both worked great. Also got some practice with layout which I seem to need some days! And press fits all always fun...

Now, I think this project is done! :cool: Thanks for following along. Geez, imagine if I had a large project.....

Cannot figure out why photos rotate.....:-?


Cheers,

Shawno
 

Attachments

  • Old setup.jpg
    Old setup.jpg
    147.5 KB · Views: 14
  • Riser block with locate pin.jpg
    Riser block with locate pin.jpg
    150.2 KB · Views: 14
  • Riser block inplace2.jpg
    Riser block inplace2.jpg
    154.9 KB · Views: 14
Top