-
Scam Alert. Members are reminded to NOT send money to buy anything. Don't buy things remote and have it shipped - go get it yourself, pay in person, and take your equipment with you. Scammers have burned people on this forum. Urgency, secrecy, excuses, selling for friend, newish members, FUD, are RED FLAGS. A video conference call is not adequate assurance. Face to face interactions are required. Please report suspicions to the forum admins. Stay Safe - anyone can get scammed.
-
Several Regions have held meetups already, but others are being planned or are evaluating the interest. The Calgary Area Meetup is set for Saturday July 12th at 10am. The signup thread is here! Arbutus has also explored interest in a Fraser Valley meetup but it seems members either missed his thread or had other plans. Let him know if you are interested in a meetup later in the year by posting here! Slowpoke is trying to pull together an Ottawa area meetup later this summer. No date has been selected yet, so let him know if you are interested here! We are not aware of any other meetups being planned this year. If you are interested in doing something in your area, let everyone know and make it happen! Meetups are a great way to make new machining friends and get hands on help in your area. Don’t be shy, sign up and come, or plan your own meetup!
You are using an out of date browser. It may not display this or other websites correctly.
You should upgrade or use an alternative browser.
You should upgrade or use an alternative browser.
Tool Optical Centre punch.
- Thread starter toglhot
- Start date
Tool
Former Member
Guest
I have one but it was store bought yes the are good.
DPittman
Ultra Member
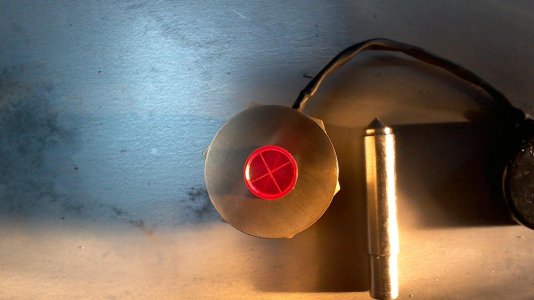
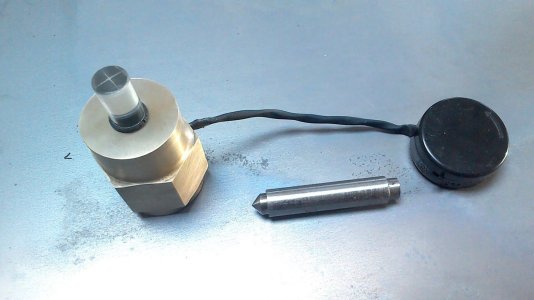
Yours appears to be electrically operated? How is that done? I'm just familiar with the simple painted on crosshairs to the acrylic shaft used for the magnification.An optical centre punch. i made a while ago as a project. If you're like me and have trouble centre punching on the line, this little gizmo is worth its weight in gold.
Former Member
Guest
Here you go, 10sec search online.
Here you go, 10sec search online.
No light on that one. I think that's what most of us old guys are looking for. Certainly what I'm looking for. I can't see well with a light let alone without.
Did I ever mention how much I hate YouTube?
DPittman
Ultra Member
Who you calling old?!!!!most of us old guys
140mower
Don
Damn it!!!!!!! I RESEMBLE THAT REMARK!Who you calling old?!!!!

Damn it!!!!!!! I RESEMBLE THAT REMARK!
When I was 10 (chronologically)I was already old.
It wasn't clear to me what the (plastic? ) material is. And does making the 2 ends of it slightly round create the magnification lens ? I think it does, but roughly how much rounding is needed.
I scrolled back and forth on that video several time trying to ge answers, but to no avail.
Looks like I'd benefit from one of these things
Mike
I scrolled back and forth on that video several time trying to ge answers, but to no avail.
Looks like I'd benefit from one of these things
Mike
Former Member
Guest
I have one like that from LV years ago. No light is require as the optics bring in ambiant light unless fat fingers block it. The location where the cross hairs are is flat the to is curved for magnification, focal length is by eye distance to optic.
Sight, align, hold down, pull optic, insert punch, tap, done.
The base has an o-ring imbedded to help prevent movement. So a gentle touch is needed removing and inserting.
Works well, but if you've learned how to use a center punch correctly the center punch is way faster.
Sight, align, hold down, pull optic, insert punch, tap, done.
The base has an o-ring imbedded to help prevent movement. So a gentle touch is needed removing and inserting.
Works well, but if you've learned how to use a center punch correctly the center punch is way faster.
An optical centre punch. i made a while ago as a project. If you're like me and have trouble centre punching on the line, this little gizmo is worth its weight in gold.
@toglhot perhaps you would provide this thread with the background music so to speak, list of components and (elctronics) used along with a scale drawing would be helpful.
Yes photos speak 1,000's of words and questions. Just saying!
Former Member
Guest
I knew we had this discussion previously, here is a link to my post showing how it works.

 canadianhobbymetalworkers.com
Name this shop TOOL
I don't own an optical punch; just remembered it from the Youtube video and found a random link via DuckDuckGo. I wouldn't turn one down but with a DRO it probably has limited application, IMHO. Craig Thanks, Craig.
DPittman
Ultra Member
It is often possible to feel the marking lines with the punch tip and when you hit the intersecting lines you have arrived at your destination. Of course this can only be done with a relatively sharp punch and when you are able to actually score the surface with marking lines.
Like DPittman said.
I'd add, its beneficial first use a prick punch. It is sharper, i.e. the point is a smaller angle than a centre punch. Its function is really to locate the the hole so you can then centre punch. The centre punch angle is close to a drill 's so after locating with the prick punch, it squashing things down making a nicely angled cone for the drill to start in. I'm very light with the optical punch, fairly light with the prick punch and as heavy handed with the centre punch as the drill size warrarnts.
I'd add, its beneficial first use a prick punch. It is sharper, i.e. the point is a smaller angle than a centre punch. Its function is really to locate the the hole so you can then centre punch. The centre punch angle is close to a drill 's so after locating with the prick punch, it squashing things down making a nicely angled cone for the drill to start in. I'm very light with the optical punch, fairly light with the prick punch and as heavy handed with the centre punch as the drill size warrarnts.
That's how I was taught. Follow a scribe line with the punch tip until you feel the intersecting scribe line. Make a SMALL initial pop. Now examine under magnification. You will see 2 V trenches & hopefully a conical crater in the center. If not, figure out which way it has to go. Position the tip back in the cone, but slightly angle the tool in opposite direction so you drift into correct direction & it becomes just a bit deeper. Rinse & repeat for accuracy required. Where most people get it wrong is a big off-centered whack, much more difficult to correct.
There is also probably a relationship between the center pop divot depth/diameter & the drill that will follow. A small divot probably isn't going to do much for a large diameter thick faceted drill. Probably best to open the center pop up with a small spot drill. The spot drill included angle should be >= the drill angle.
There is also probably a relationship between the center pop divot depth/diameter & the drill that will follow. A small divot probably isn't going to do much for a large diameter thick faceted drill. Probably best to open the center pop up with a small spot drill. The spot drill included angle should be >= the drill angle.
My experience is prolly worth what it's gunna cost you.
I have over 70 years of shooting with everything from open sights to scopes to archery. My eyes are crap now, but I still have an excellent eye for centering and leveling things. Compensating for parralax is second nature to me. To this day, my bride still marvels at how perfectly level everything I do is.
Sometimes I will scribe lines and sometimes I don't. I usually center by eye and set offsets with a scribe on dykem. If I scribe a line, I can use a sharp center punch set on the line with my good eye and give it a light tap. I follow the light tap with a heavy punch the same way others have described it. For intersecting lines, I shoot down both lines visually till I'm happy and then tap and punch as above. I've never been able to see anything off using a jewellers loop. It's a bit unconventional, but if you do a lot of shooting I bet you will find it just as easy as I do.
That all said, I'm keenly interested in getting an optical center. My eyes are not getting better and I'd rather deal with it now than later.
Former Member
Guest
Center punch it a skill that can be learn, it also an art.
The trick is scribed lines act as the catch for the point of a sharp punch, second scribed line is the stop, first is the guide. Come in at an angle rotate to vertical, tap sets the initial locate, check for equalness and do the deep punch. If not correct with a direction punch.
The trick is scribed lines act as the catch for the point of a sharp punch, second scribed line is the stop, first is the guide. Come in at an angle rotate to vertical, tap sets the initial locate, check for equalness and do the deep punch. If not correct with a direction punch.