• Spring 2024 meetup in Calgary - date Saturday, April 20/2024. discussion Please RSVP Here to confirm and get your invitation and the location details. RSVP NOW so organizers can plan to get sufficient food etc. One week to go! More info and agenda
  • We are having email/registration problems again. Diagnosis is underway. New users sorry if you are having trouble getting registered. We are exploring different options to get registered. Contact the forum via another member or on facebook if you're stuck. Update -> we think it is fixed. Let us know if not.
  • Spring meet up in Ontario, April 6/2024. NEW LOCATION See Post #31 Discussion AND THE NEW LOCATION

Tool Optical Centre punch.

Tool
Where the optical punch really shines is when the scribed lines are done with a height gauge on a plate. The resulting mark should be within a couple of thou.
I have both, the optical gauge makes it easier when you are tired, however with proper technique old school punching has the same accuracy and believe it not faster.
 

CWret

Ultra Member
Premium Member
Step 1- a sharpe automatic punch on the layout intersection;
Step 2- then a small punch on an angle if some lateral adjustment is needed (like others described above); and
Step 3- then a healthy wack with a large punch to give the drill bit somewhere to bite in.
Step 2 is optional.

Today i ordered some acrylic dowel from Amazon. An optical centre punch is going to be a project when the dowel arrives. Hopefully this new tool can take me right to Step 3.

I think getting the crosshairs accurately onto the flat bottom of the dowel will be the biggest challenge. (Oh yea, I only have a mill - so getting my mill to think like a lathe maybe a challenge too).
 

Susquatch

Ultra Member
Administrator
Moderator
Premium Member
Oh yea, I only have a mill - so getting my mill to think like a lathe maybe a challenge too).

It might be easier than you anticipate. If the dowel will fit a collet, you can spin it just like on a lathe and then mount your cutting tool in the vice (or some other holder arrangement using X&Y&Z to position the tool the same way you would normally use the lathe saddle and tool holder. It won't be perfect, but the dowel isn't exactly steel.....
 

DPittman

Ultra Member
Premium Member
Step 3- then a healthy wack with a large punch to give the drill bit somewhere to bite in.
Just one side point...sometimes on metal like stainless steel, the punch mark can make the surface work harden and getting the pilot drill bit to bite is difficult. In these cases, you want to punch mark just enough to guide the first drill bit and no more.
 

CWret

Ultra Member
Premium Member
“It might be easier than you anticipate. If the dowel will fit a collet, you can spin it just like on a lathe and then mount your cutting tool in the vice”

Yep. I get it. The dowel i ordered is 1” diameter. A while ago i also got a 1” R8 collet so i could hold the 1” diameter steel rod i have - so now i can hold the 1” acrylic dowel and get the diameter i want with a cutter held in the mill vise.
So the fun begins
 

CWret

Ultra Member
Premium Member
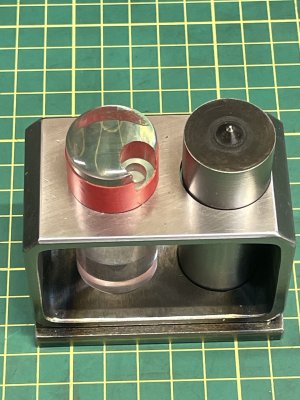
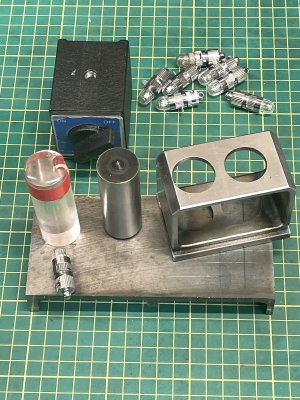
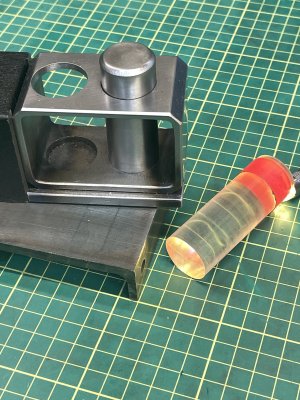
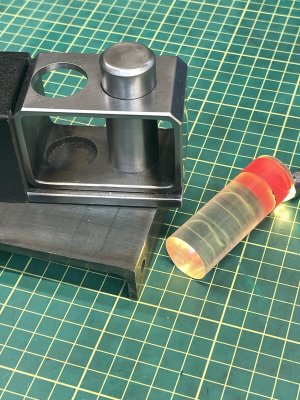
About a year ago I bought some acrylic 1” dowels to make an optical center punch. They just gathered dust until a few weeks ago. I finally got a roundtoit.
47B02BDF-553F-4949-A553-16863CEFDE36.jpeg
356F8F00-26AD-4EFB-9DDD-994B6098DA54.jpeg
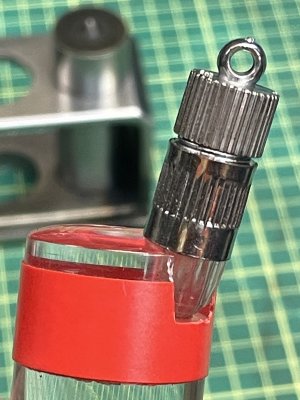
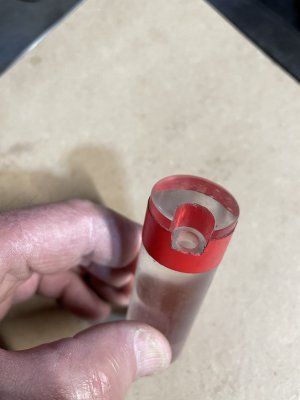
The little lights are designed for putting into party balloons before they are inflated.

Typical comments about these punches include:
1- by using proper techniques for center punching you don’t need one of these;
2- they don’t transmit enough light to see the cross hairs;
3- they are expensive;
4- they are even way more expensive if you can find one that has a light; and
5- not needed if you have a DRO.

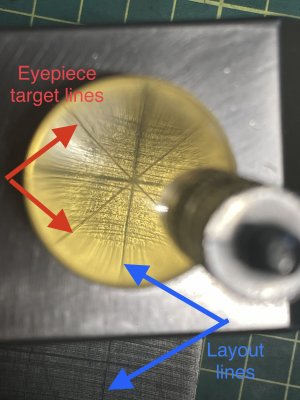
The $0.90 light bulb works great.
6E6D1B41-6623-4954-9EFC-01D17DBD9331.jpeg
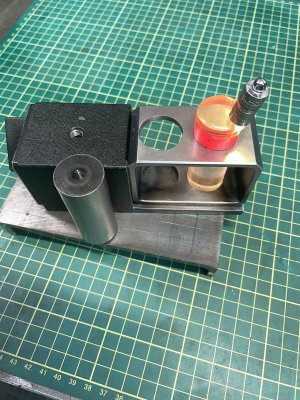
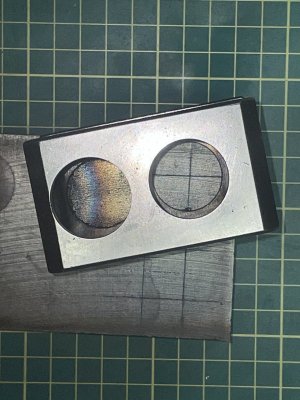
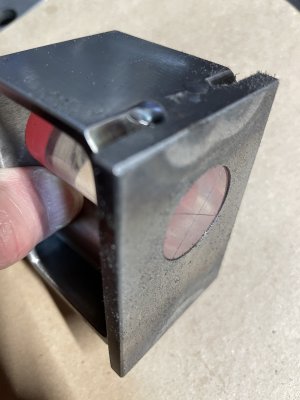
The magnetic base (from a test indicator kit) holds it on target while pulling out the dowel and putting in the punch. The V bottom helps if punching a pipe.

394D74CC-E5F2-4CD0-992B-8C31347A63AC.jpeg
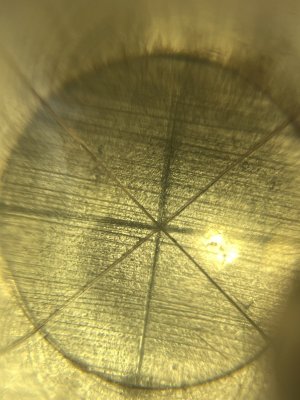
With the frame roughly located, then the dowel is installed and the magnetic base is partially switched on. Here is the view with the light on.
6E6D1B41-6623-4954-9EFC-01D17DBD9331.jpeg
9675EACE-9063-422C-B992-12E676715674.jpeg
F725E931-8C3F-46F2-B06D-A26189550F0E.jpeg
After final adjustments, switch the magnetic base fully on and then give it a punch.
FB894AF3-84C3-4671-B1A2-169440AFE23A.jpeg
BDBDE022-7FF9-4BD8-97EB-D3B7822974D9.jpeg
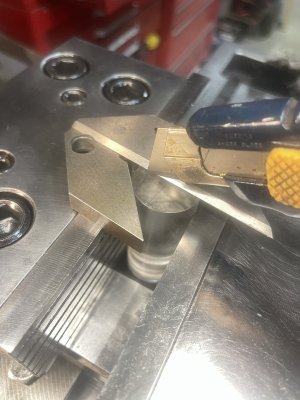
A center finder was used to cut the crosshairs into the dowel.
3D662749-D6A6-48B2-8C70-D0E3A4F6CDD8.jpeg

dowels:

lights:


KBC 1” transfer punch
 

Attachments

  • 11FECA2F-90CD-4EB9-81EA-6CA8FA084C74.jpeg
    11FECA2F-90CD-4EB9-81EA-6CA8FA084C74.jpeg
    564.1 KB · Views: 6

Raygers

Member
Premium Member
In another life, before fancy accurate machines, I was taught to "box" my holes in using a height gauge. Draw a line above and below the centre point and both sides. Drill using the full-size drill and you can see where the drill is cutting, apply a bit of pressure to the part to move the hole so that the drill cuts all four lines. This way you are not reliant on centre-punched holes and any drill wander.
 

Susquatch

Ultra Member
Administrator
Moderator
Premium Member
About a year ago I bought some acrylic 1” dowels to make an optical center punch. They just gathered dust until a few weeks ago. I finally got a roundtoit.

This is beautiful @CWret ! Very well done!

My photo loading is very slow lately so I didn't really appreciate all the details of how you did this till just now after waiting for them all to load. Especially the light mount inset into the acrylic and the steel box holder and magnetic mount.

I think it's a very superior modern version of an old favorite.

How did you polish the light recess?

I also seem to recall asking how you made the right curvature on the lens but I think that was in person and I've forgotten. Was it calculated or trial & error?
 

CWret

Ultra Member
Premium Member
Light recess:
Drilled with a new carbide 10mm EM. It is a snug/tight fit for the bulb. This gives a flat bottom, so I deepened the hole with a new 3/16” drill bit to help diffuse the light.
61A15F26-AAE2-4D34-A54B-AF987DD5B4AD.jpeg
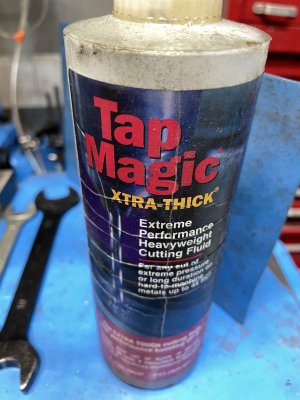
For any cutting (after a lots of experimentation) I used new sharpe tooling at half the rpm you would use for steel with lots of thick lubricant:
FD8C3EE0-120C-4280-A9C8-E4274CCB8B01.jpeg
The red tape keeps the dowel from falling out the bottom and also holds the dowel up 1/32” so it does not get scratched.
0D56B7BC-CB13-4A96-9D43-1802935A169D.jpeg
I experimented with the amount of curvature on the dowel. I think it is a personal preference thing - this one gives about a 2x magnification.
 
Top