-
Scam Alert. Members are reminded to NOT send money to buy anything. Don't buy things remote and have it shipped - go get it yourself, pay in person, and take your equipment with you. Scammers have burned people on this forum. Urgency, secrecy, excuses, selling for friend, newish members, FUD, are RED FLAGS. A video conference call is not adequate assurance. Face to face interactions are required. Please report suspicions to the forum admins. Stay Safe - anyone can get scammed.
-
Several Regions have held meetups already, but others are being planned or are evaluating the interest. The Calgary Area Meetup is set for Saturday July 12th at 10am. The signup thread is here! Arbutus has also explored interest in a Fraser Valley meetup but it seems members either missed his thread or had other plans. Let him know if you are interested in a meetup later in the year by posting here! Slowpoke is trying to pull together an Ottawa area meetup later this summer. No date has been selected yet, so let him know if you are interested here! We are not aware of any other meetups being planned this year. If you are interested in doing something in your area, let everyone know and make it happen! Meetups are a great way to make new machining friends and get hands on help in your area. Don’t be shy, sign up and come, or plan your own meetup!
You are using an out of date browser. It may not display this or other websites correctly.
You should upgrade or use an alternative browser.
You should upgrade or use an alternative browser.
Mini Lathe Help
- Thread starter Dogpounder
- Start date
Bofobo
M,Mizera(BOFOBO)
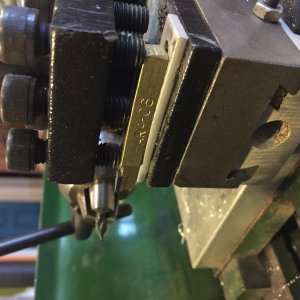
I have a machine similar to yours and there are Set screws for your slides and on the ways that need to be snug enough to allow easy motion but ridged enough not to move ... See the 3 or so holes on the top side of the compound without the tool post? That will help set the screw lash which should be done before attempting to adjust the slides. Basically take the whole compound apart and re assemble it with carefull attention to keeping parts clean and snug. The machine needs to be 100% before the cutting tools should be scrutinized especially in the little machines when you work with steel.
Dogpounder
Member
I did clean the machine up and set those screws but looking now at it I think they are not set right, thanks for the thoughts though and will work out the play in the slides.
Dabbler I may take you up on that some day, headed out for a couple of weeks fishing so maybe when I get back.
Dabbler I may take you up on that some day, headed out for a couple of weeks fishing so maybe when I get back.
Dogpounder
Member
Update on the milling, its going a lot better now with a new set of tools, Carbide tipped tools that is. The mill is clamped now on a sled to my work bench, sliders are adjusted and tight. It finally cuts steel to my tolerance anyway, not perfect but for a hammerhead blacksmith its perfect!
Thanks all for the help
Thanks all for the help
Attachments
Bofobo
M,Mizera(BOFOBO)
The wear on the hss looks to me like you are to low on the center line, my tool post is just like yours and I require at least 1 banding shim to get my hss to centre line. Use the pointy center on the tail stock to judge your height. Different cutters do make a difference here but typically you do not want above or below center. with the compound a little on the loose side leading to deflection you will never get it 100% right but that's the trade off from new expensive and new cheap. "The dial in"Thanks everyone,
Peter the tool was used for just the brass and the steel, it was brand new when I started. It was very slightly off center and orientated 90 degrees to the work and used right to left into the work piece. I spent a few minutes on the brass and less than a minute in the steel. It dulled immediately and the vibrations set up in the machine was very bad. It chipped when I was machining the steel, no filings were coming off just a fine dust and small chips and the tip burned up right away. Crap tool or more likely my technique orientation etc.? Making a sled out of tube steel so I can clamp to my welding table for use and see if that makes it solid and level as a start. Where is a good place to buy tools?
John thanks for the video links and I will learn how to grind these tools effectively.
Thanks Steve I now have a chart for speeds based on materials, I was just spinning fast for everything!
I used very similar brazed carbides for a while & still do. Just be aware that some knockoff brands must originate from the same factory that makes other <cough> tools like: crazy carbide boring bars with wickedly off center braze-ons that cannot possibly bore a hole for sh*t. Or crazy 123 blocks with thru-holes that cant pass the same bolt that the adjacent holes are tapped (uh-huh, got some in my own collection). But I digress.
I've seen some of those brazed carbide lathe tools that have no side relief angle or they plopped the carbide on with little or no cutting edge angle. You can re-dress these just like a HSS bit but you need a green wheel in the bench grinder (vs. typical AO) & probably a diamond to touch-up lap (vs. regular oil stone). Carbide is harder than HSS so should hold a cutting edge longer all things equal. And often can be had for same price. But it wont give you a better finish if it isn't shaped properly, may well be INferior for that reason. If its a 'good one' with proper geometry, you are set to go. But just a heads up.
Another lathe tool height centering method if the tailstock is occupied or not convenient: (lightly) squeeze a typical steel 6" rule between the cutting tip against the chucked work. Viewed from the tailstock side looking towards chuck, the ruler should be vertical if tip is on center. Shims may well be required because the carbide shanks can vary in size. Also try to get as many set screws down on the cutter as you can & reduce tool stick-out to minimum to avoid chatter. Good luck!
Dogpounder
Member
Thanks Peter, just was using the lathe and am very happy with the results with the fixes I used here. The tools are cutting great so I can only assume that the geometry is in good shape.
FYI on centre height...
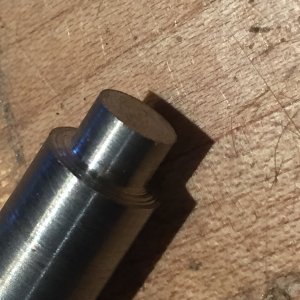
The way to get a very accurate centre height is to turn a cone to a point, using any setup you like (such as a 3 jaw chuck) You then use the point with a magnifier to establish your centre height. You can be +/- .002 for diameters bigger than .750 or so, but for small work (such as .125) it would be better to be closer. For really big work, the tolerance is much larger.
The tail stock is usually pretty good, but can be out more than .002 in many cases. From the factory, mine was .006 high, and I had to correct it.
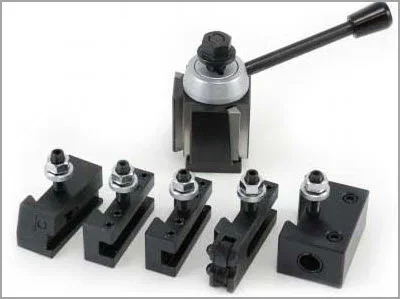
That's true Dabbler. But if you are changing tools while a part is already chucked & needs to stay put, like for subsequent machining operation, you wont have the opportunity to turn a new center or insert one in the chuck. Sometimes you can swivel the toolpost around to point to a center in the tailstock. But sometime that's not practical or possible either. The 'steel rule' method actually works not too bad. I guess that's why the height locking tool holders were invented, huh? 🙂 That way all the tools are pre-cenetered & just plunk them on the toolpost. Sooner or later everyone runs into this though - chip a tool or break an insert mid-operation sharpening required changes height... Good discussion.
Bofobo
M,Mizera(BOFOBO)
"Just plunk it on" sounds like you may want to double check that your set screw is not losing height (smack the pointy end of a nail on a table with your hand and watch as it gets smushed) or bending if .002" is a matter of importance.That's true Dabbler. But if you are changing tools while a part is already chucked & needs to stay put, like for subsequent machining operation, you wont have the opportunity to turn a new center or insert one in the chuck. Sometimes you can swivel the toolpost around to point to a center in the tailstock. But sometime that's not practical or possible either. The 'steel rule' method actually works not too bad. I guess that's why the height locking tool holders were invented, huh? 🙂 That way all the tools are pre-cenetered & just plunk them on the toolpost. Sooner or later everyone runs into this though - chip a tool or break an insert mid-operation sharpening required changes height... Good discussion.
Not sure if we are talking about the same thing? I'm referring to using cutting tools clamped into individual dovetail tool holders. The toolholders can adjust up/down so the cutter tip height is centered. Once positioned they have a locknut which maintains this position. So by loading a different tool holder (meaning a different cutting tool) onto the toolpost, it's pre-aligned to however the cutter was set up. Could this setup vary by 0.002" by wear or inconsistency loading on the toolpost? Maybe. Would I see that difference in cutting performance? Not sure, depends. There is also a train of thought that certain tools should be positioned above center. I've heard that with carbide parting tools because of twist under load, its better to start a bit high, as much as 0.010" so it ends up on center. Vs. starting on center statically & then it ends up below center under load & digs in. Above my pay grade, I mostly strive for center & call it good 🙂
Attachments
Bofobo
M,Mizera(BOFOBO)
I've used these quick Change tool posts a lot, repeated impact on a threaded rod when performing repetitive tool changes for different operations will affect the height adjustment, I had to check my heights every couple pieces especially when I first started because I "just plunked it on" and collapsed the end of the threaded rod. However yes some times the cutter requires a non typical height adjustment and quick change is a fine system but is not impervious to misuse. Perhaps .002 is no big deal but you complete 5 or 10 pieces and it adds up quick
Probably time for me to bow out of this post, but what 'impact on the threaded rod' are you talking about? The toolholder gently slides down the dovetail until the knurled nut contacts the top of toolpost to the height set point. Then its locked in that position with toolpost piston or wedge to secure into position. The threaded rod is maybe 5/16", how could that get damaged sliding a toolholder on? By plunking I just mean sliding it on as in changing from one tool to another. Maybe a bad word choice but there is no force involved.
In my previous post I was trying to suggest that calibrating the tail stock first with a cone that was freshly turned made sense. In rereading it, I was being way too terse. Sorry about that... BTW - I have fixed a friend's lathe that never had his tail stock calibrated, and he was running into problems... Trust but verify?
My offshore Busy Bee Aloris knock-off that is in the AXA size holds the height consistently closer than .0005 each time I put various tools on. Several of my machinist friends think poorly of QCTP holders, but for me it has been a godsend. I still have and use both the 4-way and the lantern tool posts for various operations - but for day to day facing and turning QCTP is the way to go!
I haven't had any problems with my QCTP tool posts wandering, my turning tool holder has been in and out more than 100 times... I'll check it but I am sure it is within .001.