Mini Lathe Help

Dogpounder

Member
I have a small mini lathe that I use for small turnings for my forging projects. It turns out aluminum and Brass with a smooth finish, however if I put any type of steel in it the finish is rough and pitted. The machine vibrates like crazy when cutting.

I want advice on how to minimize the chatter at the cutting tool, if at all? New cutting heads etc? I'm at a loss.

Thanks Bruce
 

kylemp

Well-Known Member
Lighter cuts and maybe try honing your tools. Also There's a lot of variables on a small machine.. how is your workpiece supported? What's your tool post like?
 

PeterT

Ultra Member
Premium Member
As above suggestions, the basics are
- Material: some steels just cut crappy. Hot rolled is a tad better than cold rolled but neither are exactly wonderful in plain grades when you get right down to it. Try to get hold of some 12L14 (leaded) steel just to try. Its not actually that much more expensive. Should cut shiny nice like brass or aluminum. If you cant make a nice finish on that, there is something else to chase down
- Machine rigidity: generally smaller machines flex a bit more so you might have to take lighter depth cuts & slower traverse speed. But I've seen some real nice steel results on little Sherlines & Taigs. Ensure everything is clamped down rigidly. Try & obey tailstock usage if protruding amount is (what is it now... 2-3 times diameter?). Some guys bolt their lathes to spongy plywood bases or non-solid wood which can loosen up over time. Heavier cuts & more power will put more demand on rigidity.
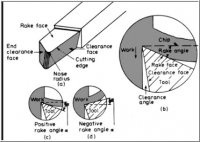
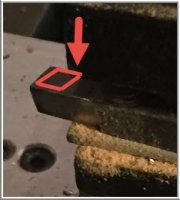
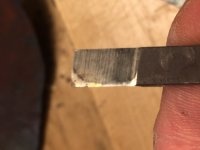
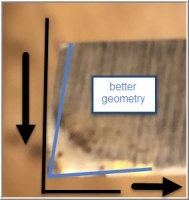
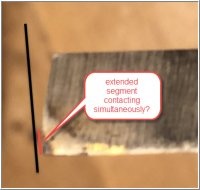
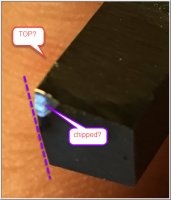
- Cutting tools: when it comes to finish many hobbyists actually prefer HSS over carbides, even on steel. Why? because you can alter tip geometry like nose radius & rake etc just with a grinder & fine hand stone. If you have the wrong carbide selected or cannot operate it at recommended material removal, finish could be worse than HSS. That said, I actually find little difference when both are properly selected. If you are using carbide, check for micro-chip on nose. This has burned me before but your softer alloy finish would be similarly affected. Check you have the correct carbide insert. Ive actually seen incorrect rake inserts sold with tooling even though they may have the correct style shape (triangular or whatever)
- Speeds & feeds: there are textbook numbers but there is some latitude on small lathes when you don't have as much power or you experience vibration or harmonic at certain rpms. A fine feed should yield a decent finish, just takes more time.
- Geometry: ensure tip is on work center

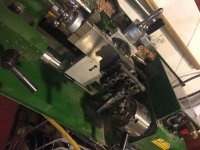
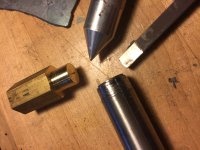
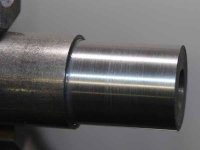
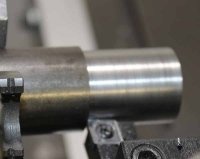
Can you take some pics of your setup & cutting results?
 

Dogpounder

Member
HI Ky Peter and Steve. Thanks for all the info, it's much appreciated. The lathe really isn't mounted its sitting on a crappy wooden cabinet and I feel that is an issue for sure. The steel I was trying is cold rolled and you can see in the photos what it did to the tool. The tools are suspect as well, I am guessing they are HSS. Still getting my head around the various profiles used for machining things. I will get a good chart for speeds etc, great idea.

IMG_2434.JPG View attachment 1041 View attachment 1041 IMG_2434.JPG
 

Attachments

  • IMG_2435.JPG
    IMG_2435.JPG
    1.3 MB · Views: 12

PeterT

Ultra Member
Premium Member
Hard to tell at that scale what the actual cutting tool nose condition & geometry is. Attaching the classic grinding layout sketch to guide. I almost feel that its not quite coming to a point? I grind my facets to a point to first get the angle right. Then very carefully apply the nose radius. Its easy to mess this up on a grinder so use light touch. Sometimes just stoning the round by hand better control & fine. Larger radius = better finish but requires more power & makes more heat. Also (hard to tell) maybe minimal rake face. I'm not an expert but sometimes if this angle is not conducive to good chips forming, it can also result in poor finish or if bad enough create chatter. When you regrind, re-check the center height using the old 'pinch the ruler so its vertical' method.

The lathe mounting is a big thing. It has to be secured. Also be careful here. On a little machine bolted to an uneven datum surface, its actually possible to introduce lathe bed twist by wrenching down on the foot bolts. That's a bad thing. Now your carriage & lead screw mechanism is fighting misalignment & you risk permanent deformation. As a minimum for wood bench, I'd suggest something flat & dense like MDF hardboard, maybe even 2 lams of 3/4" or so. MDF is pretty consistent flatness wise & will actually absorb machine vibration. The downside is, liquids will penetrate it & then it can swell or blister. So either needs a laminate or paint coat sealer or apparently there are outdoor waterproof grades but I'm not 100% there. Some guys mount the lathe to a square tubing steel sub frame & then mount that to essentially wood table. Kind of varies by application. The idea is you want rigidity downstairs.

Can you post your steel turning example, maybe alongside your 'good' examples brass/alum
 

Attachments

  • 10-25-2016 0001.jpg
    10-25-2016 0001.jpg
    28 KB · Views: 9
  • 10-25-2016 0000.jpg
    10-25-2016 0000.jpg
    14 KB · Views: 9

PeterT

Ultra Member
Premium Member
Also if you didn't know, when you make a longitudinal traversing cut, lock the cross slide & compound in position with your setscrew knob. This is important on old loosey lathes and/or not-so-great fitting dovetail assemblies or loose gibs... any ability to float or move somewhat while under cutting load. This can also be a contributor to finish and accuracy issues. Yes, you have to reset & re-lock every pass,. Kind of a pain, but good habit to get into. Tougher materials like steel put up more resistance, so secure every unnecessary movement source.
 

Dogpounder

Member
here are the photos
 

Attachments

  • IMG_2437.JPG
    IMG_2437.JPG
    2.1 MB · Views: 21
  • IMG_2447.JPG
    IMG_2447.JPG
    751.5 KB · Views: 20
  • IMG_2449.JPG
    IMG_2449.JPG
    800.1 KB · Views: 20

PeterT

Ultra Member
Premium Member
I know photography of metal lies & looks worse than reality, but it almost looks like you have a small flat segment on the cutter (red line). Ideally the facet lines should converge to a point (blue geometry) but in reality the point has a small nose radius superimposed. But anyway, flats are bad. They rub & chatter & don't cut efficiently. Now this all depends on how you had the tool oriented in the tool block & relative to work but even the brass to my eye looks like some rubbing as opposed to pure cutting. Here are some sketches, hopefully you can see the difference. I'd regrind it, hone it with a real fine oil stone, re-center & try again. Also note my black lines (work) and arrows (cut direction). I think you want some relief so you can traverse out of corners in Y-direction. If you leave the shank rectangular, that's fine, but youhave to set the cutter at an angle to achieve the same effect.
 

Attachments

  • 10-25-2016 0006.jpg
    10-25-2016 0006.jpg
    22.5 KB · Views: 8
  • 10-25-2016 0003.jpg
    10-25-2016 0003.jpg
    29.9 KB · Views: 8

PeterT

Ultra Member
Premium Member
Not sure if I'm looking at the orientation right but it almost looks like you have a chip/degradation using the dash line as reference?
 

Attachments

  • 10-25-2016 0009.jpg
    10-25-2016 0009.jpg
    31.3 KB · Views: 11

schor

Active Member
And you need to have the right speeds for different materials. Tom also has a video on that.

And bolt your machine down to the table at least.
 

Dogpounder

Member
Thanks everyone,

Peter the tool was used for just the brass and the steel, it was brand new when I started. It was very slightly off center and orientated 90 degrees to the work and used right to left into the work piece. I spent a few minutes on the brass and less than a minute in the steel. It dulled immediately and the vibrations set up in the machine was very bad. It chipped when I was machining the steel, no filings were coming off just a fine dust and small chips and the tip burned up right away. Crap tool or more likely my technique orientation etc.? Making a sled out of tube steel so I can clamp to my welding table for use and see if that makes it solid and level as a start. Where is a good place to buy tools?

John thanks for the video links and I will learn how to grind these tools effectively.

Thanks Steve I now have a chart for speeds based on materials, I was just spinning fast for everything!
 

PeterT

Ultra Member
Premium Member
Some run-o-mill 1018? beater bar CRS just to give you a visual comparison. Pic-1 cut with insert maybe 0.002" depth using my lathes finest traverse (of course its out of focus, sorry about that). Anyway, kind of stringy looking, but somewhat typical no matter what kind of cutting tool. Pic-2 is cleanup using fine file, took off 0.001" which is pretty much my procedure on this stuff. Nothing special but you can improve it with a bit of TLC. I don't have any 12L14 pics handy but it looks like the finished pic-2 or better but straight cutting. You can polish it to a mirror with just 1000 grit.
 

Attachments

  • IMG_0937_edited-1.jpg
    IMG_0937_edited-1.jpg
    30.6 KB · Views: 12
  • IMG_0936_edited-1.jpg
    IMG_0936_edited-1.jpg
    32.2 KB · Views: 11

Dogpounder

Member
Thanks for that Peter, The orientation of the cutter in pic 2; is that your typical orientation for cutting right to left.
 

PeterT

Ultra Member
Premium Member
Yes, right to left cut direction. You can see the insert tool geometry matches the sketch I showed, so you can also back out & make a square shoulder with same tool. A HSS tool can be ground the exact same way.
 

Johnwa

Ultra Member
I've never seen an HSS blank that wasn't shiny silver and didn't have sharp 90 degrees on every corner. Your blank isn't shiny and the corners are rounded. Are you sure it is HSS?
 

Dabbler

ersatz engineer
Hey Johnwa, I have a fair number of HSS blanks and Cobalt blanks that are unfinished. They have a black uneven finish. The easy test is to see if it can scratch the smooth part of a file. (just like you test for hardness with a file, but in reverse.)
 
Top