• Scam Alert. Members are reminded to NOT send money to buy anything. Don't buy things remote and have it shipped - go get it yourself, pay in person, and take your equipment with you. Scammers have burned people on this forum. Urgency, secrecy, excuses, selling for friend, newish members, FUD, are RED FLAGS. A video conference call is not adequate assurance. Face to face interactions are required. Please report suspicions to the forum admins. Stay Safe - anyone can get scammed.

Tool Lathe Stops

Tool

Janger

(John)
Vendor
Premium Member
Recently there have been a few posts on lathe stop projects. If you posted one why don't you move it here.

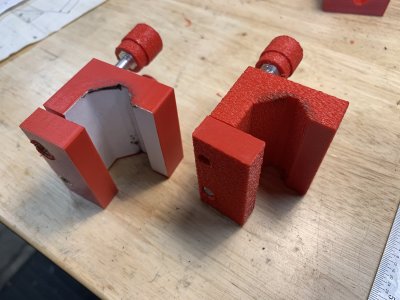
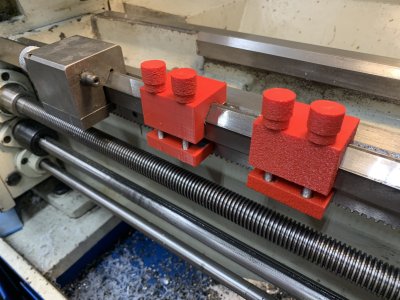
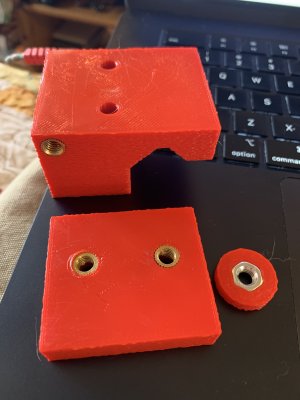
Here are my 3d printed versions. The first one shows 3d printed fuzzy skin as an experiment. I tried smooth, fuzzy, and paper as gripping surfaces. Problem with them so far is even a very light tap from the carriage and the stop moves. The third pic is another revision with a larger nut plate and also a perpendicular hole for mounting an adjustable stop bolt. I'm going to go try that.
 

Attachments

  • IMG_6376.jpeg
    IMG_6376.jpeg
    1.3 MB · Views: 11
  • IMG_6377.jpeg
    IMG_6377.jpeg
    1.5 MB · Views: 11
  • IMG_6379.jpeg
    IMG_6379.jpeg
    1 MB · Views: 11
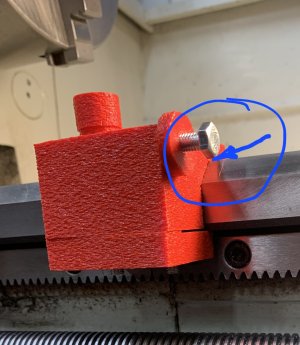
You can see the adjustable stop bolt in this shot. The stop still moves when lightly bumped. I cleaned the bottom of the way, still moves. I'm going to make a few sizing adjustments and reprint.


IMG_6382.jpeg
 
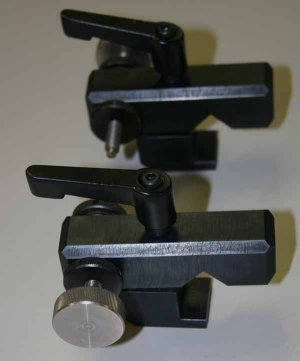
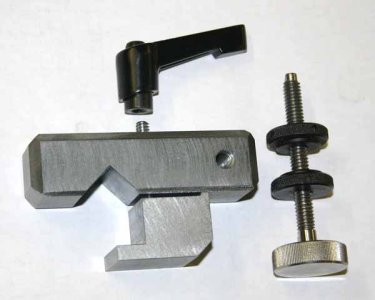
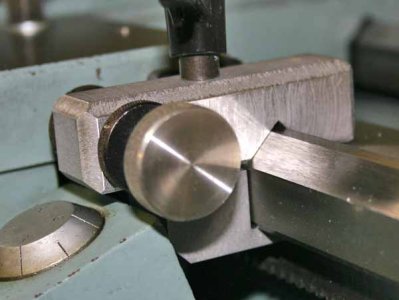
I posted this design earlier in this thread, but take a look at this because it is one piece and really easy to make in plastic or metal. It clamps across the way, not vertically.

The first version I made was Delrin. This one is steel. The Delrin worked nicely but when the clamp was cranked up, it began to deform and eventually stripped the thread. With the steel design, it doesnt take a lot of pressure to clamp the stop very firmly. Of course it is not a hard stop, and it will slip if its not clamped too hard.

There is an adjustment screw that makes contact with the saddle to be used when the indicator isn't needed.

IMG_5130.JPG
IMG_5131.JPG
IMG_5129.JPG
 
Omg, now I'll never keep the threads straight.......

@Janger - earlier on the other thread, you mentioned. Your stop moved to easily.

This might be a problem.

20241111_212954.jpg

If the top of your v-way is flat, the stop must extend above it.

If your way is a sharp V top, then your stop needs a slot at the top.

You cannot reliably match two V's without the top causing interference that affects seating.
 
While you're at it make 2. They are useful for both sides of carriage like grooving between 2 fixed dimensions
 

Attachments

  • IMG_5629_edited-1.jpg
    IMG_5629_edited-1.jpg
    37.2 KB · Views: 10
  • IMG_5625_edited-1.jpg
    IMG_5625_edited-1.jpg
    36.8 KB · Views: 12
  • IMG_5622_edited-1.jpg
    IMG_5622_edited-1.jpg
    38.8 KB · Views: 10
I will try adjusting the clearance on the top of the V. Thank you John.

I set the metal “real” one up like this with the dial indicator. And discovered it moves!

With a gentle tap maybe .001” maybe 0.0. With a light thunk it might move 0.001” to 0.005”! I probably wouldn’t hit the stop that hard but I could without noticing.

The plastic one moves similarly with an even lighter tap.
 

Attachments

  • image.jpg
    image.jpg
    1.7 MB · Views: 6
I will try adjusting the clearance on the top of the V. Thank you John.

I set the metal “real” one up like this with the dial indicator. And discovered it moves!

With a gentle tap maybe .001” maybe 0.0. With a light thunk it might move 0.001” to 0.005”! I probably wouldn’t hit the stop that hard but I could without noticing.

The plastic one moves similarly with an even lighter tap.
I wonder if a thin strip of rubber or cork etc on the clamp portion might give a little bit of grip......
 
I stuck two pieces of sandpaper back to back (glued to each other) on the clamping plate. No change in the movement it still moves when bumped.

Gents please try your lathe stop with the test indicator and see if it moves when bumped with your carriage.
 
I stuck two pieces of sandpaper back to back (glued to each other) on the clamping plate. No change in the movement it still moves when bumped.

Gents please try your lathe stop with the test indicator and see if it moves when bumped with your carriage.
No, mine is quite solid. I have the adjustment screw set such that the saddle stops before the indicator bottoms out.

It takes a bit of effort to move the clamp unless the feedscrew was being driven under power, and when that happens it slides as expected. The clamping screw has a bronze plug, which is gripping the side of the ways in my design.
 
The plastic one moves similarly with an even lighter tap.

There are a few other things to consider:

One is the shape of your ways. I have seen the odd one that appeared to have 90 degree ways, but were actually more like 95 or 85. Perhaps even closer.

Also, I trust you are wiping off all the way oil.

Contact with the oil trough?

Topped out clamp?

Here is a drawing of the two way shapes I mentioned earlier.

20241112_062514.jpg
 
You might be able to take advantage of the rack just below to solidly lock the plastic lathe stop in place. I always found it difficult to use plastic for clamping stuff. My Zyliss bench vise has some plastic soft jaws and I was never able to clamp much with it.
 
I have a printed dial indicator mount for my southbend I use all the time, I don't run the carriage right into it like a stop tho but it seems rock solid.
 
I posted this design earlier in this thread, but take a look at this because it is one piece and really easy to make in plastic or metal. It clamps across the way, not vertically.

The first version I made was Delrin. This one is steel. The Delrin worked nicely but when the clamp was cranked up, it began to deform and eventually stripped the thread. With the steel design, it doesnt take a lot of pressure to clamp the stop very firmly. Of course it is not a hard stop, and it will slip if its not clamped too hard.

There is an adjustment screw that makes contact with the saddle to be used when the indicator isn't needed.

View attachment 54290View attachment 54291View attachment 54292
Looks great @Arbutus - is that a metal flake paint? The paint really finishes it off nice. All the way across the back of the ways that is a good idea.
 
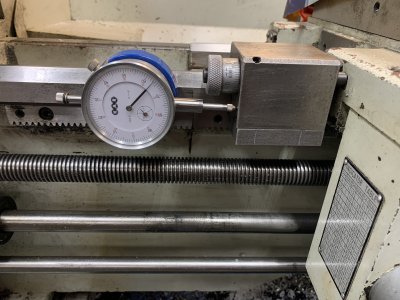
The carriage stop for my Myford S7b may be of interest. Myfords have a flat bed so there is no problem of accommodating prismatic ways. The stop is simply a length of 1.5x0.5 aluminum with a cutout. The screw with plastic knob on the left has a brass tip that presses against the edge of the bed. The small knob at the top is a 4-40 screw and split cotter to lock the dial indicator.
Image00008.jpg
Image00007.jpg
 
Are there still use to these when you have a DRO and know where to stop? Also few lathes have automatic OFF to their power feed when they hit a stop.
 
Back
Top